SAML (Enterprise add-on)
Note
Single sign-on with SAML is an Enterprise add-on.
You can integrate your active directory or other SAML compliant identity provider in your OpenProject Enterprise edition. To activate and configure SAML providers in OpenProject, navigate to Administration -> Authentication and choose -> SAML providers.
Prerequisites
In order to integrate OpenProject as a service provider (SP) using SAML, your identity providers (idP):
- needs to be able to handle SAML 2.0 redirect Single-Sign On (SSO) flows, in some implementations also referred to as WebSSO
- has a known or configurable set of attributes that map to the following required OpenProject attributes. The way these attribute mappings will be defined is described later in this document.
- login: A stable attribute used to uniquely identify the user. This will most commonly map to an account ID, samAccountName or email (but please note that emails are often interchangeable, and this might result in logins changing in OpenProject).
- email: The email attribute of the user being authenticated
- first name and last name of the user.
- a name identifier (NameID) property that uniquely identifies the user. This could a be an internal uid, or otherwise stable attribute that will never change.
- provides the public certificate or certificate fingerprint (SHA1) in use for communicating with the idP.
User interface to add SAML providers
Starting with OpenProject 15.0, you can define the SAML integration using an internal administrator account.
-
Login as OpenProject Administrator
-
Navigate to Administration -> Authentication and choose -> SAML providers.
Step 1: Display name
- Click the green + SAML identity provider button
- Set a display name. This will be shown on the login button for all users. Choose a name that users associate with your SAML login provider (e.g., “SSO”)
- Click Continue
Step 2: Metadata exchange
SAML 2.0 allows the service provider and identity provider to exchange public information/configuration (Specification of Metadata Interoperability). In the second step of the creation form, you can leverage the metadata exchange endpoint of your SAML identity provider to pre-fill most of the configuration.
The second step allows you to provide metadata in two ways:
- With a metadata URL endpoint. OpenProject will try to connect to that endpoint and download the XML,
- Providing the metadata XML manually as a text input.
With a metadata option, OpenProject will pre-fill the next sections with all the given information. In case there are any errors in the values provided, they will be marked in red for correction. If you do not have metadata for this provider, choose I don’t have metadata. Click Continue.
Step 3: Primary configuration
If you have used the metadata exchange, the next form will be pre-filled like in the example below.
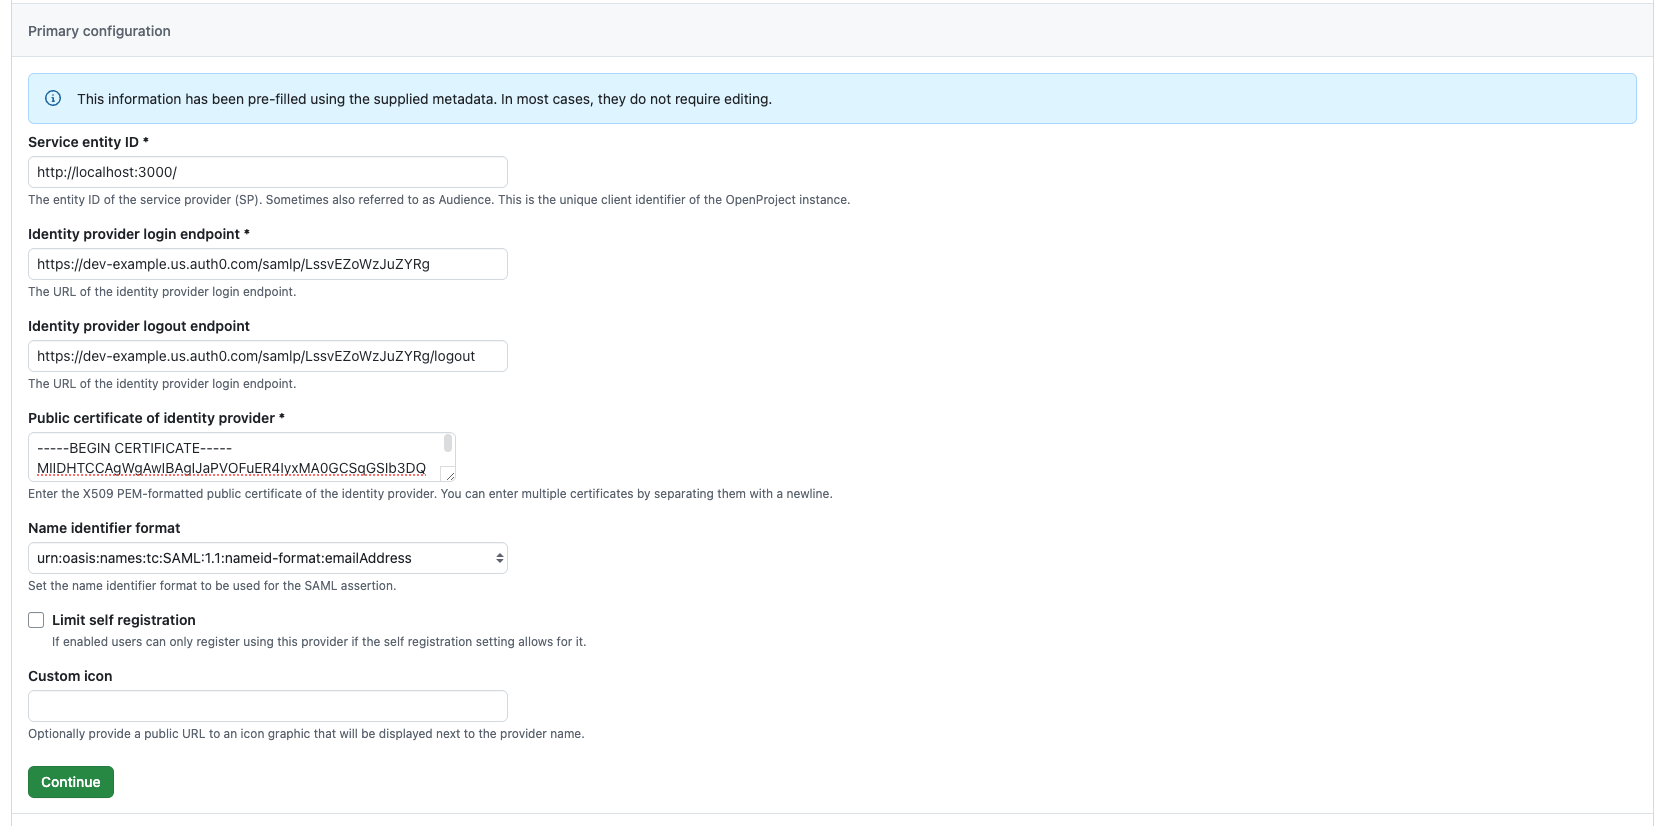
If some of the required fields (marked with an asterisk) are missing, fill them out with the information from your identity provider. OpenProject assumes you’re using the URL of your OpenProject instance as the Service entity ID by default. If your provider expects a different format, this can be an arbitrary string.
Once you verified the configuration with your settings from the identity provider, click on Continue.
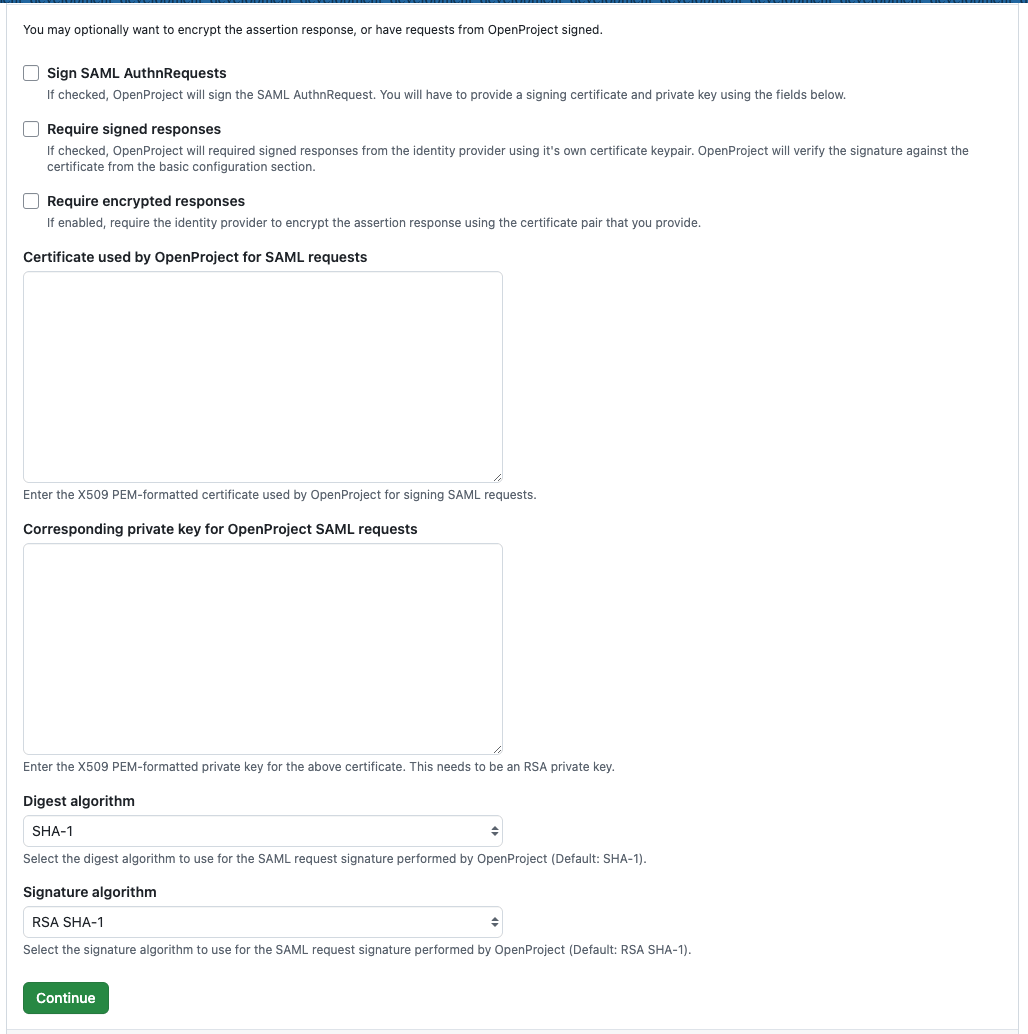
Step 4: Signatures and Encryption
Your identity provider may optionally sign and/or encrypt the assertion response. You may for example wish to use Assertion Encryption if TLS is terminated before the OpenProject application server (e.g., on the load balancer level).
To configure assertion encryption, you need to provide a PEM-formatted certificate to send in the request and private key to decrypt the response. If you need more help on creating a certificate, please see this guide as an example.
Request signing means that the service provider (OpenProject in this case) uses the certificate specified to sign the request to the identity provider. They reuse the same certificate and private_key settings as for assertion encryption. It is recommended to use an RSA key pair, the key must be provided without password.
With request signing enabled, the certificate will be added to the identity provider to validate the signature of the service provider’s request.
Require signed responses should always be checked to ensure that signatures on all assertions provided by the identity provider are verified by OpenProject, unless your identity provider does not allow this for some reason.
Fill out the respective fields, or if you do not need these features, simply leave the rest of this section empty and click Continue.
Step 5: Attribute Mapping
OpenProject expects a set Use the key attribute_statements to provide mappings for attributes returned by the SAML identity provider’s response to OpenProject internal attributes. We provide an extensive set of default values that should work for the majority of providers. Also, the metadata endpoint might already specify some attributes that can be used.
If you have a custom attribute that you want to use for e.g., email, you can replace or add this to the list of attributes. The attributes will be assigned in order from top to bottom, and the first attribute that is found in the SAML assertion will be used.
Optionally, you can set a mapping for the internal user ID. By default, we take this information from the name_id attribute. In many SAML providers, the NameID is assigned to the email address of the user. However, this attribute might change over time. If you have an internal UID or another attribute that is stable, enter this instead.
If your users start logging in with this provider and see a registration form with missing attributes for their first or last name, email address, or login, then this mapping section is not filled correctly, or your provider is not sending an attribute back to OpenProject.
Save your configuration, or skip if you do not need to make changes, using the Continue button.
Step 6: Requested Attributes
By default, the attributes from the mapping above will be requested with the format urn:oasis:names:tc:SAML:2.0:attrname-format:basic. That means the response should contain attribute names ‘mail’, etc. as configured above.
Some SAML providers are very specific about the attributes being requested from the service provider. If you have URN or OID attribute identifiers, you can modify the request in this last section of the form.
If your provider sends a default set of attributes, you can probably skip over this section. If your users start logging in with this provider and see a registration form with missing attributes for their first or last name, email address, or login, then you might need to change this configuration.
Complete the registration of the provider using the Finish setup button.
Step 7: Configuration of the identity provider
In order for users to start logging in using the new SSO button that you just added, you need to tell your identity provider some details of the OpenProject provider. Once the provider is saved, you will see details on the right pane of the provider.
In the sidebar, you will see the OpenProject configuration:
- Metadata endpoint: This is the metadata XML exchange endpoint for the OpenProject client. If your provider allows to import metadata from a service provider, you can use this metadata to inform it about the details of OpenProject.
- Service entity ID: This is the entity id of OpenProject, you might need to configure this in your identity provider to allow it to connect
- Assertion consumer service URL: This is the callback or redirect URL used from your SAML identity provider to lead users back to OpenProject when they’re authenticated.
Use the copy to clipboard buttons on each of these entries to copy the information and enter it in your identity provider.
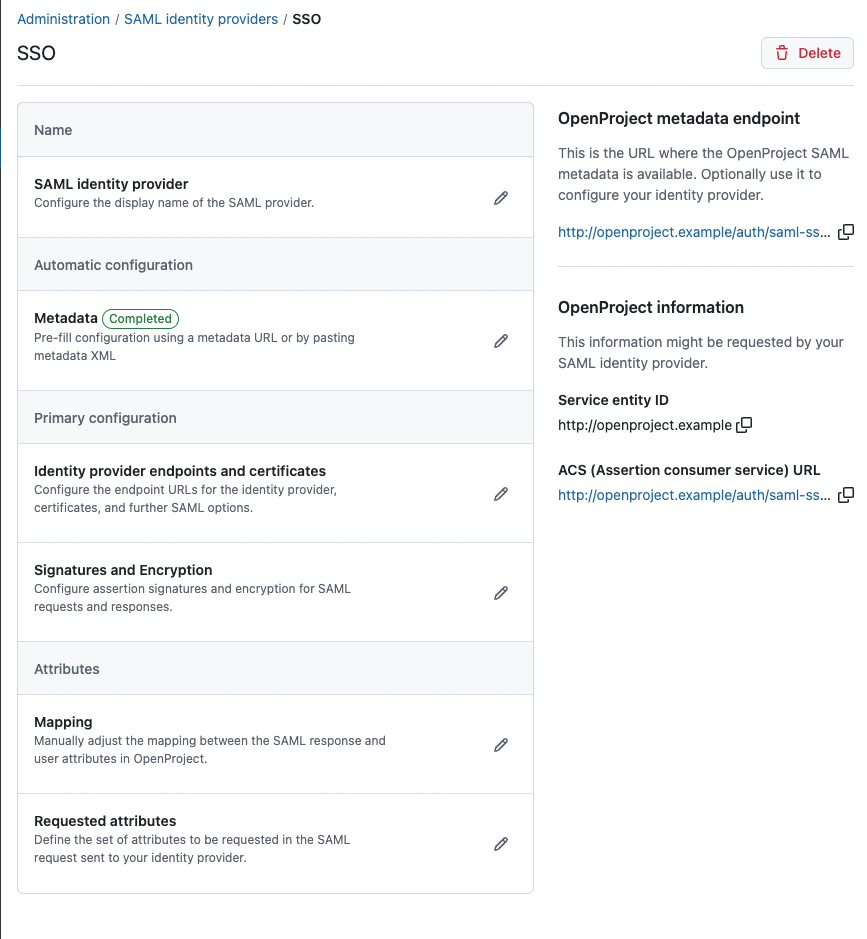
Congratulations, you have now finished the setup of your SAML integration provider in OpenProject.
SAML configuration as Environment Variables
For some deployment scenarios, it might be desirable to configure a provider through environment variables.
Warning
Only do this if you know what you are doing. This may break your existing SAML authentication providers or cause other issues otherwise.
As with all the rest of the OpenProject configuration settings, the SAML configuration can be provided via environment variables.
The provider entries are defined dynamically based on the environment keys. All variables will start with the prefix OPENPROJECT_SAML_ followed by the provider name.
Example
This set of environment keys will set up a provider entry in the UI called saml.
# Name of the provider, leave this at saml unless you use multiple providers
OPENPROJECT_SAML_SAML_NAME="saml"

# The name that will be display in the login button
OPENPROJECT_SAML_SAML_DISPLAY__NAME="<Name of the login button>"

# The SAML issuer string that OpenProject will call your idP with
OPENPROJECT_SAML_SAML_ISSUER="https://<openproject.host>"

# IF your SSL certificate on your SSO is not trusted on this machine, you need to add it here in ONE line
### one liner to generate certificate in ONE line
### awk 'NF {sub(/\r/, ""); printf "%s\\n",$0;}' <yourcert.pem>
#idp_cert: "-----BEGIN CERTIFICATE-----\n ..... SSL CERTIFICATE HERE ...-----END CERTIFICATE-----\n"
# Otherwise, the certificate fingerprint must be added
# Either `OPENPROJECT_SAML_SAML_IDP__CERT` or `OPENPROJECT_SAML_SAML_IDP__CERT__FINGERPRINT` must be present!
OPENPROJECT_SAML_SAML_IDP__CERT="-----BEGIN CERTIFICATE-----<cert one liner>-----END CERTIFICATE-----"
# If you  this environment variable through a shell, you will need to run it through C style quoting to preserve the newline
# Otherwise you will get an internal error with this log line "PEM_read_bio_X509: bad base64 decode"
# OPENPROJECT_SAML_SAML_IDP__CERT=$'-----BEGIN CERTIFICATE-----<cert one liner>-----END CERTIFICATE-----'

# Alternatively, provide a fingerprint of the certificate.
#OPENPROJECT_SAML_SAML_IDP__CERT__FINGERPRINT="da:39:a3:ee:5e:6b:4b:0d:32:55:bf:ef:95:60:18:90:af:d8:07:09"
# Replace with your single sign on URL, the exact value depends on your idP implementation
OPENPROJECT_SAML_SAML_IDP__SSO__SERVICE__URL="https://<hostname of your idp>/application/saml/<slug>/sso/binding/post/"

# (Optional) Replace with your redirect flow single sign out URL that we should redirect to
OPENPROJECT_SAML_SAML_IDP__SLO__SERVICE__URL=""

# Which SAMLAttribute we should look for for the corresponding attributes of OpenProject
# can be a string or URI/URN depending on our idP format
OPENPROJECT_SAML_SAML_ATTRIBUTE__STATEMENTS_EMAIL="[mail]"
OPENPROJECT_SAML_SAML_ATTRIBUTE__STATEMENTS_LOGIN="[mail]"
OPENPROJECT_SAML_SAML_ATTRIBUTE__STATEMENTS_FIRST__NAME="[givenName]"
OPENPROJECT_SAML_SAML_ATTRIBUTE__STATEMENTS_LAST__NAME="[sn]"
# You can also specify multiple attributes, the first found value will be used. Example:
# OPENPROJECT_SAML_SAML_ATTRIBUTE__STATEMENTS_LOGIN="['mail', 'samAccountName', 'uid']"
Please note that every underscore (_) in the original configuration key has to be replaced by a duplicate underscore (__) in the environment variable as the single underscore denotes namespaces. For more information, follow our guide on environment variables.
Configuration details
In this section, we detail some of the required and optional configuration options for SAML.
Mandatory: Response signature verification
SAML responses by identity providers are required to be signed. You can configure this by either specifying the response’s certificate fingerprint in OPENPROJECT_SAML_SAML_IDP__CERT__FINGERPRINT , or by passing the entire PEM-encoded certificate string in OPENPROJECT_SAML_NAME_IDP__CERT (beware of newlines and formatting the cert, c.f. the idP certificate options in omniauth-saml)
Mandatory: Attribute mapping
Use the key attribute_statements to provide mappings for attributes returned by the SAML identity provider’s response to OpenProject internal attributes.
You may provide attribute names or namespace URIs as follows: email: ['http://schemas.xmlsoap.org/ws/2005/05/identity/claims/emailaddress'].
The OpenProject username is taken by default from the email attribute if no explicit login attribute is present.
OPENPROJECT_SAML_SAML_ATTRIBUTE__STATEMENTS_EMAIL="[mail]"
OPENPROJECT_SAML_SAML_ATTRIBUTE__STATEMENTS_LOGIN="[mail]"
OPENPROJECT_SAML_SAML_ATTRIBUTE__STATEMENTS_FIRST__NAME="[givenName]"
OPENPROJECT_SAML_SAML_ATTRIBUTE__STATEMENTS_LAST__NAME="[sn]"
# You can specify a UID attribute to use. If not present, will take the NAMEID
OPENPROJECT_SAML_SAML_ATTRIBUTE__STATEMENTS_UID="[uid]"
# You can also specify multiple attributes, the first found value will be used. Example:
# OPENPROJECT_SAML_SAML_ATTRIBUTE__STATEMENTS_LOGIN="['mail', 'samAccountName', 'uid']"
Optional: Request signature and Assertion Encryption
Your identity provider may optionally encrypt the assertion response, however note that with the required use of TLS transport security, in many cases this is not necessary. You may wish to use Assertion Encryption if TLS is terminated before the OpenProject application server (e.g., on the load balancer level).
To configure assertion encryption, you need to provide the certificate to send in the request and private key to decrypt the response:
Important
Example is ONLY for OpenProject version 11 and older and needs to be redesigned for ENV configuration
OPENPROJECT_SAML_SAML_CERTIFICATE="-----BEGIN CERTIFICATE-----\n .... certificate contents ....\n-----END CERTIFICATE--""
OPENPROJECT_SAML_SAML_PRIVATE__KEY="-----BEGIN PRIVATE KEY-----\n .... private key contents ....\n-----END PRIVATE KEY-----"
Request signing means that the service provider (OpenProject in this case) uses the certificate specified to sign the request to the identity provider. They reuse the same CERTIFICATE and PRIVATE__KEY settings as for assertion encryption. It is recommended to use an RSA key pair, the key must be provided without password.
For request signing and assertion encryption, these attributes are available
# When true, OpenProject will sign AuthnRequests using the above certificate and private key pair
OPENPROJECT_SAML_SAML_SECURITY_AUTHN__REQUESTS__SIGNED="false"
# When true, OpenProject will require assertions to be signed using a private key matching the provided IDP__CERT
# This setting SHOULD always be true to ensure integrity of the idP assertions
OPENPROJECT_SAML_SAML_SECURITY_WANT_ASSERTIONS_SIGNED="true"
# When true, OpenProject will require assertiations to be encrypted using the public key from CERTIFICATE
OPENPROJECT_SAML_SAML_SECURITY_WANT_ASSERTIONS_ENCRYPTED="false"
# Whether to embed the signature in the request.
OPENPROJECT_SAML_SAML_SECURITY_EMBED__SIGN="true"
# XML definition of signature and digest methods
OPENPROJECT_SAML_SAML_SECURITY_SIGNATURE__METHOD="http://www.w3.org/2001/04/xmldsig-more#rsa-sha256"
OPENPROJECT_SAML_SAML_SECURITY_DIGEST__METHOD="http://www.w3.org/2000/09/xmldsig#sha1"
Optional: Restrict who can automatically self-register
You can configure OpenProject to restrict which users can register on the system with the authentication self-registration setting
By default, users returning from a SAML idP will be automatically created. If you’d like for the SAML integration to respect the configured self-registration option, please use this setting:
OPENPROJECT_SAML_SAML_LIMIT__SELF__REGISTRATION="true"
Optional: Set name_identifier_format
There are a number of name identifier formats that are relevant, so if you have specific requirements or configuration on the identity provider side, you might need to set the name_identifier_format property.
The default behavior would be to use the email Address like so:
OPENPROJECT_SAML_SAML_NAME__IDENTIFIER__FORMAT="urn:oasis:names:tc:SAML:1.1:nameid-format:emailAddress"
Applying the configuration
To apply the configuration after changes, you need to run the db:seed rake task. In all installations, this command is run automatically when you upgrade or install your application. Use the following commands based on your installation method:
-
Packaged installation:
sudo openproject run bundle exec rake db:seed -
Docker:
docker exec -it <container of all-in-one or web> bundle exec rake db:seed.
XML Metadata exchange
Once applied, the configuration will enable the SAML XML metadata endpoint at https://<your openproject host>/auth/saml/metadata for service discovery use with your identity provider.
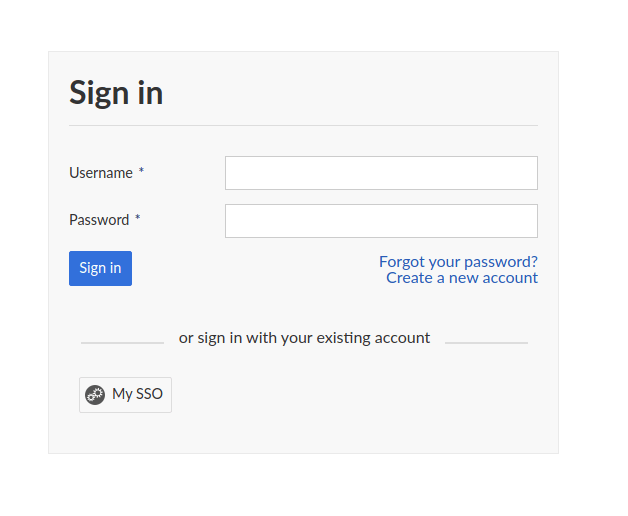
Log in
From there on, you will see a button dedicated to logging in via SAML, e.g named “My SSO” (depending on the name you chose in the configuration), when logging in. Clicking it will redirect to your SSO provider and return with your attribute data to set up the account, or to log in.
Troubleshooting
When you return from the authentication provider, you might be shown one of these return paths:
- The user is automatically created and logged in. The SAML authentication integration is fully working
- You are being redirected to the account registration modal with missing pieces of information. In this case, your authentication provider might not send us the full set of attributes required, or their mapping is invalid.
- You are being redirected to the account registration modal as user name or email is already taken. In this case, the account you want to authenticate already has an internal OpenProject account. You need to follow the Troubleshooting guide below to enable taking over that existing account.
- You are getting an internal or authentication error message. This is often a permission or invalid certificate/fingerprint configuration. Please consult the server logs for any hints OpenProject might log there.
Direct login
Once created, you can assign this SAML provider to become the direct login provider. Users will be directed to the login page of the provider without seeing a login form in OpenProject. Read more.
In the user interface, you can assign this through Administration > Authentication > Settings.
Using environment variables, you could also set this in the following way
OPENPROJECT_OMNIAUTH__DIRECT__LOGIN__PROVIDER="saml" # This value should be the 'name' property of your configuration
With the direct login feature activated, accessing the page without authentication will immediately redirect the user to your Single Sign-On (SSO) portal.
A dedicated route /login/internal is available for internal authentication, which does not redirect to the SSO portal. We strongly advise you to maintain an internal administrative login, as you won’t be able to access the application otherwise.
Instructions for common SAML providers
In the following, we will provide configuration values for common SAML providers. Please note that the exact values might differ depending on your idP’s version and configuration. If you have additions to these variables, please use the “Edit this file” functionality in the “Docs feedback” section of this documentation.
ADFS
For ADFS, you need add OpenProject as a “relying part trust” entry within the ADFS management screen. Please follow this guide to be guided through the steps.
Add OpenProject as a Relying Trust Party
-
In the ADFS management snap-in, right click on
AD FS -> Relying Party Trusts, and selectAdd Relying Party Trust... -
Select Claims aware and hit Start
-
Select Data Source: Choose “Enter data about the relying party manually” and click Next
-
Specify Display Name: Enter “OpenProject” or any arbitrary name for the OpenProject instance you want to identify
-
Configure Certificate: Skip this step, unless you explicitly want to enable assertion encryption, whose steps are documented for OpenProject above.
-
Configure URL: Check “Enable support for the SAML 2.0 WebSSO protocol” and enter the URL
https://<Your OpenProject hostname>/auth/saml-sso -
Configure Identifier: Add the value
https://<Your OpenProject hostname>as a “Relying party trust identifier”. This is also called the issuer and OpenProject will be configured to send this value -
Choose Access Control Policy: Select an appropriate access control policy for the OpenProject instance
-
Ready to Add Trust: Under the tab endpoints, click on “Add SAML” to add a SAML Assertion Consumer with Binding
POSTand the Trusted URL set tohttps://<Your OpenProject hostname>/auth/saml-sso/callback -
Click next and select “Configure claims issuance policy for this application”
A new wizard will pop up. If you missed this step, you can right click on the new party to select “Edit Claim Issuance Policy”. In there, you will need to create attribute mappings from LDAP for OpenProject to access user data such as login, email address, names etc.
You can also follow this guide to add the LDAP claim rules:
- Click on “Add Rule…”
- Select “Send LDAP Attributes as Claims” and click Next
Add the following Claim rules:
| LDAP attribute | Outgoing Claim Type (the value OpenProject looks for in the SAML response) |
|---|---|
| SAM-account-name | Name ID |
| SAM-account-name | uid |
| Email-Addresses | mail |
| Surname | sn |
| Given-name | givenName |
Export the ADFS public certificate
OpenProject needs the certificate or fingerprint of the ADFS to validate the signature of incoming tokens. Here are the steps on how to do that:
- In the ADFS management window, select “AD FS -> Service -> Certificates”
- Right click on the “Token-signing” certificate and click on “View Certificate…”
- Select the action “Copy to File…”
- Click on Next and select “Base-64 encoded X.509 (.CER)” and click Next
- Export the file and copy its contents
Set up OpenProject UI for ADFS integration
In OpenProject, these are the variables you will need to set. Please refer to the above documentation for the different ways you can configure these variables OpenProject.
| UI attribute | Value |
|---|---|
| Display name | for example, SSO (name is arbitrary) |
| Attribute Mapping for: Email | |
| Attribute Mapping for: Login | uid |
| Attribute Mapping for: Last name | sn |
| Attribute Mapping for: First name | givenName |
| Identity provider login endpoint | https://<Your ADFS hostname>/adfs/ls |
| Identity provider logout endpoint | https://<Your ADFS hostname>/adfs/ls/?wa=wsignout1.0 |
| Certificate | the |
Alternative: Setting up through environment variables
You will need to format the certificate so that it works in environment variables: awk 'NF {sub(/\r/, ""); printf "%s\\n",$0;}' <path to the certificate> . These are the attributes
OPENPROJECT_SAML_SAML_NAME="saml-sso"
OPENPROJECT_SAML_SAML_DISPLAY__NAME="ADFS SSO" # This is the text shown to users in OpenProject, freely change this value
OPENPROJECT_SAML_SAML_ATTRIBUTE__STATEMENTS_LOGIN="[uid, mail]"
OPENPROJECT_SAML_SAML_ATTRIBUTE__STATEMENTS_FIRST__NAME="[givenName]"
OPENPROJECT_SAML_SAML_ATTRIBUTE__STATEMENTS_LAST__NAME="[sn]"
OPENPROJECT_SAML_SAML_SSO__TARGET__URL="https://<Your ADFS hostname>/adfs/ls"
OPENPROJECT_SAML_SAML_SLO__TARGET__URL="https://<Your ADFS hostname>/adfs/ls/?wa=wsignout1.0"
OPENPROJECT_SAML_SAML_IDP__CERT="<The output of the awk command above>"
Keycloak
In Keycloak, use the following steps to set up a SAML integration OpenProject:
- Select or create a realm you want to authenticate OpenProject with. Remember that realm identifier.
- Under “Clients” menu, click on “Create”
- Add client: Enter the following details
- Client ID:
https://<Your OpenProject hostname> - Client protocol: Set to “saml”
- Client SAML Endpoint:
https://<Your OpenProject hostname>/auth/saml-keycloak
- Client ID:
You will be forwarded to the settings tab of the new client. Change these settings:
- Enable Sign Documents
- Master SAML Processing URL: Set to
https://<Your OpenProject hostname>/auth/saml-keycloak - Name ID Format Set to username
- Expand section “Fine Grain SAML Endpoint Configuration”
- Assertion Consumer Service POST Binding URL: Set to
https://<Your OpenProject hostname>/auth/saml-keycloak/callback - Assertion Consumer Service Redirect Binding URL: Set to
https://<Your OpenProject hostname>/auth/saml-keycloak/callback
- Assertion Consumer Service POST Binding URL: Set to
Go the “Mappers” tab and create the following mappers. Note that the “User attribute” values might differ depending on your LDAP or Keycloak configuration.
| Mapper Type | User Attribute | Friendly Name | SAML Attribute Name | SAML Attribute NameFormat |
|---|---|---|---|---|
| User Attribute | uid | uid | uid | Basic |
| User Attribute | lastName | sn | sn | Basic |
| User Attribute | firstName | givenName | givenName | Basic |
| User Attribute | Basic |
Set up OpenProject for Keycloak integration
In OpenProject, you can use the Metadata exchange from Keycloak to import the values. In the keycloak realm, you will find the metadata endpoint for SAML at the bottom of the page under “Realm settings -> Endpoints”.
Go to Administration -> Authentication -> SAML providers and create a new provider with the name “Keycloak”. Then, use the metadata URL to fill out the parameters. Logging in should immediately work afterwards.
Alternative: Setting up through environment variables
You will need to format the certificate so that it works in environment variables. To view the certificate in Base64 encoding, go to the menu “Realm settings” and click on “Endpoints -> SAML 2.0 Identity Provider Metadata”. This will open an XML file, and the certificate is stored in the ds:X509Certificate node under the signing key. Copy the content of the certificate (MII.....)awk 'NF {sub(/\r/, ""); printf "%s\\n",$0;}' <path to the certificate> . These are the attributes
OPENPROJECT_SAML_SAML_NAME="saml-keycloak"
OPENPROJECT_SAML_SAML_DISPLAY__NAME="Keycloak" # This is the text shown to users in OpenProject, freely change this value
OPENPROJECT_SAML_SAML_ATTRIBUTE__STATEMENTS_EMAIL="[mail]"
OPENPROJECT_SAML_SAML_ATTRIBUTE__STATEMENTS_LOGIN="[uid, mail]"
OPENPROJECT_SAML_SAML_ATTRIBUTE__STATEMENTS_FIRST__NAME="[givenName]"
OPENPROJECT_SAML_SAML_ATTRIBUTE__STATEMENTS_LAST__NAME="[sn]"
OPENPROJECT_SAML_SAML_SSO__TARGET__URL="https://<Your Keycloak hostname>/realms/<Keycloak REALM>/protocol/saml"
OPENPROJECT_SAML_SAML_SLO__TARGET__URL="https://<Your Keycloak hostname>/realms/<Keycloak RELAM>/protocol/saml"
OPENPROJECT_SAML_SAML_IDP__SSO__SERVICE__URL="https://<Your Keycloak hostname>/realms/<Keycloak RELAM>/protocol/saml"
OPENPROJECT_SAML_SAML_IDP__CERT="<The certificate base64 copied from the metadata XML>"
If you’re unsure what the realm value is, go to the menu “Realm settings” and click on “Endpoints -> SAML 2.0 Identity Provider Metadata”. This will include URLs for the SingleSignOnService and SingleLogoutService.
FAQ
Q: After clicking on a provider badge, I am redirected to a signup form that says a user already exists with that login.
A: This can happen if you previously created user accounts in OpenProject with the same email than what is stored in the identity provider. In this case, if you want to allow existing users to be automatically remapped to the SAML identity provider, you should do the following:
Spawn an interactive console in OpenProject. The following example shows the command for the packaged installation. See our process control guide for information on other installation types.
sudo openproject run console
> Setting.oauth_allow_remapping_of_existing_users = true
> exit
Then, existing users should be able to log in using their SAML identity. Note that this works only if the user is using password-based authentication, and is not linked to any other authentication source (e.g. LDAP) or OpenID provider.
Note that this setting is set to true by default for new installations already. If you’re on the Hosted Enterprise Cloud, reach out to our Customer Support to see if this is flag is enabled already.
Q: "certificate" and "private key" are used in the SAML configuration and openproject logs show a FATAL error after GET “/auth/saml” **FATAL** -- : OpenSSL::PKey::RSAError (Neither PUB key nor PRIV key: nested asn1 error):
A1: The given private_key is encrypted. The key is needed without the password (cf., see)
A2: The provided key pair is not an RSA key. ruby-saml might expect an RSA key.