OAuth applications
To configure OpenProject to act as a server to an OAuth client applications, please navigate to Administration -> Authentication -> OAuth applications.
Add a new authentication application for OAuth
To add a new OAuth application, click the green + OAuth application button.

You can configure the following options to add your OAuth application:
- Enter the Name of your OAuth application.
- Define a Redirect URL where users are redirected to after having authorized OAuth2 access in OpenProject. This URL is provided by your client application. In the case of locally running Postman you can use the special string:
urn:ietf:wg:oauth:2.0:oobPostman 9.6 and higher also provides a Web URL that you can use:https://oauth.pstmn.io/v1/callback. - Set the Scopes that the OAuth client application will be able to access. Multiple selection is possible. If no scope is checked, per default api_v3 is assumed. api_v3 is the standard OpenProject API, while bcf_v2_1 is specific to the BIM edition of OpenProject.
- Check if the application will be Confidential. This is typically the case for client applications running on a server or desktop but requires the client application to ensure it.
- (Optional) Choose Client Credentials User and define a user on whose behalf requests will be performed.
- Press Create to add your OAuth application.

Tip
Don’t forget to note down your
Client IDand yourClient secretin a safe space. You will need them later.
OAuth endpoints
The authentication endpoints of OpenProject OAuth2 server are:
- Auth URL:
https://example.com/oauth/authorize - Access Token URL:
https://example.com/oauth/token
Authorization code flow example
Request authorization code
Request an authorization code. Please adopt the following URL replacing:
example.comwith the IP/host name of your OpenProject instance,<Client ID>with your OAuth2 client ID, and<Redirect URI>with the redirect URI as configured above.- You can leave the
scopevalue untouched unless you are running the OpenProject BIM edition and also plan to access to the BCF version 2.1 REST API. Then simply replaceapi_v3withapi_v3%20bcf_v2_1.
https://example.com/oauth/authorize?response_type=code&client_id=<Client ID>&redirect_uri=<Redirect URI>&scope=api_v3&prompt=consent
This requests redirects you to a URL that holds a code parameter which is the authentication code.
Typically the server that was requested with that redirect will save the authorization code and use it to obtain API token, with which the server can then act on behalf of the current user.
In this example we skip that server side implementation and just copy the value of the code parameter from the URL that you see in your browser.
Request API token
With the authorization code that you obtained above you can now request an API token.
We do this manually in the command line using cURL. Please replace:
example.comwith the IP/host name of your OpenProject instance,<Client ID>with your OAuth2 client ID,<Client secret>with your OAuth2 client secret,<Authentication code>with the code you obtained above,- and
<Redirect URI>with the redirect URI as configured above.
$ curl --request POST \
  --url 'https://example.com/oauth/token' \
  --header 'content-type: application/x-www-form-urlencoded' \
  --data grant_type=authorization_code \
  --data client_id=<Client ID> \
  --data client_secret=<Client secret> \
  --data code=<Authentication code> \
  --data 'redirect_uri=<Redirect URI>'
The response will look like this:
{
  "access_token": "Ize6vvCIeENQ_suzd9kBJ6BxDNpxcumfTfweZQaOoJc",
  "token_type": "Bearer",
  "expires_in": 7200,
  "refresh_token": "kDQ5pxzOE_4kCSKzONZaI1ogcyjcXk97_KhBS0JfCw4",
  "scope": "api_v3",
  "created_at": 1652112852
}
The response contains the bearer token (“access_token”) and a refresh token that you will need when working with the API. Please copy the tokens for reference.
Perform a request to the OpenProject API with OAuth token
With the token that you obtained above you can now make API calls to the OpenProject instance on behalf of the current user.
For example, the following cURL command fetches all projects from the API V3. Please replace:
example.comwith the IP/host name of your OpenProject instance, and<Token>with the bearer token you obtained above.
$ curl --request GET 'https://example.com/api/v3/projects' \
  --header 'Authorization: Bearer <Token>'`
Using Postman with OAuth2
You can exercise the authentication flow above using Postman. Just create a new request:
GET {{protocolHostPort}}/api/v3/projects
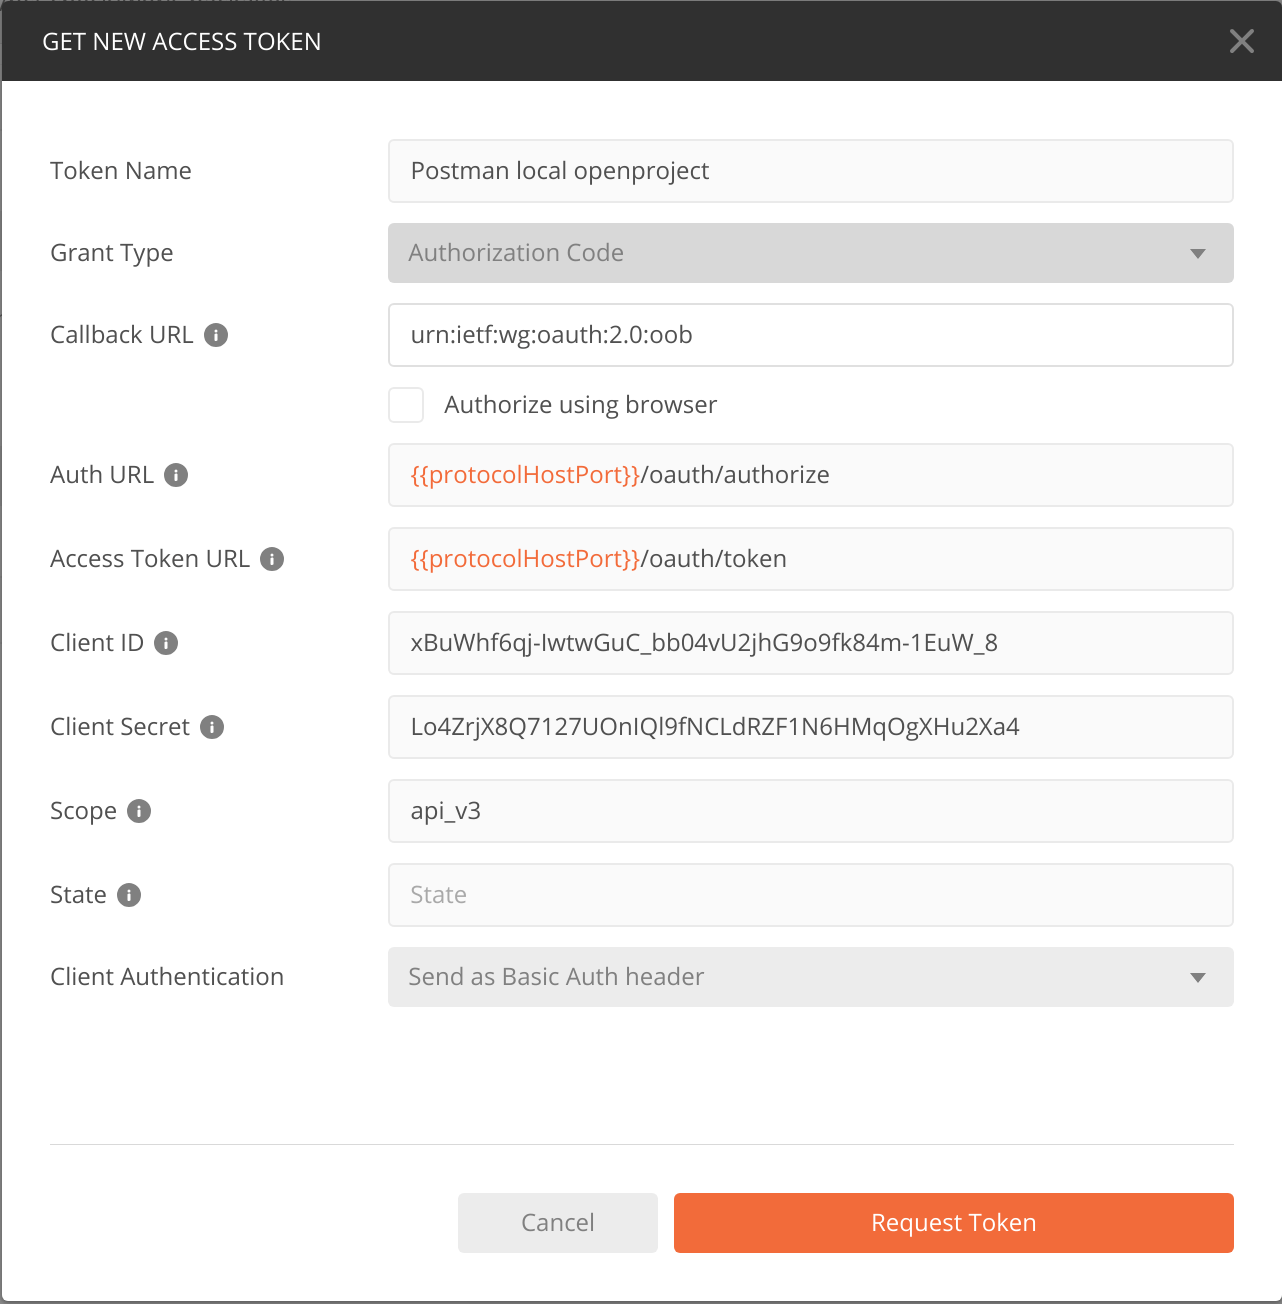
with {{protocolHostPort}} corresponding to your server and port, for example http://localhost:3000. Then go to the Authorization tab and select Type: OAuth2 2.0. On the right side you will see a form similar to the one below. Please fill in your specific Client ID and Client Secret from above.

Clicking on “Request Token” will initiate the same flow as above and complete with a success screen. Please click on “Use Token” to use this token for authenticating your /api/v3/projects request.
Please note that your Bearer token will expire after two hours (default) and you will have to click on “Request Token” again. Otherwise your API request will return an error message.
CORS headers
By default, the OpenProject API is not responding with any CORS headers. If you want to allow cross-domain AJAX calls against your OpenProject instance, you need to enable CORS headers being returned.
Please see our API settings documentation on how to selectively enable CORS.


