Mon suivi du temps
Vue d’ensemble
Le module Mon suivi du temps offre une vue d’ensemble claire de vos entrées de temps personnelles. Vous pouvez rapidement enregistrer votre temps directement à partir de cette page. Pour y accéder, sélectionnez Mon suivi du temps dans le menu de gauche.
![]()
Les filtres de la page Mon suivi du temps
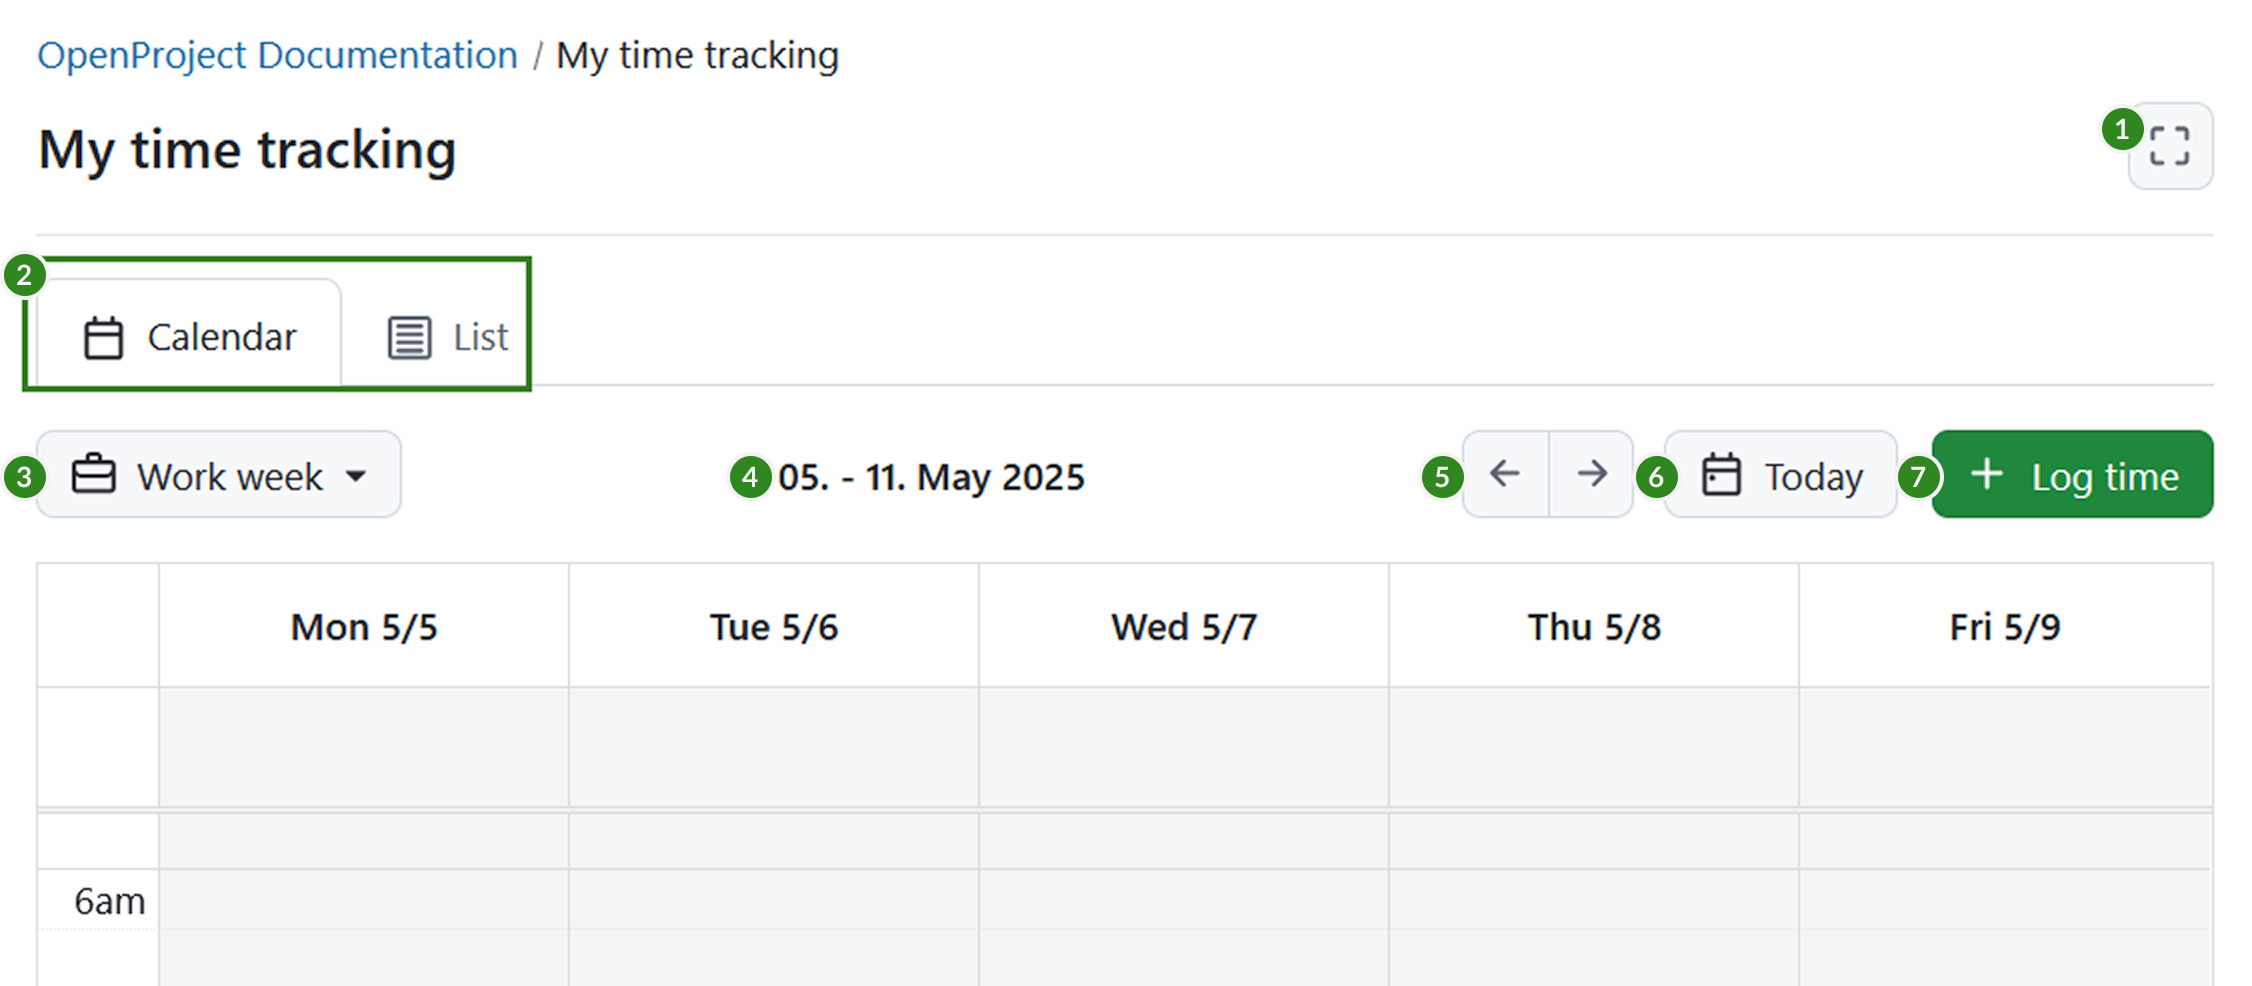
- Sur la page Mon suivi du temps, vous trouverez les éléments d’interface suivants :
- Bouton Mode zen : permet de basculer vers un affichage sans distraction.
- Sélecteur d’onglet : basculez entre les vues Calendrier et Liste.
- Menu déroulant du niveau de zoom : choisissez l’échelle de temps pour la vue. Les options suivantes sont disponibles : - Jour - Semaine de travail - Semaine - Mois
- Plage de dates affichée : montre la plage de temps actuellement visible.
- Flèches de navigation : permettent de passer à la période précédente ou suivante.
- Bouton Aujourd’hui : permet de passer directement à la journée en cours.
- Bouton + Enregistrer le temps : permet d’ajouter une nouvelle entrée de temps.
Explication des filtres du module Mon suivi du temps
Vue du calendrier
La vue Calendrier s’ouvre par défaut si les heures de début et de fin des saisies de temps ont été activées dans l’interface d’administration du système. Vous pouvez ajuster le niveau de zoom à l’aide du menu déroulant, avec les options Jour, Semaine de travail, Semaine ou Mois.
Les saisies de temps existantes apparaissent le jour où elles ont été enregistrées. Les couleurs d’entrée reflètent le type de lot de travaux associé au temps enregistré.
Dans la partie supérieure de chaque jour du calendrier, une zone dédiée vous permet d’enregistrer le temps sans spécifier d’heure de début ou de fin. Cette fonction est utile pour les entrées rapides ou pour enregistrer des efforts qui ne sont pas liés à une période spécifique.
Vous pouvez enregistrer le temps en sélectionnant une plage de temps n’importe où sur le calendrier ou en utilisant le bouton + Enregistrer le temps.
Vous pouvez faire glisser et déposer les entrées de temps pour les repositionner au sein d’une même journée ou les déplacer vers une autre journée. Pour ajuster la durée d’une entrée, faites glisser le bord supérieur ou inférieur de l’entrée de temps vers le haut ou vers le bas.
![]()
Pour modifier une entrée de temps, cliquez dessus dans le calendrier, apportez vos modifications et enregistrez. Vous pouvez également la supprimer à partir du même menu.
Au bas de chaque journée, le nombre d’heures par jour est affiché. Si la semaine ou le mois est sélectionné, un total correspondant est également affiché dans le coin inférieur droit.
![]()
Vue en liste
La vue Liste s’ouvre par défaut si les heures de début et de fin des saisies de temps sont désactivées dans l’interface d’administration du système. Tout comme dans la vue Calendrier, vous pouvez sélectionner le niveau de zoom à l’aide du menu déroulant. Les options comprennent Jour, Semaine de travail, Semaine ou Mois.
Dans cette vue, les saisies de temps sont regroupées par jour. Chaque jour affiche le nombre total d’entrées et leur durée combinée à droite de la ligne d’en-tête.
-
Lorsque le zoom Jour est sélectionné, la vue est développée par défaut.
-
Lorsque le zoom Semaine ou Mois est sélectionné, les jours ou semaines passées sont réduites par défaut. Cependant, le jour actuel (dans la vue Semaine) ou la semaine actuelle (dans la vue Mois) est développée, ainsi que toutes les dates futures.
Conseil
Si vous choisissez le niveau mensuel en mode liste, les entrées d’heures sont agrégées par semaine et non par jour. Cette fonction est particulièrement utile pour obtenir une vue d’ensemble des heures suivies chaque semaine.
Les jours étendus affichent les entrées de temps sous forme de tableau avec les colonnes suivantes :
- Temps
- Heures
- Sujet (avec un lien cliquable vers le lot de travaux)
- Projet
- Activité
- Commentaire
- + (dernière colonne, utilisée pour enregistrer le temps pour ce jour spécifique)
Pour enregistrer le temps en vue Liste, vous pouvez soit
- Cliquer sur le bouton + Enregistrer le temps pour ajouter une entrée de temps pour n’importe quelle date en dehors de la plage actuellement affichée.
- Utiliser l’icône + dans le tableau pour enregistrer directement le temps d’un jour spécifique.
![]()
Pour modifier une entrée de temps dans la vue Liste, cliquez sur l’icône Plus (trois points) à la fin de la ligne de l’entrée dans le tableau, puis sélectionnez l’icône Modifier (crayon).
![]()
Enregistrer le temps dans le module Mon suivi du temps
Pour enregistrer le temps sur la page Mon suivi du temps, cliquez sur le bouton + Enregistrer le temps. Une fenêtre modale apparaît avec les champs suivants :
-
Date : sélectionnez le jour de la saisie de l’heure.
-
Heure de début et Heure de fin : lorsque les deux sont saisies, le champ Heures est calculé automatiquement.
Conseil
Ces champs ne sont visibles que si l’option Autoriser le suivi du temps exact est activée par un administrateur. Si l’option Exiger les heures exactes est également activée, ces champs deviennent obligatoires afin d’enregistrer la saisie du temps.
-
Heures : saisissez le nombre d’heures que vous souhaitez enregistrer pour un lot de travaux spécifique.
-
Lot de travaux : saisissez pour rechercher un lot de travaux ou sélectionnez dans la liste des lots de travaux récemment utilisés.
-
Activité : choisissez une activité qui est active pour le projet auquel appartient le lot de travaux sélectionné.
-
Commentaire : ajoutez toute note ou détail pertinent pour la saisie du temps.
N’oubliez pas de cliquer sur le bouton Enregistrer pour enregistrer votre saisie de temps.
![]()


