Risk management with OpenProject
Purpose
Risk management helps a project team identify uncertain events early, assess their possible effect on project objectives, agree on responses and review whether those responses work. A shared risk register makes ownership and decisions transparent and helps the team act before a risk becomes an issue.
OpenProject can support this process with existing features such as work package types, custom fields, workflows, saved work package views, relations and project templates. In this setup, each risk is a work package and the filtered work package table is the project’s risk register.
This guide separates the system-wide configuration maintained by administrators from the recurring work performed by project members.
Nota
OpenProject does not yet provide a dedicated risk module with automatically calculated inherent and residual risk scores. The setup described here uses currently available configuration options. Planned product improvements are linked in Continuous product improvements.
Risk management in OpenProject at a glance
| Risk management concept | OpenProject entity |
|---|---|
| Risk Register | A saved and shared work package table filtered by type Risk; see the demo Risk Register |
| Individual risk | A work package of type Risk; see an example risk |
| Risk owner | Assignee or a user custom field |
| Response action | A separate related work package with its own assignee, due date and status, displayed in the embedded Risk response table |
| Review trail | Work package activity, comments and status history |
| Standard setup | A reusable project template |
The same Risk Register can be presented in different views without duplicating its risks. Both views use the same underlying items, so changes to a risk remain visible everywhere.
Board view
The board view organizes the same risks by lifecycle status. It provides a visual overview and lets project members update a status by moving a card between columns.
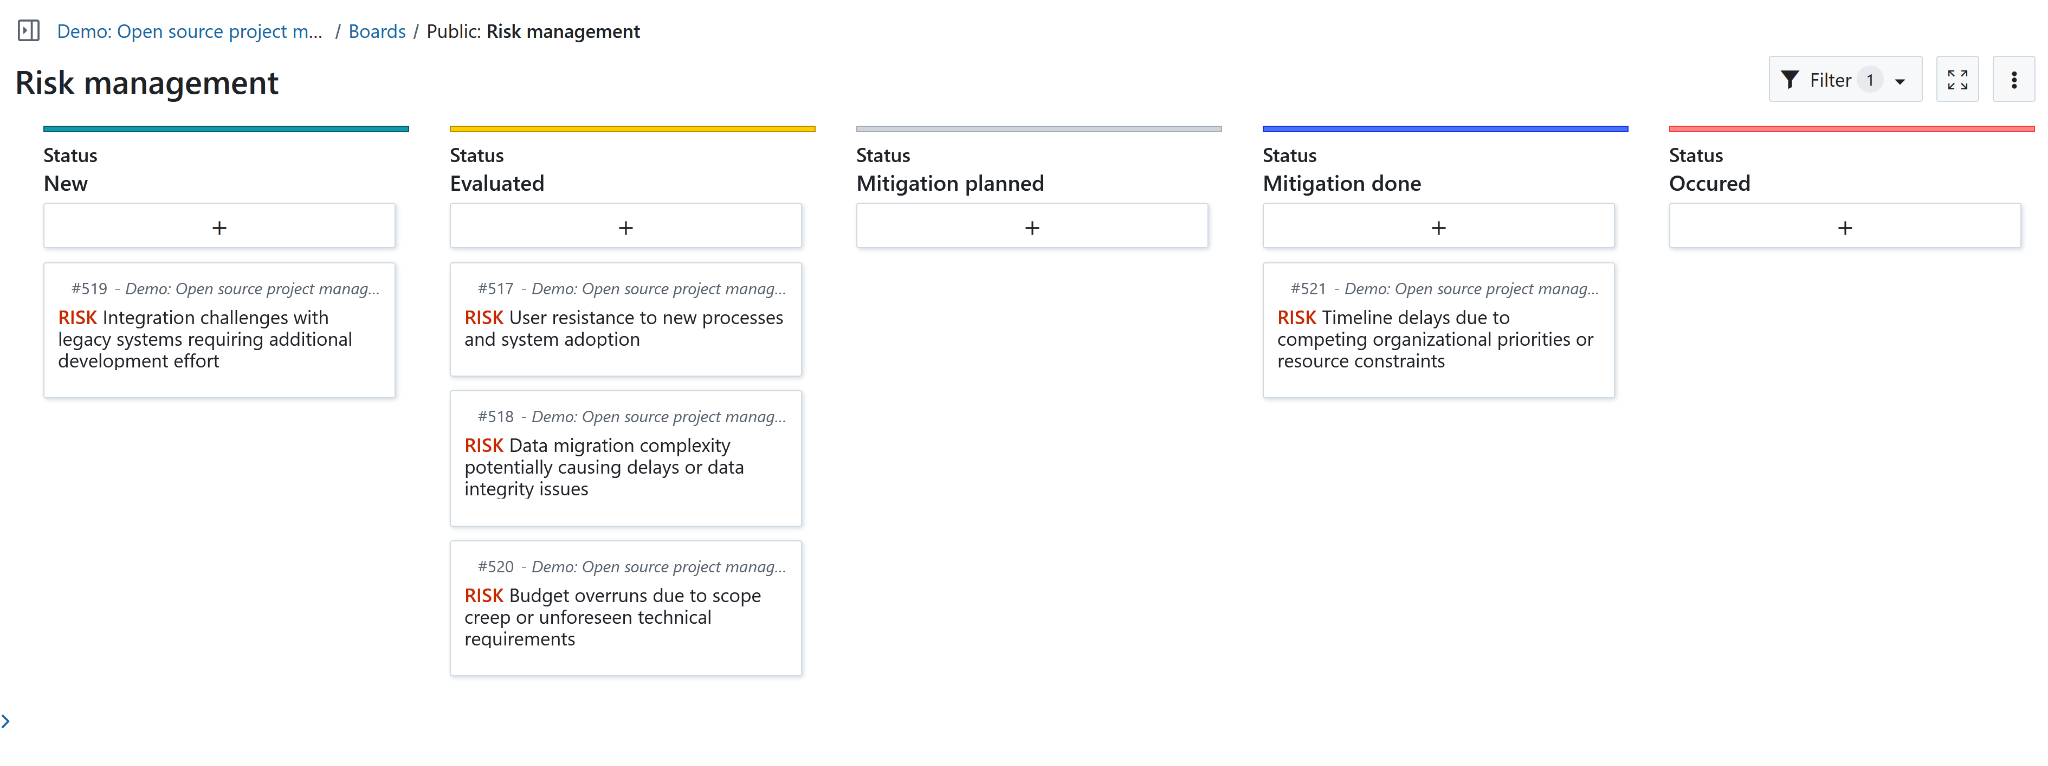
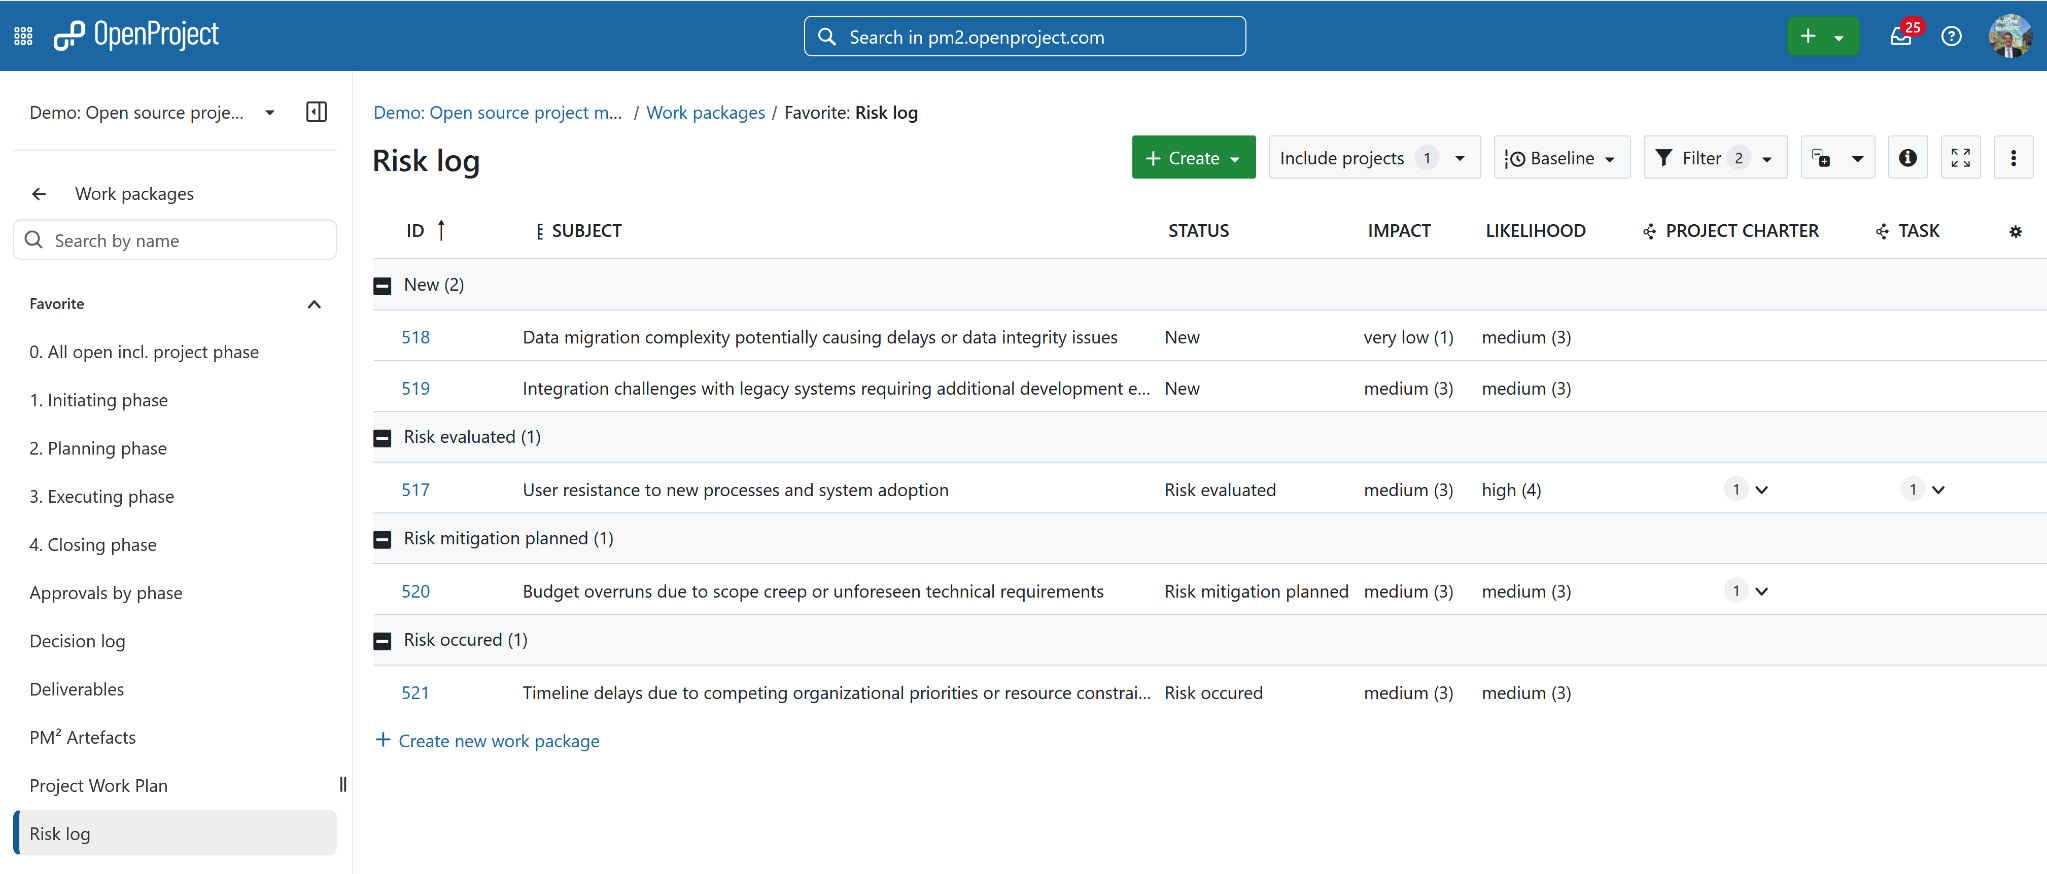
Table view
The table view provides a detailed overview with assessment fields such as impact and likelihood. It supports filtering, sorting and grouping for reporting and review meetings.
Risk lifecycle
The following lifecycle maps the project activities to the configured risk statuses. A status change records the outcome of an activity; reviews and updates can take place at any point in the lifecycle.
stateDiagram-v2
    state "Mitigation planned" as MitigationPlanned
    state "Mitigation done" as MitigationDone

    [*] --> New
    New --> Evaluated: Assessment completed
    Evaluated --> MitigationPlanned: Response and actions defined
    MitigationPlanned --> MitigationDone: Actions completed

    New --> Occurred: Risk event happens
    Evaluated --> Occurred: Risk event happens
    MitigationPlanned --> Occurred: Risk event happens
    MitigationDone --> Occurred: Risk event happens

    New --> Rejected: Invalid, duplicate or out of scope
    Evaluated --> Rejected: No longer relevant
    MitigationPlanned --> Rejected: No longer relevant
Record a new risk: New
Create an item of type Risk as soon as an uncertain event is identified. Write the subject as a concise cause, event and effect statement, for example: “Because the supplier has not confirmed capacity, hardware delivery may be delayed, which could move the pilot date.”
Complete the Cause, Risk event, Impact and Early warning indicators sections in the description. Select a category and assign a risk owner. Keep the status as New until the initial assessment is complete. The create work package guide describes the available creation flows.
Evaluate the risk: Evaluated
The risk owner and relevant specialists assess likelihood and impact using the scale defined in the Risk Management Plan. Add the supporting evidence, confirm ownership and change the status to Evaluated when the assessment is complete.
Prioritize risks consistently. If a high assessment requires authority beyond the project team, escalate the required decision and responsibility to the project manager, Project Owner or steering body.
Plan the mitigation: Mitigation planned
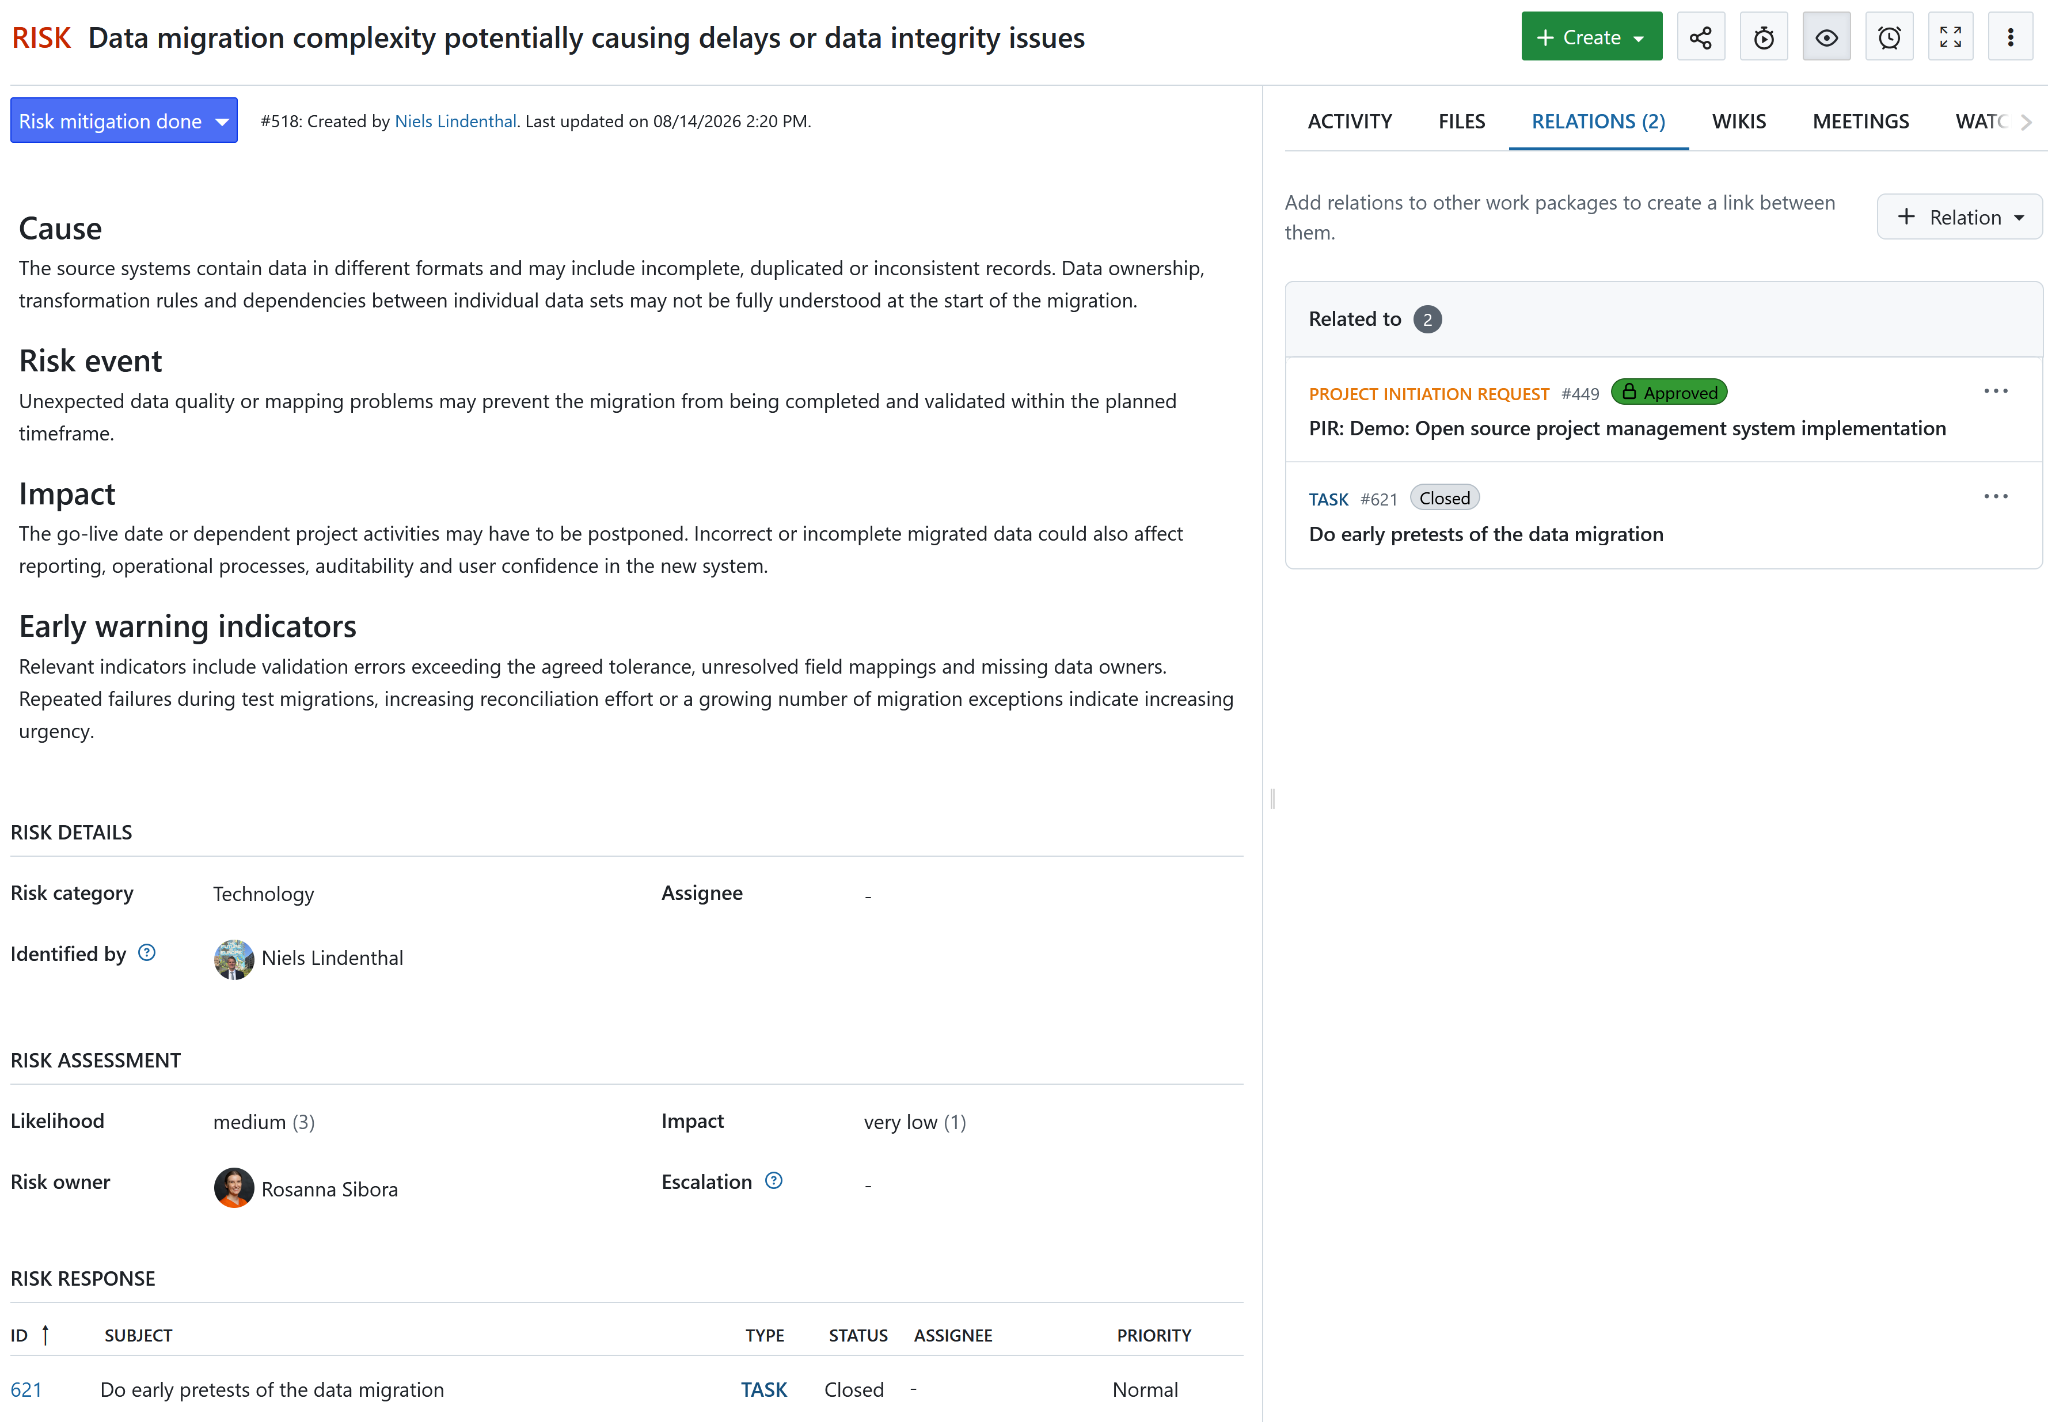
Choose the response strategy and define the intended outcome. Record every concrete mitigation as a separate work package and link it to the risk. Use one work package for each independently assignable action and give it an assignee, due date and status.
The embedded Risk response table in the risk details displays these related work packages. It keeps the risk assessment separate from the execution of preventive and contingency actions while preserving traceability. Preventive actions reduce likelihood or impact before the event; contingency actions define what to do if it occurs.
Change the risk status to Mitigation planned once the response has been agreed and all required mitigation work packages have been created and assigned. See work package relations and hierarchies for more information about linking items.
Complete the mitigation: Mitigation done
Monitor the mitigation work packages in the embedded Risk response table and document their progress through their own statuses and comments. When all planned actions have been completed, reassess likelihood and impact and record whether the response achieved its intended effect.
Change the risk status to Mitigation done only after the actions and their effectiveness have been reviewed. This status records completion of the planned response; it does not mean that the risk event occurred.
Handle an occurred risk: Occurred
When the uncertain event happens, change the risk status to Occurred. Create or link a separate issue for resolution, carry over the relevant owner, actual impact, contingency actions and due dates, and keep the relation to the original risk for traceability.
The issue is managed through its own workflow while the original risk retains the assessment and response history.
Reject an entry: Rejected
Use Rejected when the entry is a duplicate, outside the project scope or does not represent a relevant project risk. Document the reason in a comment before changing the status so that the decision remains understandable.
Do not use Rejected merely because mitigation has been completed; use Mitigation done for that outcome.
Review and report
Review risks in New, Evaluated and Mitigation planned regularly. Check assumptions and early warning indicators, update likelihood and impact when evidence changes, follow up overdue actions and schedule the next review.
Dica
OpenProject does not provide a dedicated
Next review datefield. To schedule a risk review, use the risk’s finish date as the review date and enable date alerts. OpenProject will then notify participating users as the date approaches. Date alerts are an Enterprise add-on.
Use comments for review notes and decisions. The activity history provides a chronological audit trail. For status reporting and lessons learned, include risks in Mitigation done, Occurred and Rejected as separate outcome groups.
Step-by-step configuration guide
The following configuration is normally created once and then reused across projects. Administrators should agree the terminology, scales and workflow with the organization’s project management office before configuring them.
Step 1: Create and activate the Risk work package type
Create a work package type named Risk under Administration → Work packages → Types. Add the fields needed for assessment, response and review to its form. See work package types for configuration details.
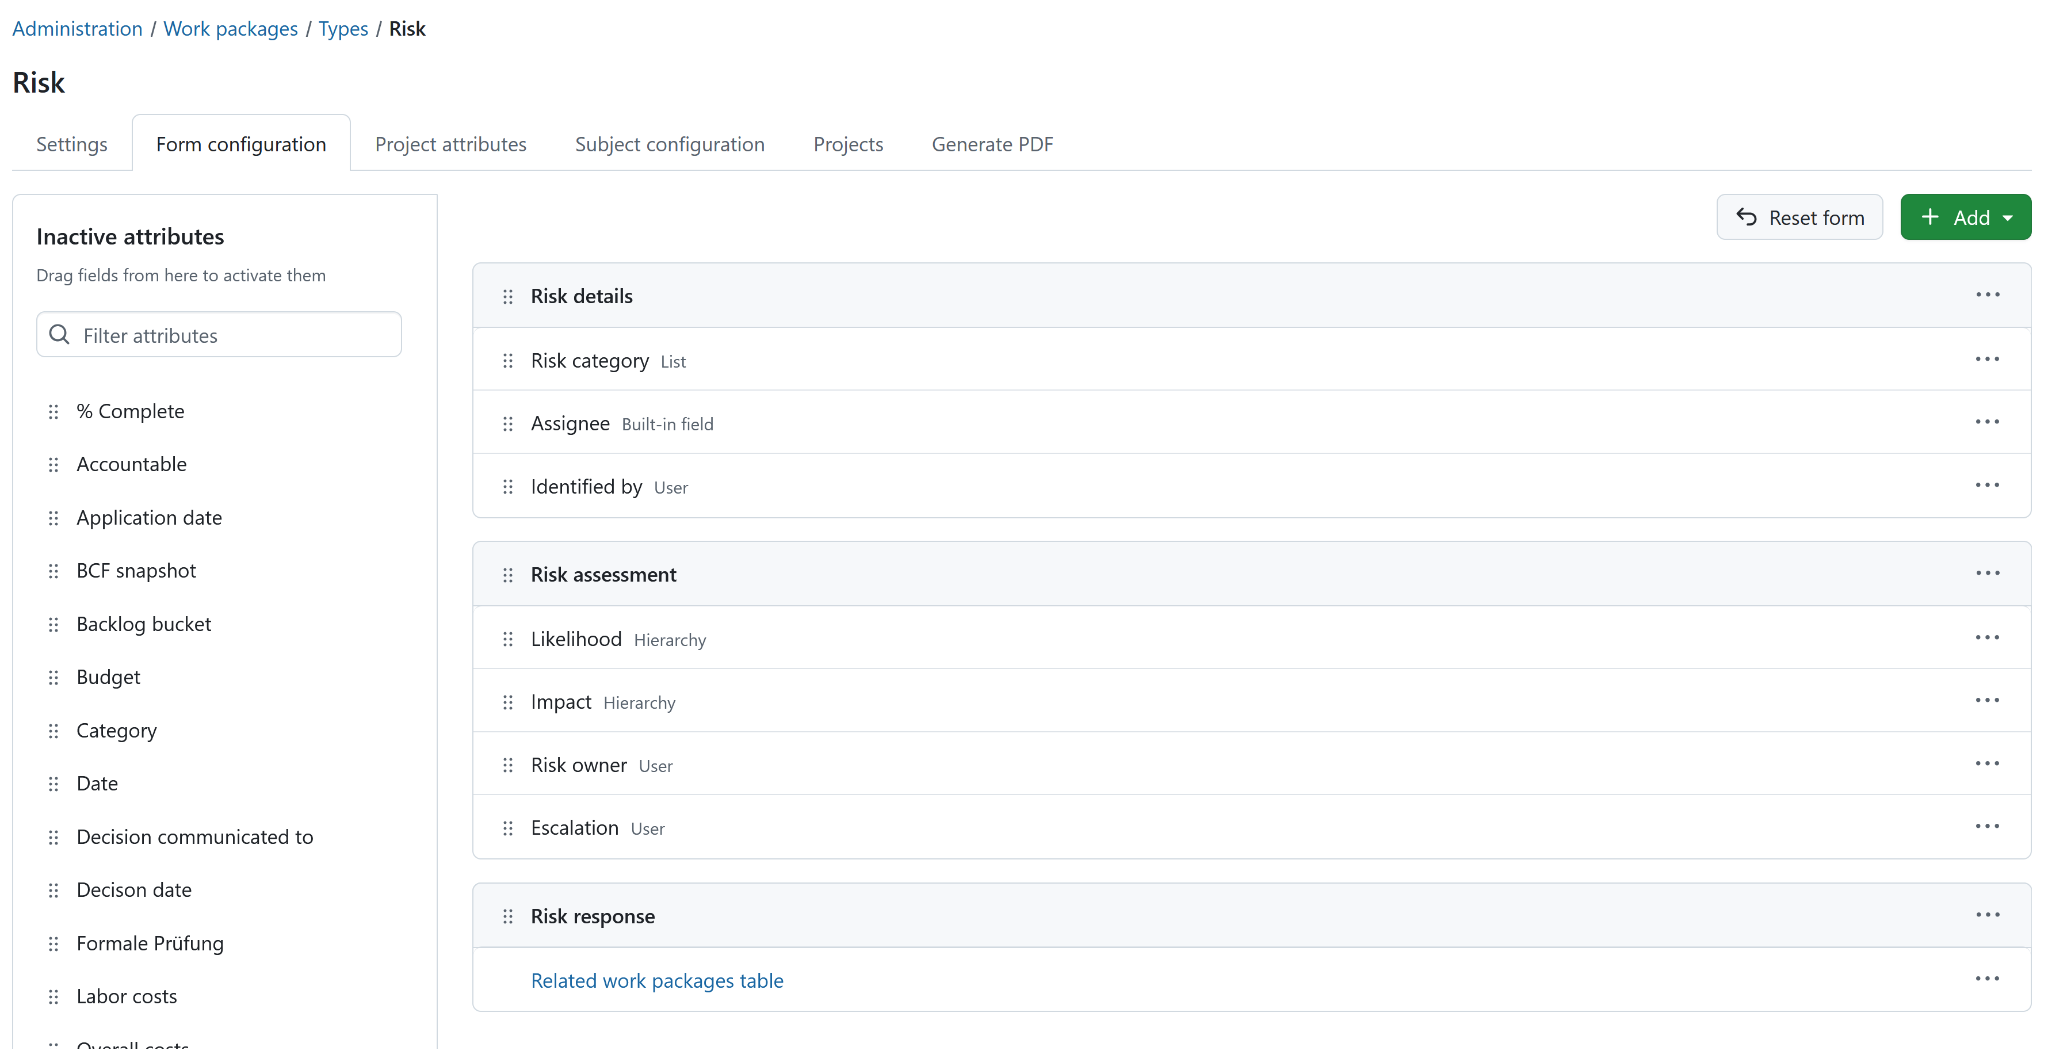
Add a form section named Risk response and place a Related work packages table in it. The embedded table displays the separate work packages used to implement the risk mitigation. Each action can therefore have its own type, assignee, dates and workflow while remaining visible from the risk.
Configure the following default description for the Risk type so every new risk uses the same structure:
## Cause

Describe the existing condition, dependency, assumption or external influence that gives rise to the risk.

## Risk event

Describe the uncertain event that may occur. Do not describe an event that has already happened.

## Impact

Describe which project objectives, deliverables, costs, dates, benefits or quality criteria would be affected if the event occurred.

## Early warning indicators

List observable signs or thresholds indicating that the risk is becoming more likely or more urgent.
Activate the type for the relevant projects under Project settings → Work packages → Types. The same project settings also control which custom fields are active in a project; see project work package settings.
Step 2: Configure the risk form
Create the required custom fields under Administration → Custom fields → Work packages. Then open Administration → Work packages → Types → Risk → Form configuration and arrange the attributes as shown below:
| Form section | Attribute | Type | Purpose |
|---|---|---|---|
| Always present | Description | Built-in field | Stores the structured risk description and is always part of the form |
| Risk details | Risk category | List | Groups risks such as schedule, cost, scope, quality, security or external dependency |
| Risk details | Assignee | Built-in field | Assigns responsibility for the next activity |
| Risk details | Identified by | User | Records who identified the risk |
| Risk assessment | Likelihood | Hierarchy | Records likelihood on a shared scale, for example 1 to 5 |
| Risk assessment | Impact | Hierarchy | Records the effect on project objectives on the same 1 to 5 scale |
| Risk assessment | Risk owner | User | Makes one person responsible for monitoring and coordinating the response |
| Risk assessment | Escalation | User | Identifies the person to involve when a decision or escalation is required |
| Risk response | Risk response | Related work packages table | Shows mitigation actions as separate related work packages |
Description is a built-in field that is always part of the risk form. It does not appear in Form configuration and cannot be activated or deactivated. Assignee is a configurable built-in field. Risk response is an embedded related work packages table. The remaining attributes are configured as custom fields and added to the form.
Use one consistent scale across projects. If the organization uses a 1 to 5 scale, define in the Risk Management Plan what each likelihood and impact value means. Until calculated fields are available, record the score explicitly or group/filter the register by likelihood and impact; do not imply that OpenProject calculates likelihood × impact automatically.
Step 3: Configure statuses and workflows
The example configuration uses the following statuses:
New: the risk has been recorded and awaits an initial assessment.Evaluated: likelihood, impact and ownership have been assessed and documented.Mitigation planned: the response strategy and concrete mitigation actions have been defined and assigned.Mitigation done: the planned mitigation actions have been completed and their effectiveness has been reviewed.Occurred: the uncertain event has happened; create or link an issue for resolution and execute the applicable contingency actions.Rejected: the entry is a duplicate, is outside the project scope or was determined not to represent a relevant project risk.
Configure these statuses under work package statuses and the permitted transitions under work package workflows.
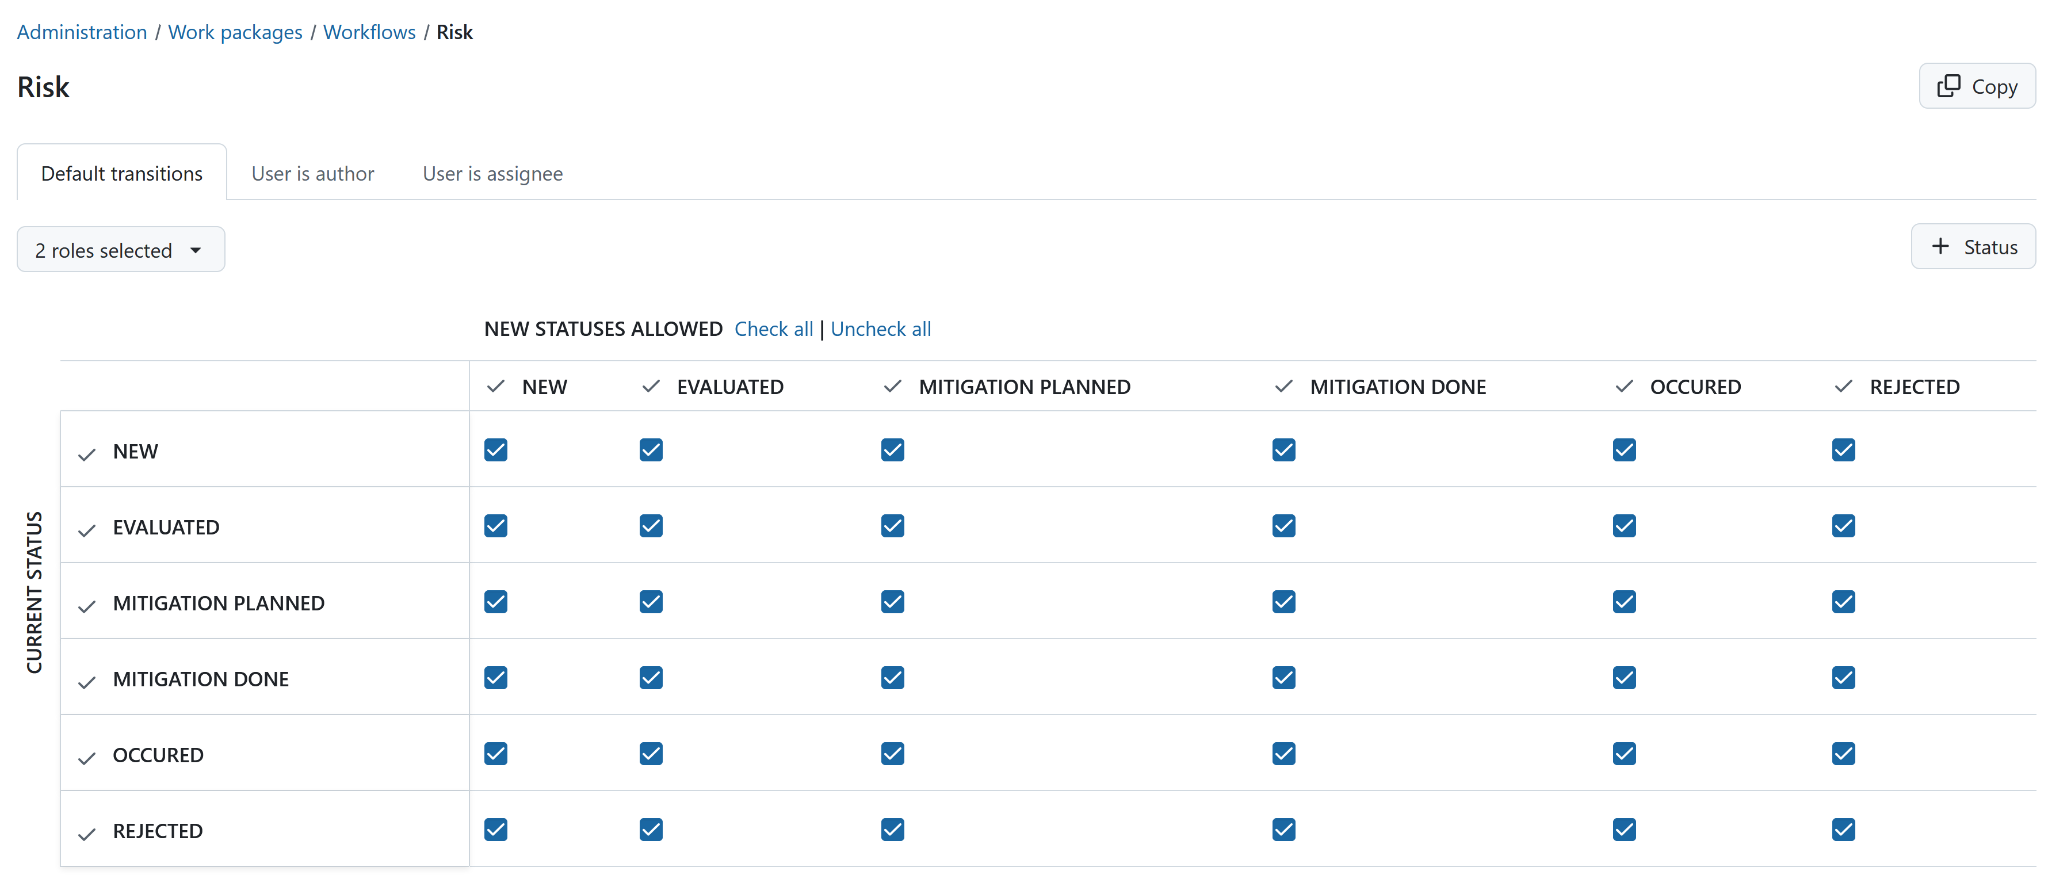
Restrict sensitive transitions where appropriate. For example, allow only the project manager or risk manager to transition a risk to Mitigation done, Occurred or Rejected. Configure the corresponding transition permissions under roles and permissions.
Step 4: Create a Risk management board and project template
Create one shared board named Risk management and filter it by type Risk. Configure the board columns by status so that they reflect the risk lifecycle. The board complements the table view of the Risk Register and uses the same underlying risk items.
Project members can open a risk from its card and move the card to another column when its status changes. The example board shows the lifecycle from New through Occurred. Items with the status Rejected can remain excluded from day to day monitoring.
Open the Risk management demo board to explore the configuration.
Finally, include the Risk type, fields, permissions and board in a project template so new projects start with the same risk management structure.
Continuous product improvements
OpenProject already provides the building blocks for transparent and repeatable risk management. Product development continues to make this experience more integrated, efficient and intuitive. The following roadmap items show potential next steps; their scope and delivery dates may evolve as the solutions are refined:
| Planned enhancement | Expected benefit |
|---|---|
| Risk management module | Brings assessment, scoring, treatments, permissions and auditability together in a dedicated and integrated risk management experience. |
| Calculated custom fields | Derives risk scores automatically from likelihood and impact, improving consistency and reducing manual effort. |
| Dynamic and status-based field validation | Guides users through the lifecycle by requesting the right information for each status and transition. |
| Workflow automation | Automates recurring reminders, assignments, follow-up changes and notifications when defined conditions are met. |
| Two-dimensional boards with configurable axes | Enables an interactive likelihood and impact matrix in which visual planning remains connected to the underlying risk assessment. |
| Built-in types | Supports consistent standard types that can be identified across installations and protected from accidental deletion. |