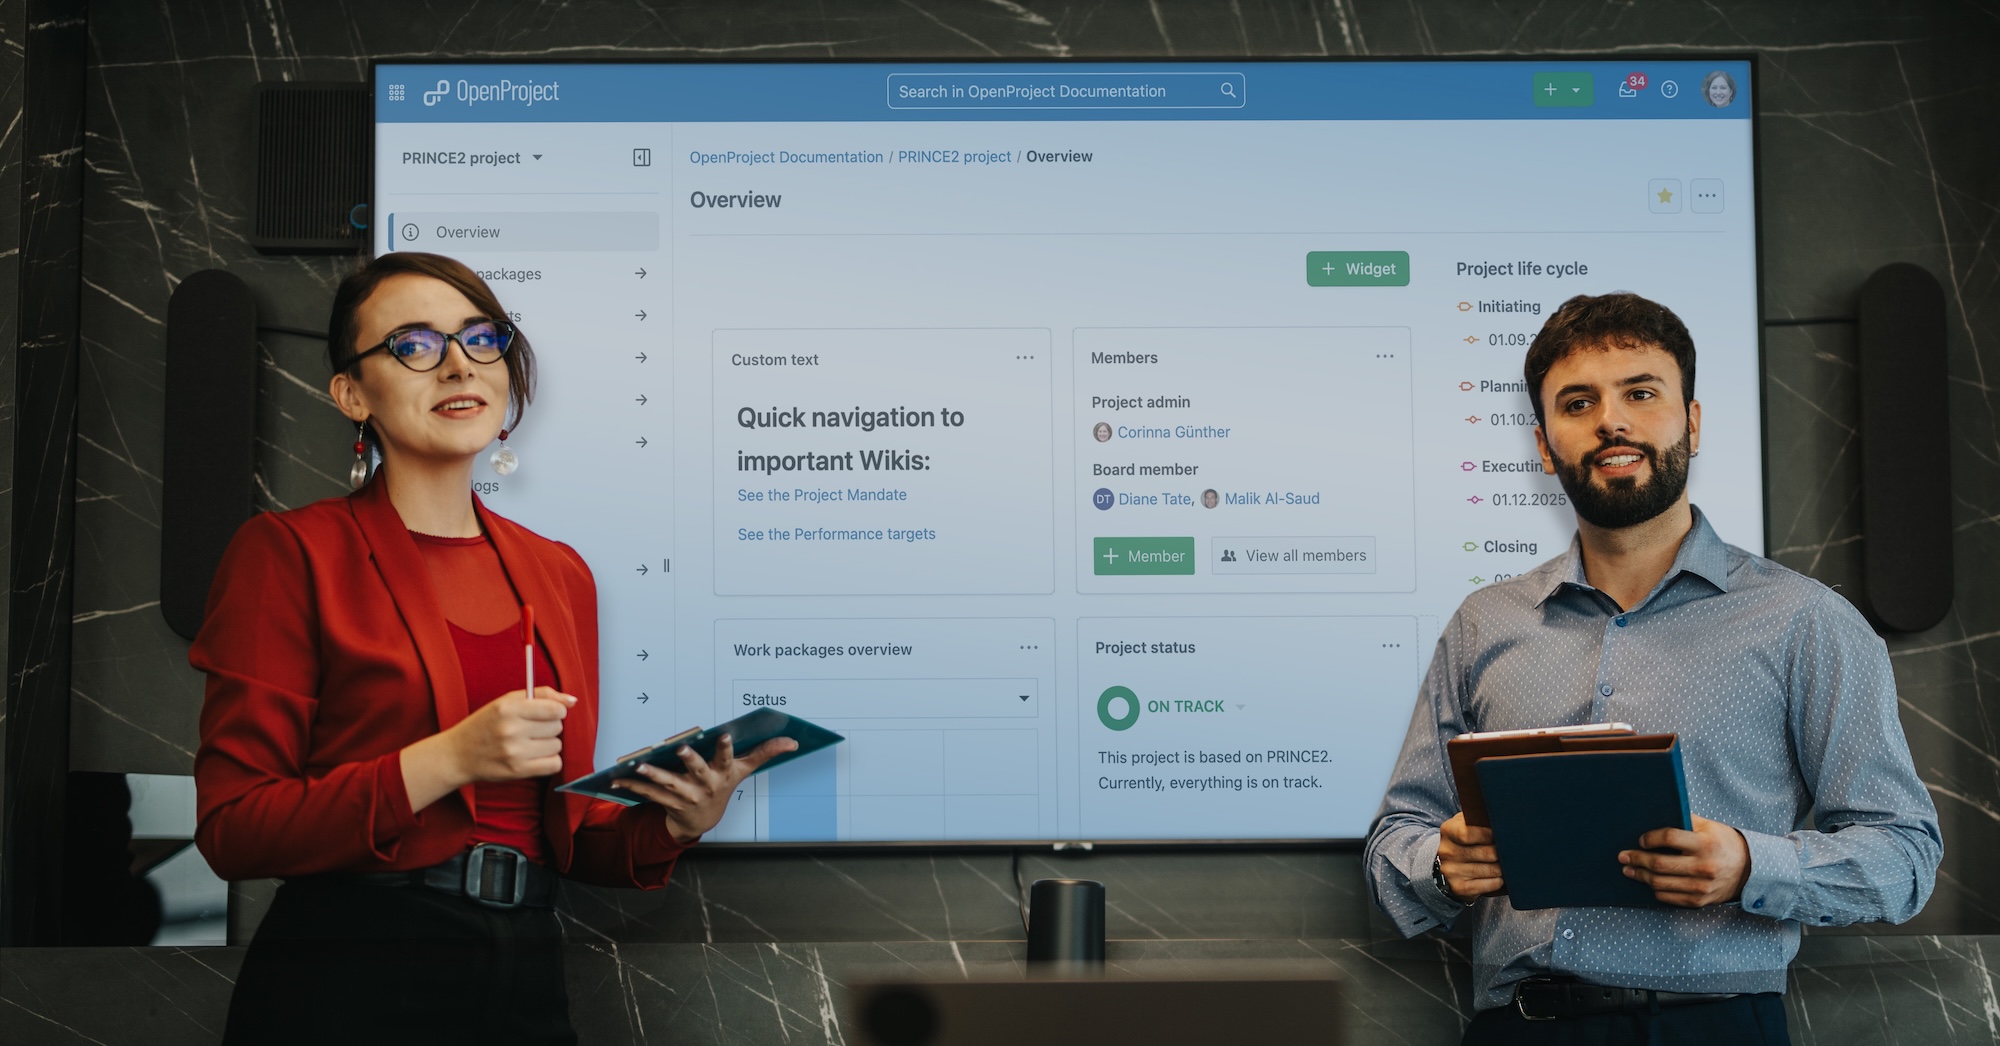
PRINCE2 with OpenProject
When managing complex projects, it is beneficial to use a project management methodology for guidance. PRINCE2 is one of the most popular and widely used methodologies available. OpenProject is a popular tool that supports PRINCE2, offering the advantages of open source software while also being cost-effective. Let’s learn how exactly project managers can implement PRINCE2 with OpenProject.
Hinweis
Originally published in 2018, this article has been substantially revised to reflect the latest changes in both PRINCE2 and OpenProject. The PRINCE2 framework was updated to version 7 in September 2023, adding new priorities such as sustainability, people-centric management, and digital/data integration. At the same time, OpenProject has introduced key features — like meetings enhancements, baseline comparison, and new permissions — that make applying PRINCE2 workflows easier and more powerful.
Article navigation
If you are already familiar with the PRINCE2 framework, you can jump straight to the practical section on using OpenProject.
What is PRINCE2 and how does it work?
PRINCE2 (or Projects in Controlled Environments) offers a structured process for projects & provides recommendations for each project phase. It is one of the leading project management methodologies (next to PMBOK (from the Project Management Institute)) and is used in over 150 countries.
PRINCE2 provides a clear structure for projects and is based on 7 principles, 7 practices (formerly known as themes) and 7 processes as described by PRINCE2.com. Let’s take a look at those basics before diving into the OpenProject software.
7 Principles
PRINCE2 is built on seven principles which represent guiding obligations and good practices.
The 7 Principles are:
- Continued business justification: A project must make good business sense (justified use of time and resources, clear return on investment).
- Learn from experience: Previous projects should be taken into account. Project teams use a lessons log for this purpose.
- Define roles, responsibilities and relationships: The decision makers in the project are clearly defined. Everyone in the project knows what they and others are doing. The ‘relationships’ has been added later to PRINCE2 as dependencies are an important part of project management.
- Manage by exception: The project board is only informed if there is or may be a problem. As long as the product is running well, there is not a lot intervention from managers.
- Manage by stages: Difficult tasks are broken into manageable chunks, or management stages.
- Focus on products: Everyone knows ahead of time what is expected of the product. Product requirements determine work activity.
- Tailor to suit the project: The PRINCE2 methodology can be tailored and scaled. Projects which are adjusted based on the actual needs perform better in general than projects which use PRINCE2 dogmatically. Formerly known as ‘Tailor to the environment’.
7 Practices
In addition to these 7 Principles, there are 7 Practices – formerly called ‘Themes’ – which are addressed continually throughout the project. They provide guidance for how the project should be managed. They are set up at the beginning of the project and then monitored continually to keep the project on track:
- Business Case: This practice is used to determine if a project is worthwhile and achievable. It is related to the principle of Continued Business Justification.
- Organization: Project managers are required to keep a record of every team member’s roles and responsibilities. It is related to the Define Roles and Responsibilities principle.
- Quality: At the beginning of the project, the project manager defines what constitutes the quality of the project. This is related to the Focus on Products principle.
- Plans: A plan is set up which describes how objectives are going to be achieved. It is focused on cost, quality, benefits, timescale and products.
- Risk: Uncertain events during the project are identified, assessed and controlled. They are recorded in a risk log. Positive risks are called opportunities, negative risks are called threats.
- Issue: How to handle change requests and all types of project-related concerns that arise and require resolution. Issues shouldn’t be ignored, but changes should only be implemented once agreed upon. This practice was formerly called ‘Change’.
- Progress: This principle is about tracking the project. This allows project managers to verify and control whether they are performing according to the project plan.
7 Processes
To structure the step-wise progression through a project, there are 7 Processes. Every one of the steps is overseen by the project manager and approved by the project board:
- 1. Starting up a project
- Create a project mandate to answer logistical questions about the project. It covers the purpose of the project, who will carry it out and how to execute it.
- From the project mandate a project brief is derived, as well as lessons log and discussions with project members.
- A project team is assigned.
- 2. Directing a project
- This is an ongoing process covering the entire life time of the project.
- The project board manages activities such as initiation, stage boundaries, guidance, project closure.
- 3. Initiating a project
- During this stage, the project manager determines what needs to be done to complete the project and outlines how the performance targets will be managed (cost, time, quality, benefits, risks, scope)
- 4. Controlling a stage
- Project managers break the project into work packages / manageable activities and assign them to the project members.
- The project manager oversees and reports the work package progress.
- 5. Managing product delivery
- This manages how the communication between the team and the project manager is controlled.
- The activities include accepting, executing and delivering work packages.
- 6. Managing stage boundaries
- The project manager and the board review every stage. The board decides whether to continue the project. The project manager records lessons learned with the team for the next stage.
- This process includes
- Planning the next stage
- Updating the project plan
- Updating the business case
- Reporting the stage end or producing an exception plan
- 7. Closing a project
- In the final process, the project is closed. This includes decommissioning the project, identifying follow-on actions, preparing project evaluation and benefits reviews, freeing up leftover resources and handing over products to the customer.
Implementing PRINCE2 with OpenProject
OpenProject supports the seven processes, seven principles and seven practices laid out by the PRINCE2 methodology. Let’s see how exactly project managers can implement PRINCE2 with OpenProject in 7 steps:
- Starting up a project: Create a project, activate modules, create project Mandate, add members.
- Directing a project: Define roles and permissions, create decision checkpoints and track them.
- Initiating a project: Define performance targets, set up budgets and assign them.
- Controlling a stage: Create work packages and relations, estimate and assessing work.
- Managing product delivery: Log time, communicate and document on work packages.
- Managing stage boundaries: Create meetings, set stages and gates, see baseline comparison.
- Closing the project: Create PDF reports, archive the project.
1) Starting up a project
Before any work begins, PRINCE2 recommends clarifying whether the project is viable and worth pursuing. In OpenProject, this “starting up” step is fast and intuitive — you create a new project space, enable the modules you need, and prepare the foundation for structured collaboration, governance, and documentation.
Erstellung eines Projektes
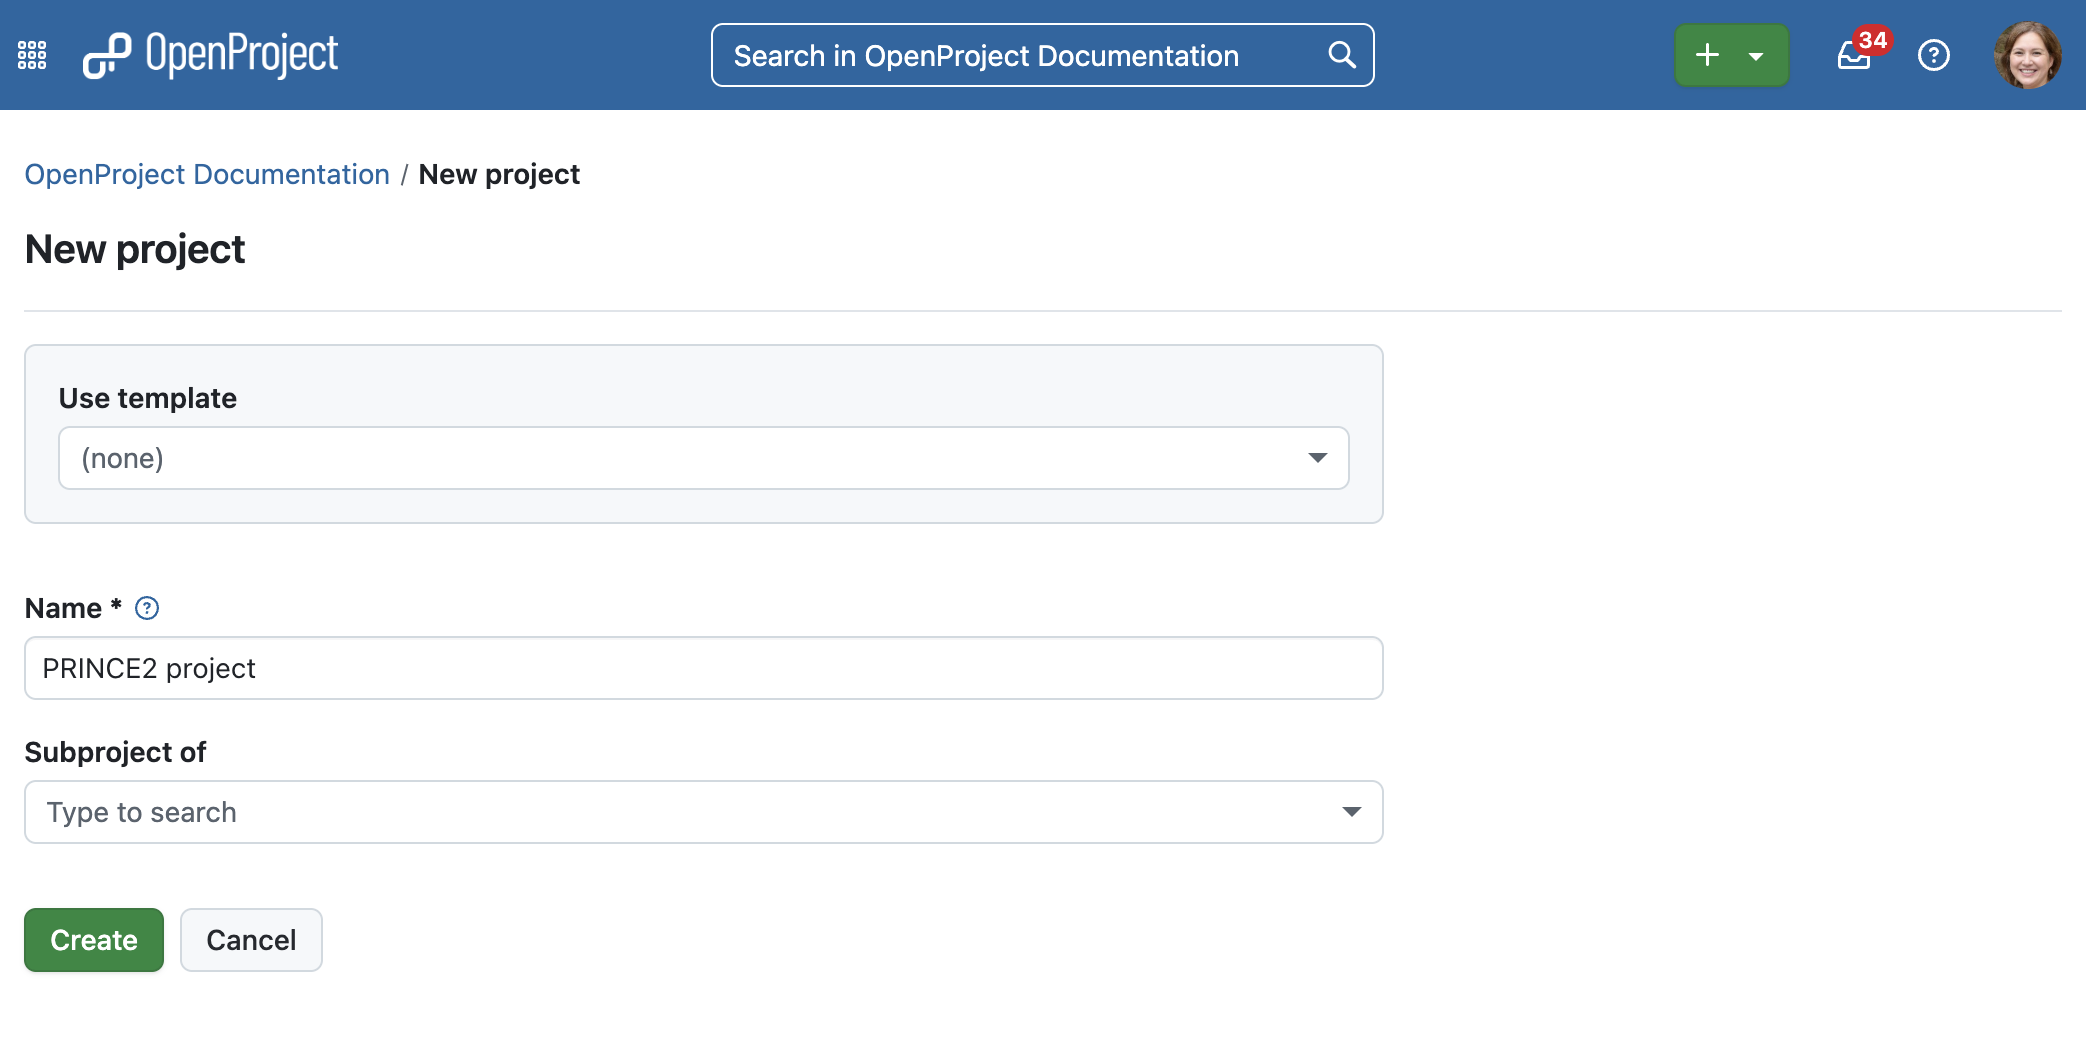
Starting up a project in OpenProject starts by simply creating a project. Simply click on the green + button in the header navigation and select + Project in the dropdown. Next, all you need is to provide a name and click on Create.
Activate the modules you need
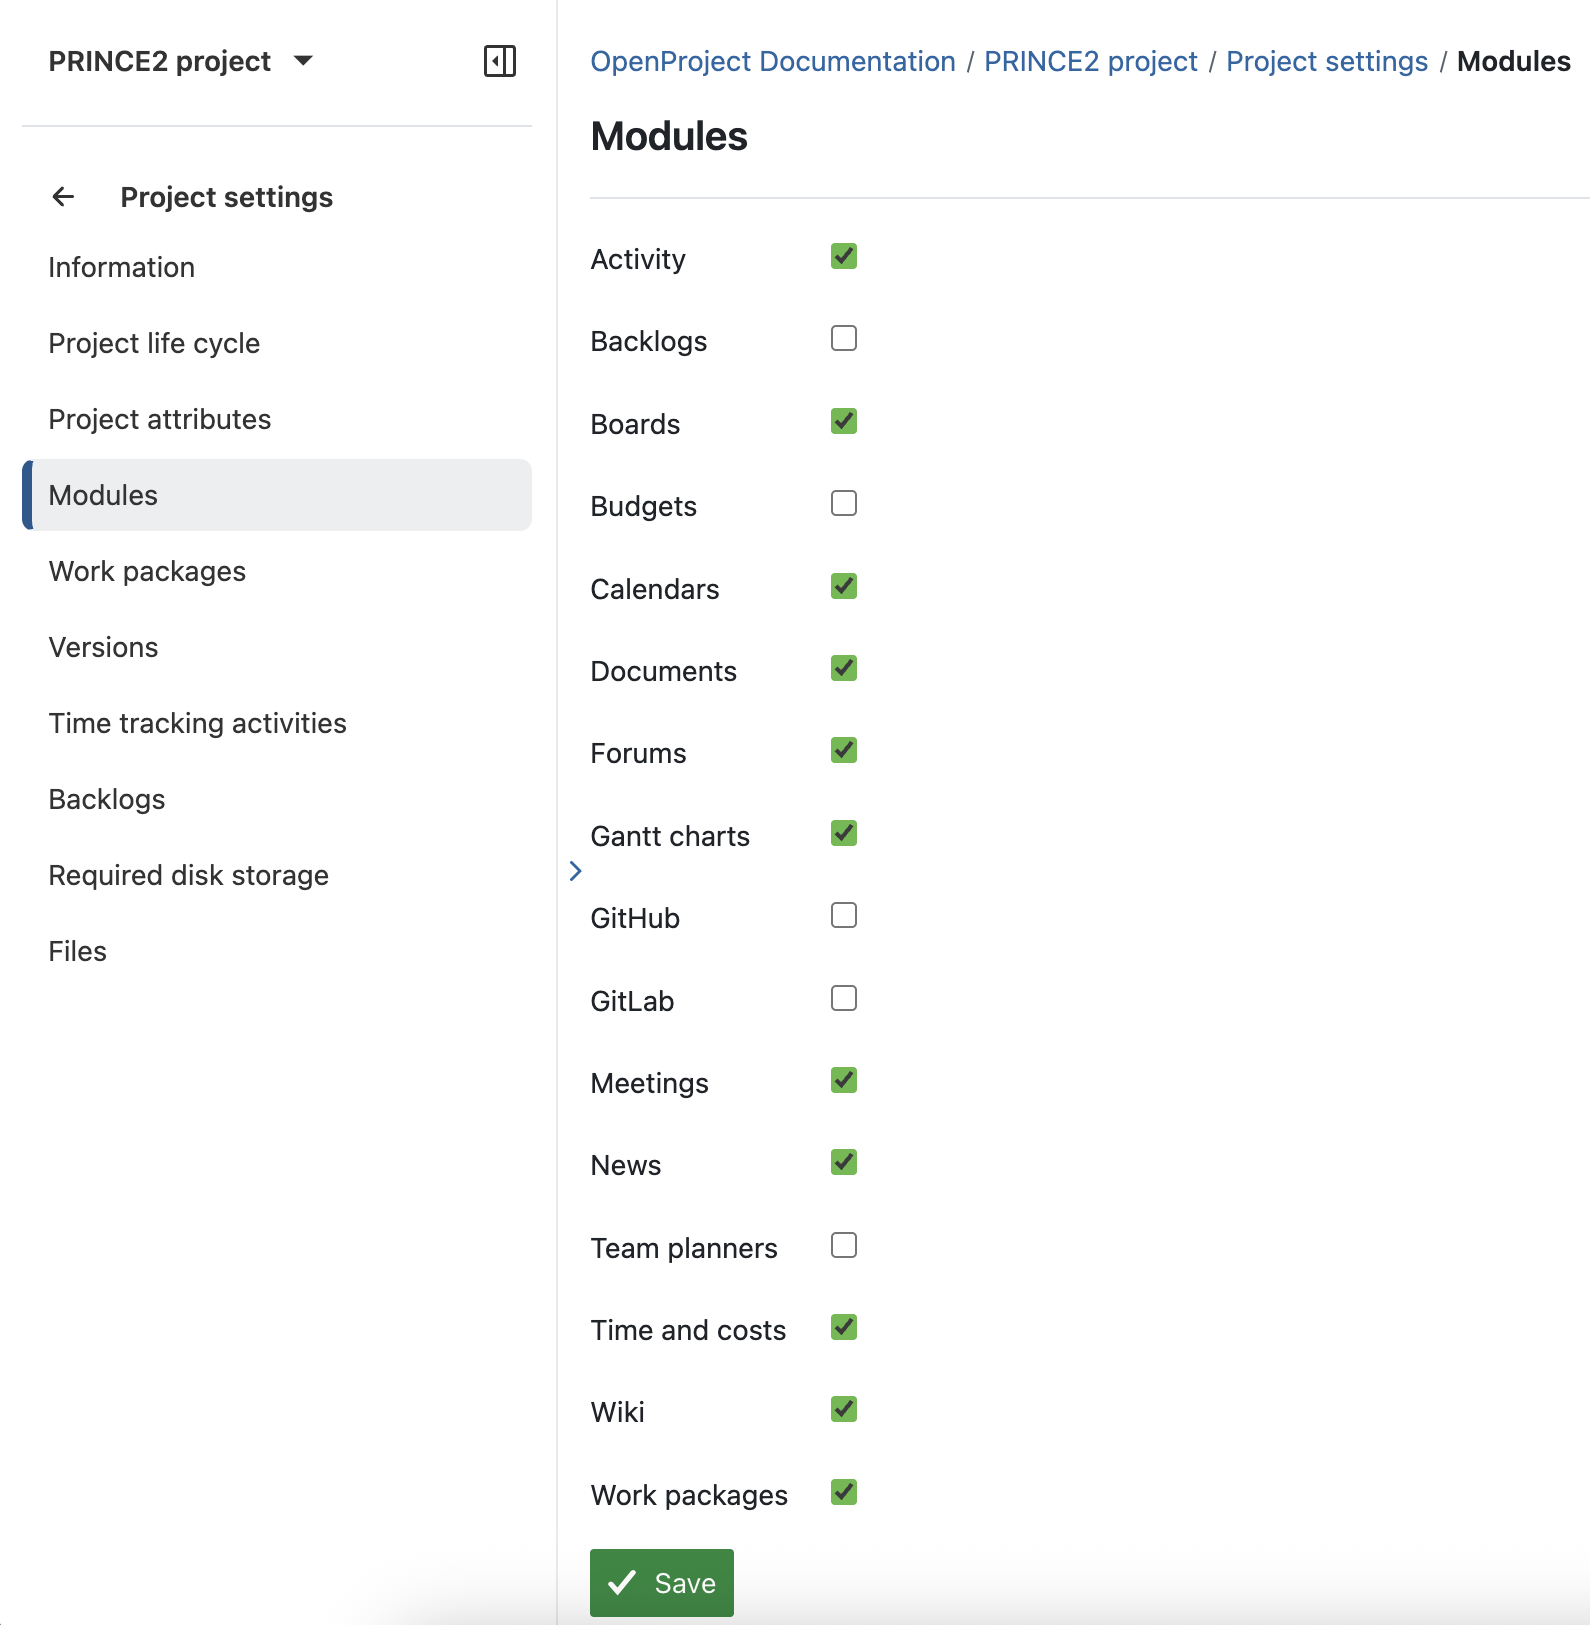
Now the project is created and you can start with some basic settings. Navigate to project settings → Modules to make sure that the Wiki, Work packages, Time and costs, and — optionally — Meetings, Forums, Budgets, and News modules are activated. These modules support transparency, collaboration, and documentation, which are all central to a people-focused approach in PRINCE2 7.
The Wiki module is especially useful for documenting your Project Mandate, Lessons Log, and other artifacts like communication plans. This aligns with PRINCE2’s emphasis on accountability, people, and continual learning.
Create a Project Mandate in the Wiki module
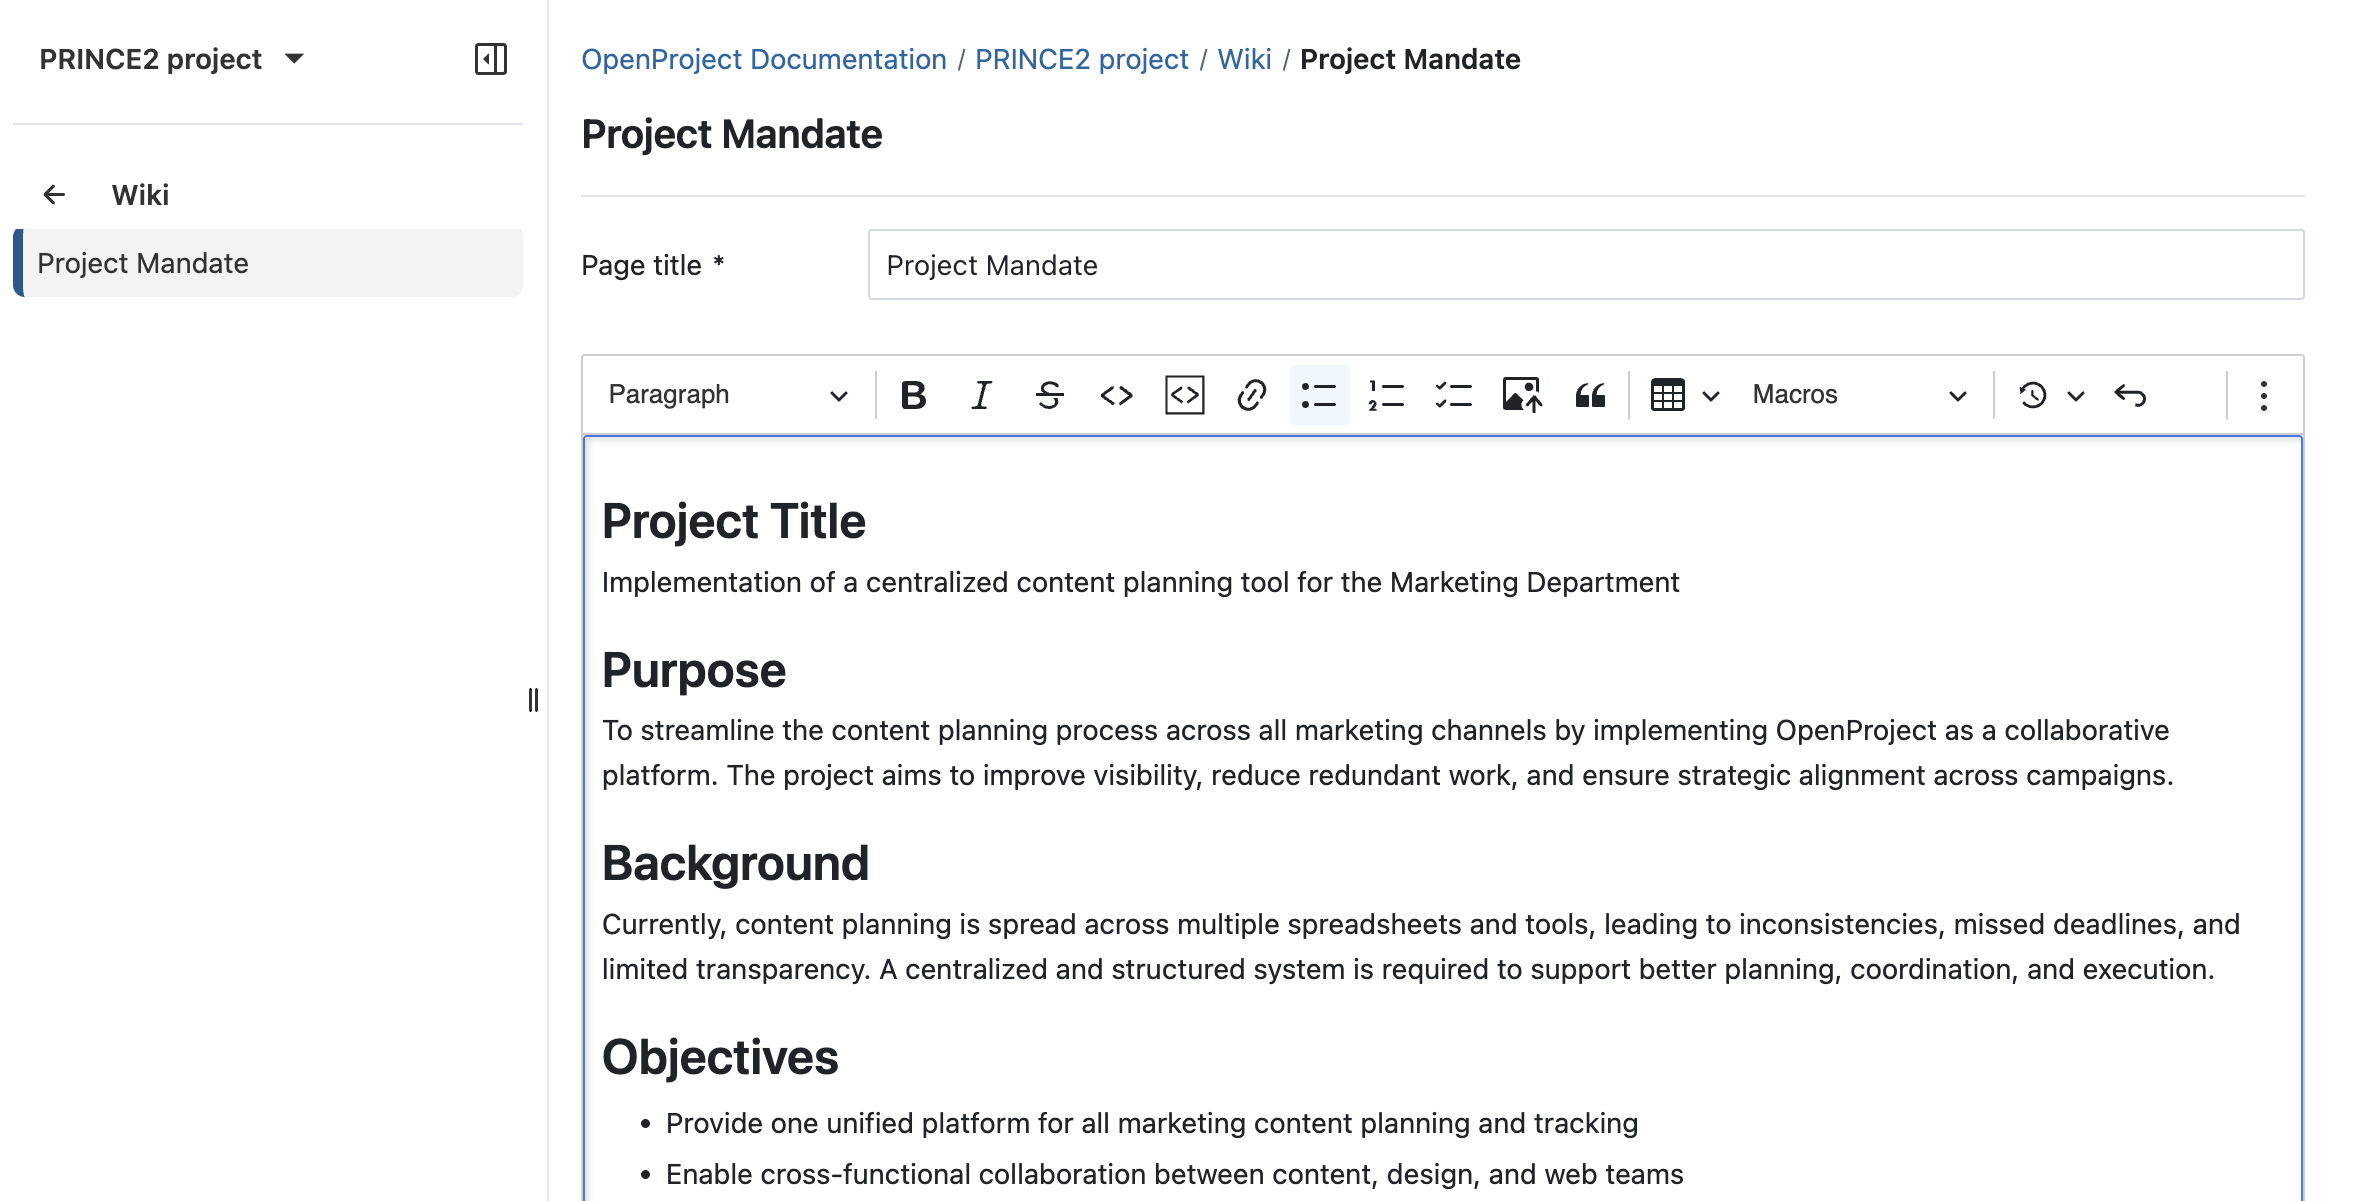
Next, select Wiki from the side menu on the left side and use it to create the Project Mandate. Make sure to press the Save button at the end. If you like, you can already create more wiki pages, such as the Lessons log as well.
Add members to your project
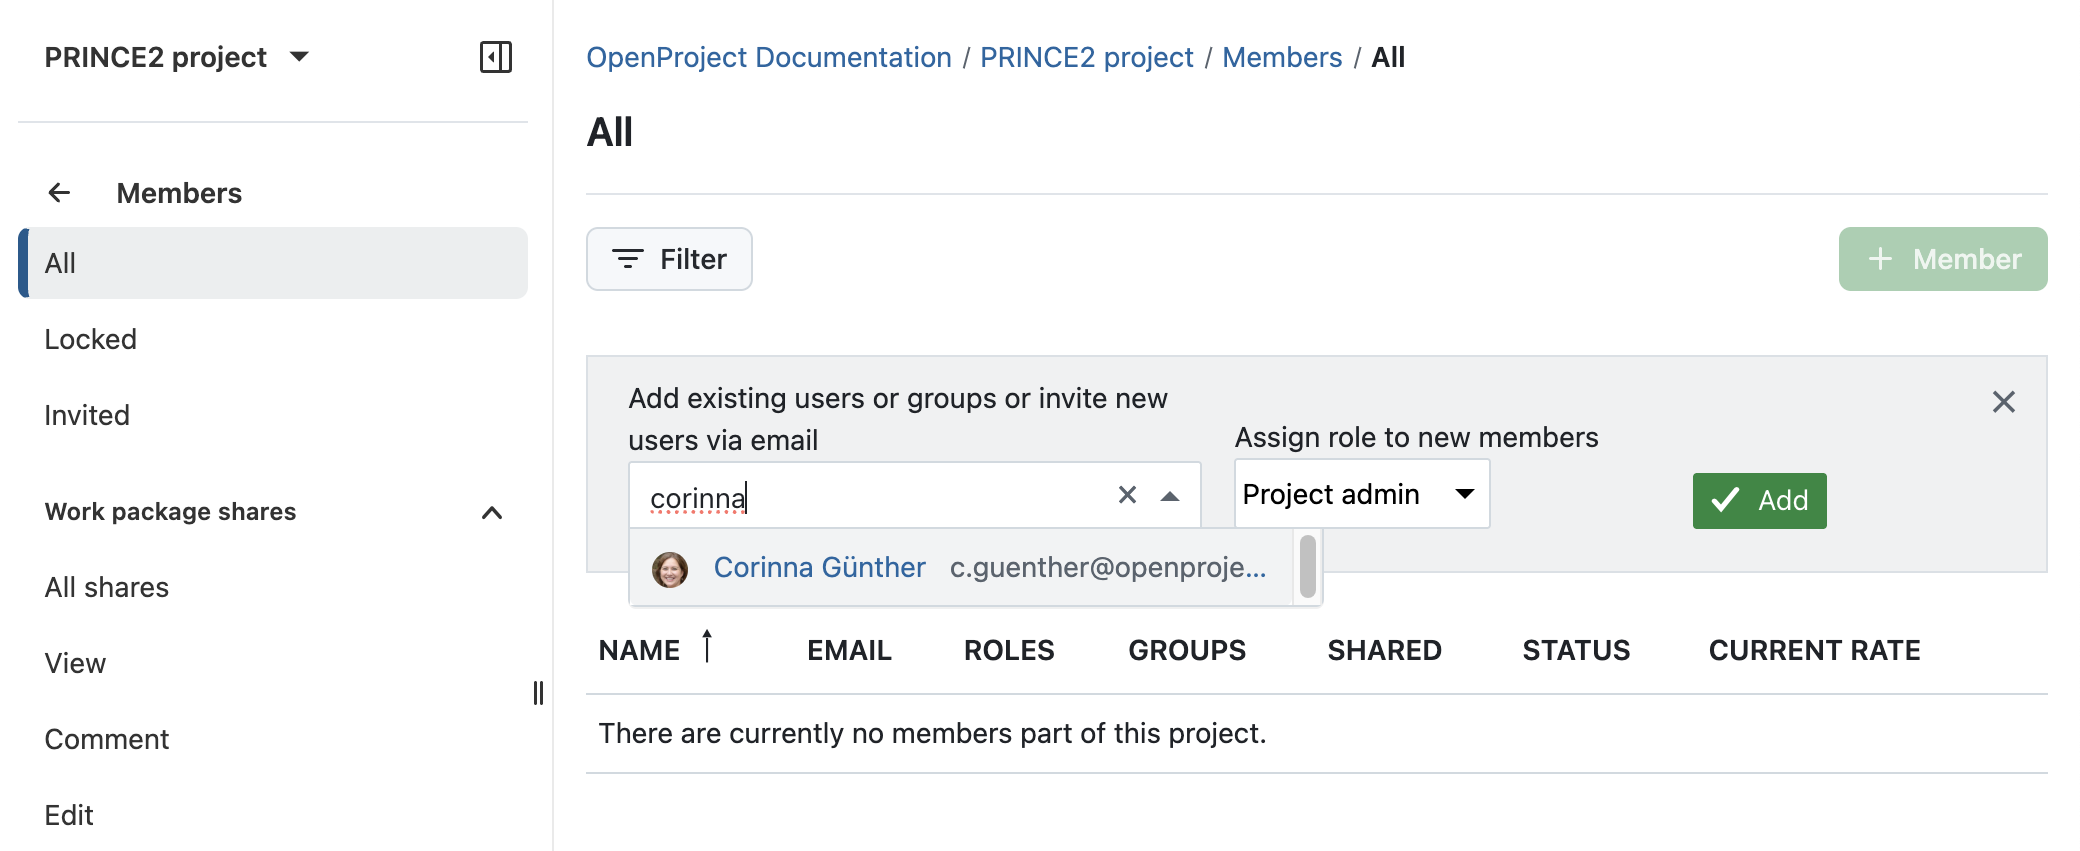
Afterward, go back to your project and select Members from the side menu to add the project members and assign them roles.
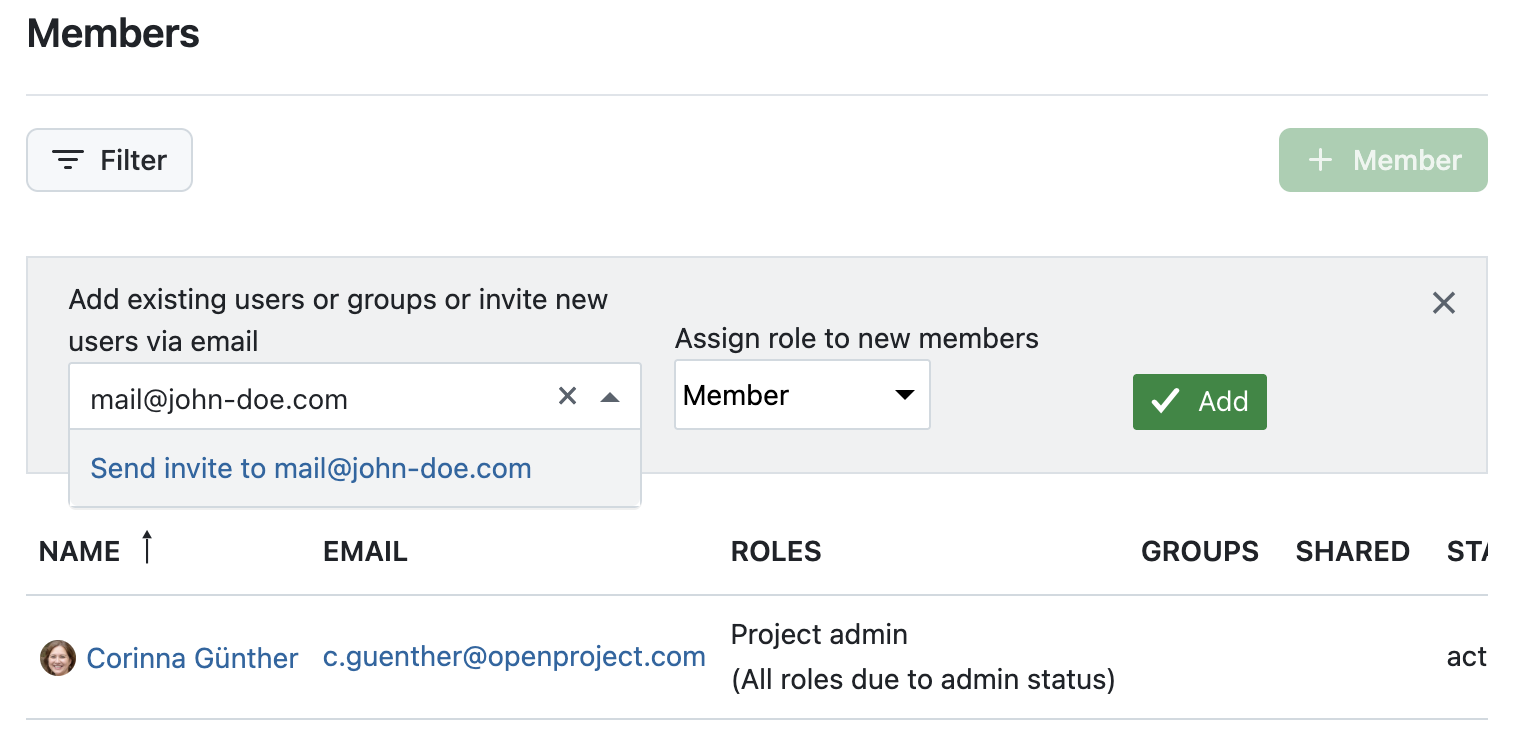
If the project members do not yet have an OpenProject account, you can send an invite to them directly in your project.
Tipp
If you’re a system admin, you can invite new members to your instance and add them to the project afterward. Click on your avatar on the top right and select Administration → Users and permissions. You can also assign entire groups to add multiple project members at once.
2. Directing a project
Once the project is set up and the team assigned, the project board’s role in PRINCE2 is to guide the project and approve important decisions. In OpenProject, you can reflect this setup through roles, permissions, and decision checkpoints.
Define roles and permissions
You can configure which roles have permissions to edit, approve, or only view information under Administration → Users and permissions → Roles and permissions.
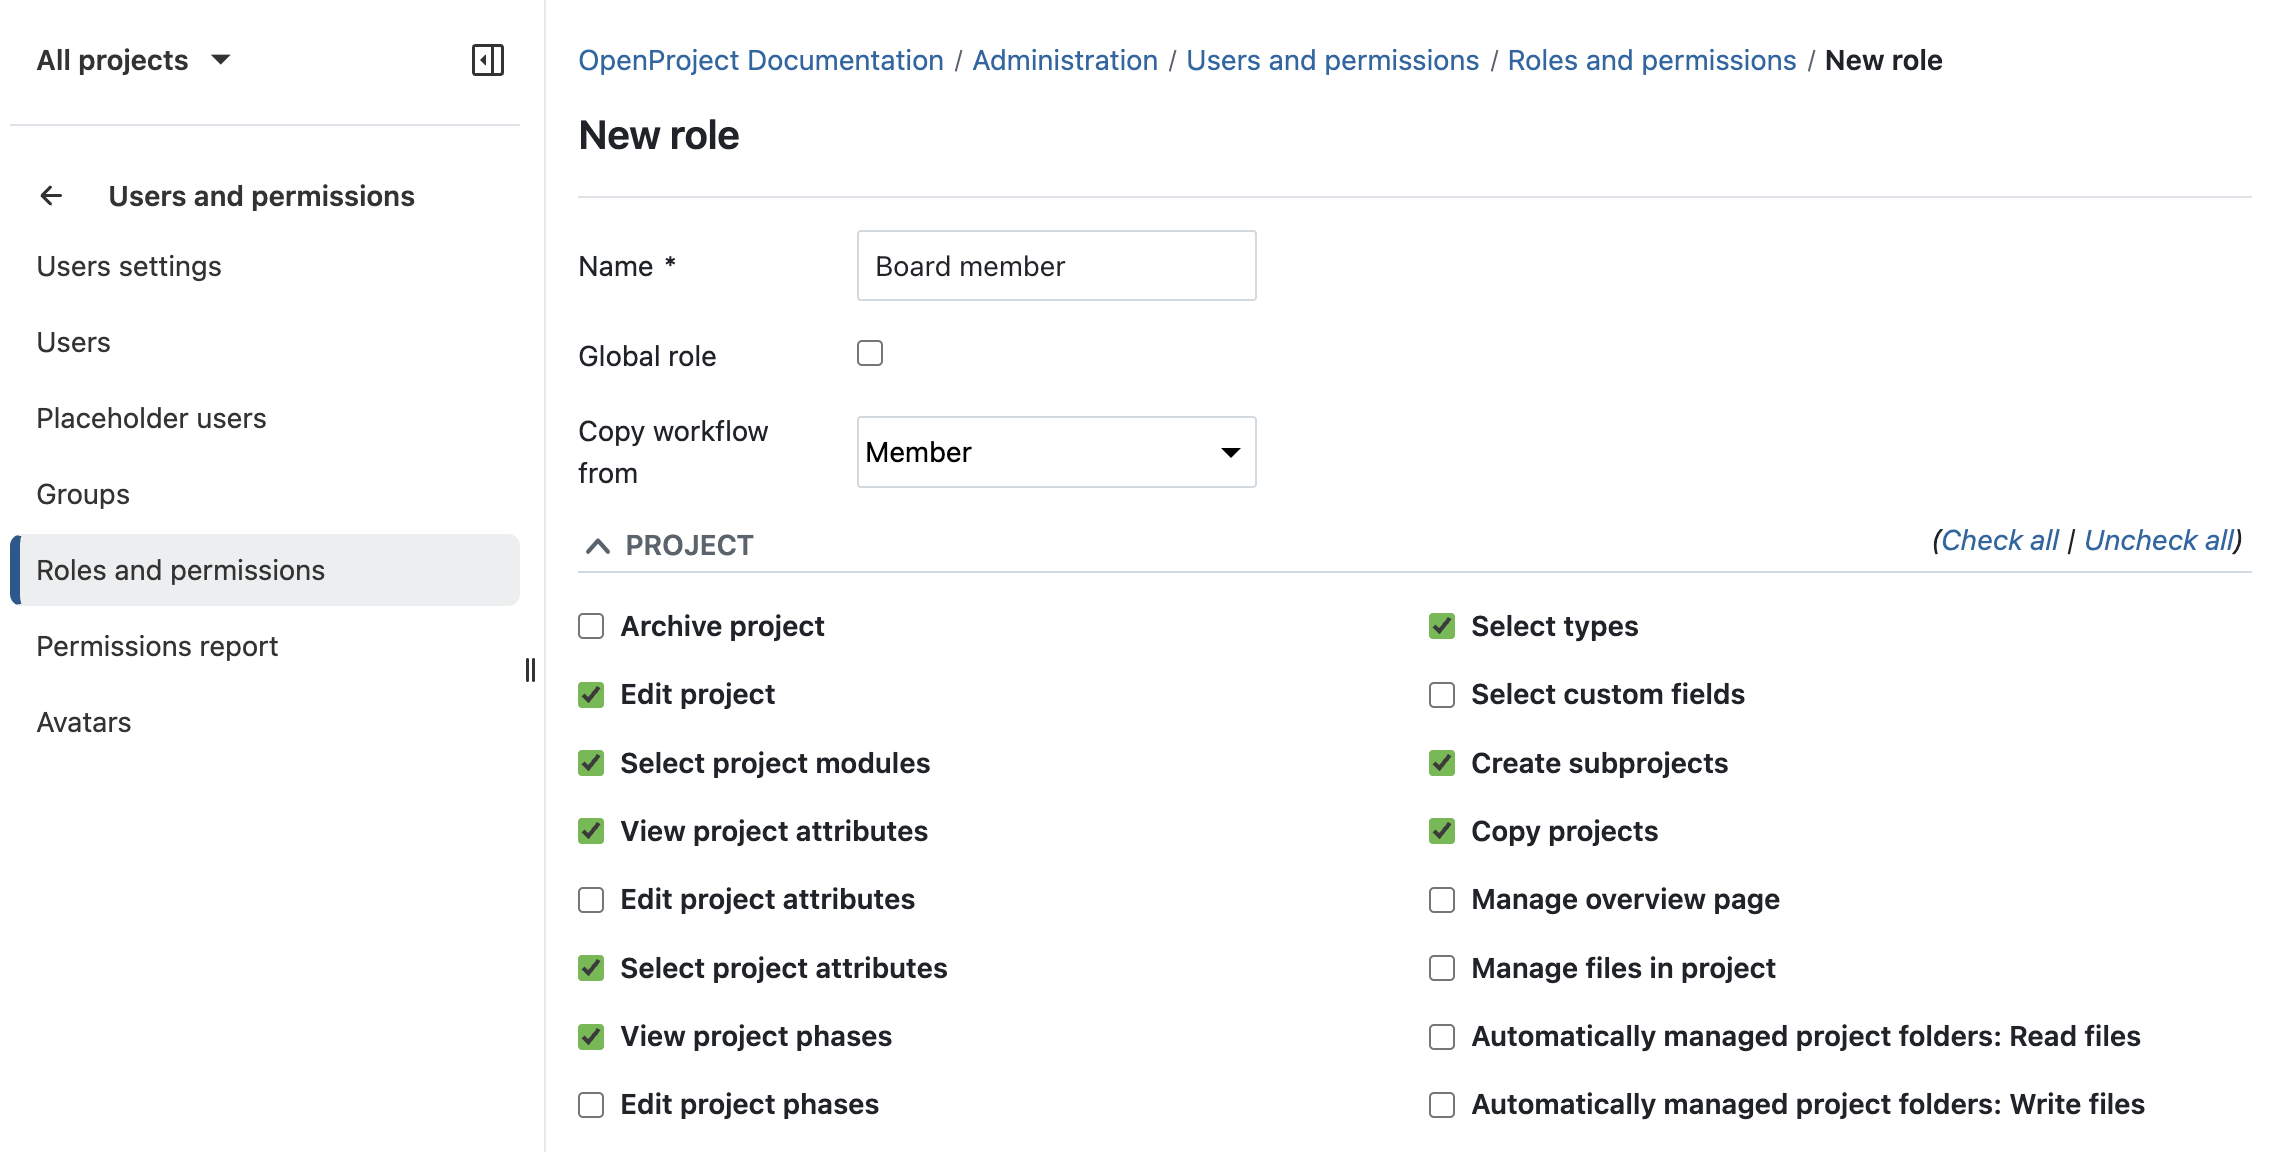
This lets you ensure that:
- Project managers can update plans and work packages.
- Board members can review progress and approve major stages.
- Team members see only what’s relevant to them.
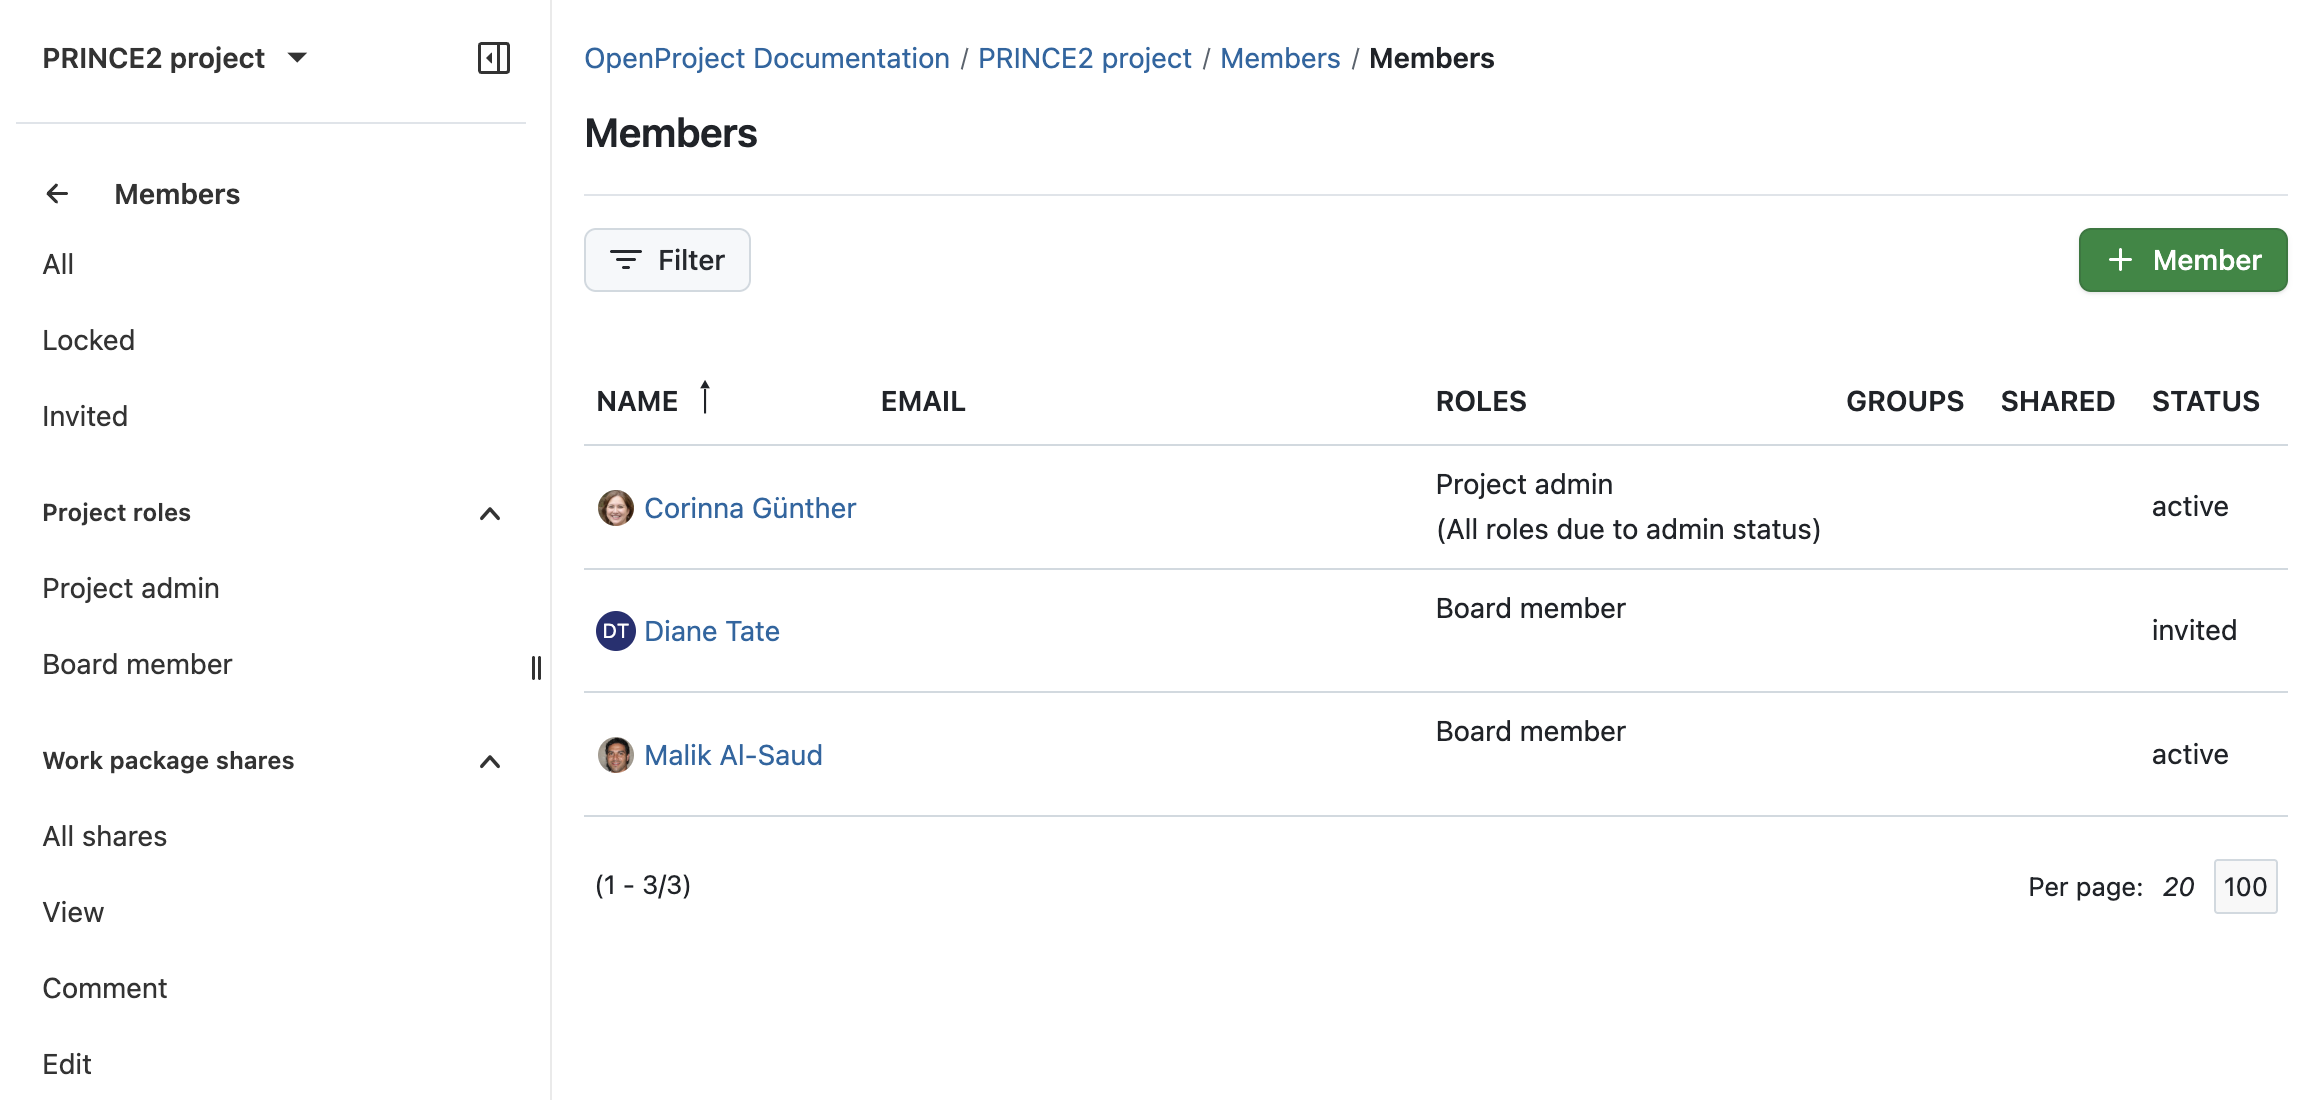
If these permissions are set in the system administration, you can go back to your project, navigate to Members in the left menu and assign key roles like Project Manager and Board Member.
Create decision checkpoints with Milestones and Gantt charts
Use Milestones to mark stage boundaries that require approval. In OpenProject, milestones are a type of work package that has a target date, but no duration like other type of work packages. To display milestones and their connected work packages, use OpenProject’s Gantt charts.
Go to Gantt charts in the left side menu, click on the green + Create button and select Milestone in the dropdown. You can also add watchers (e.g. the group ‘board members’) to be notified when a milestone is reached.
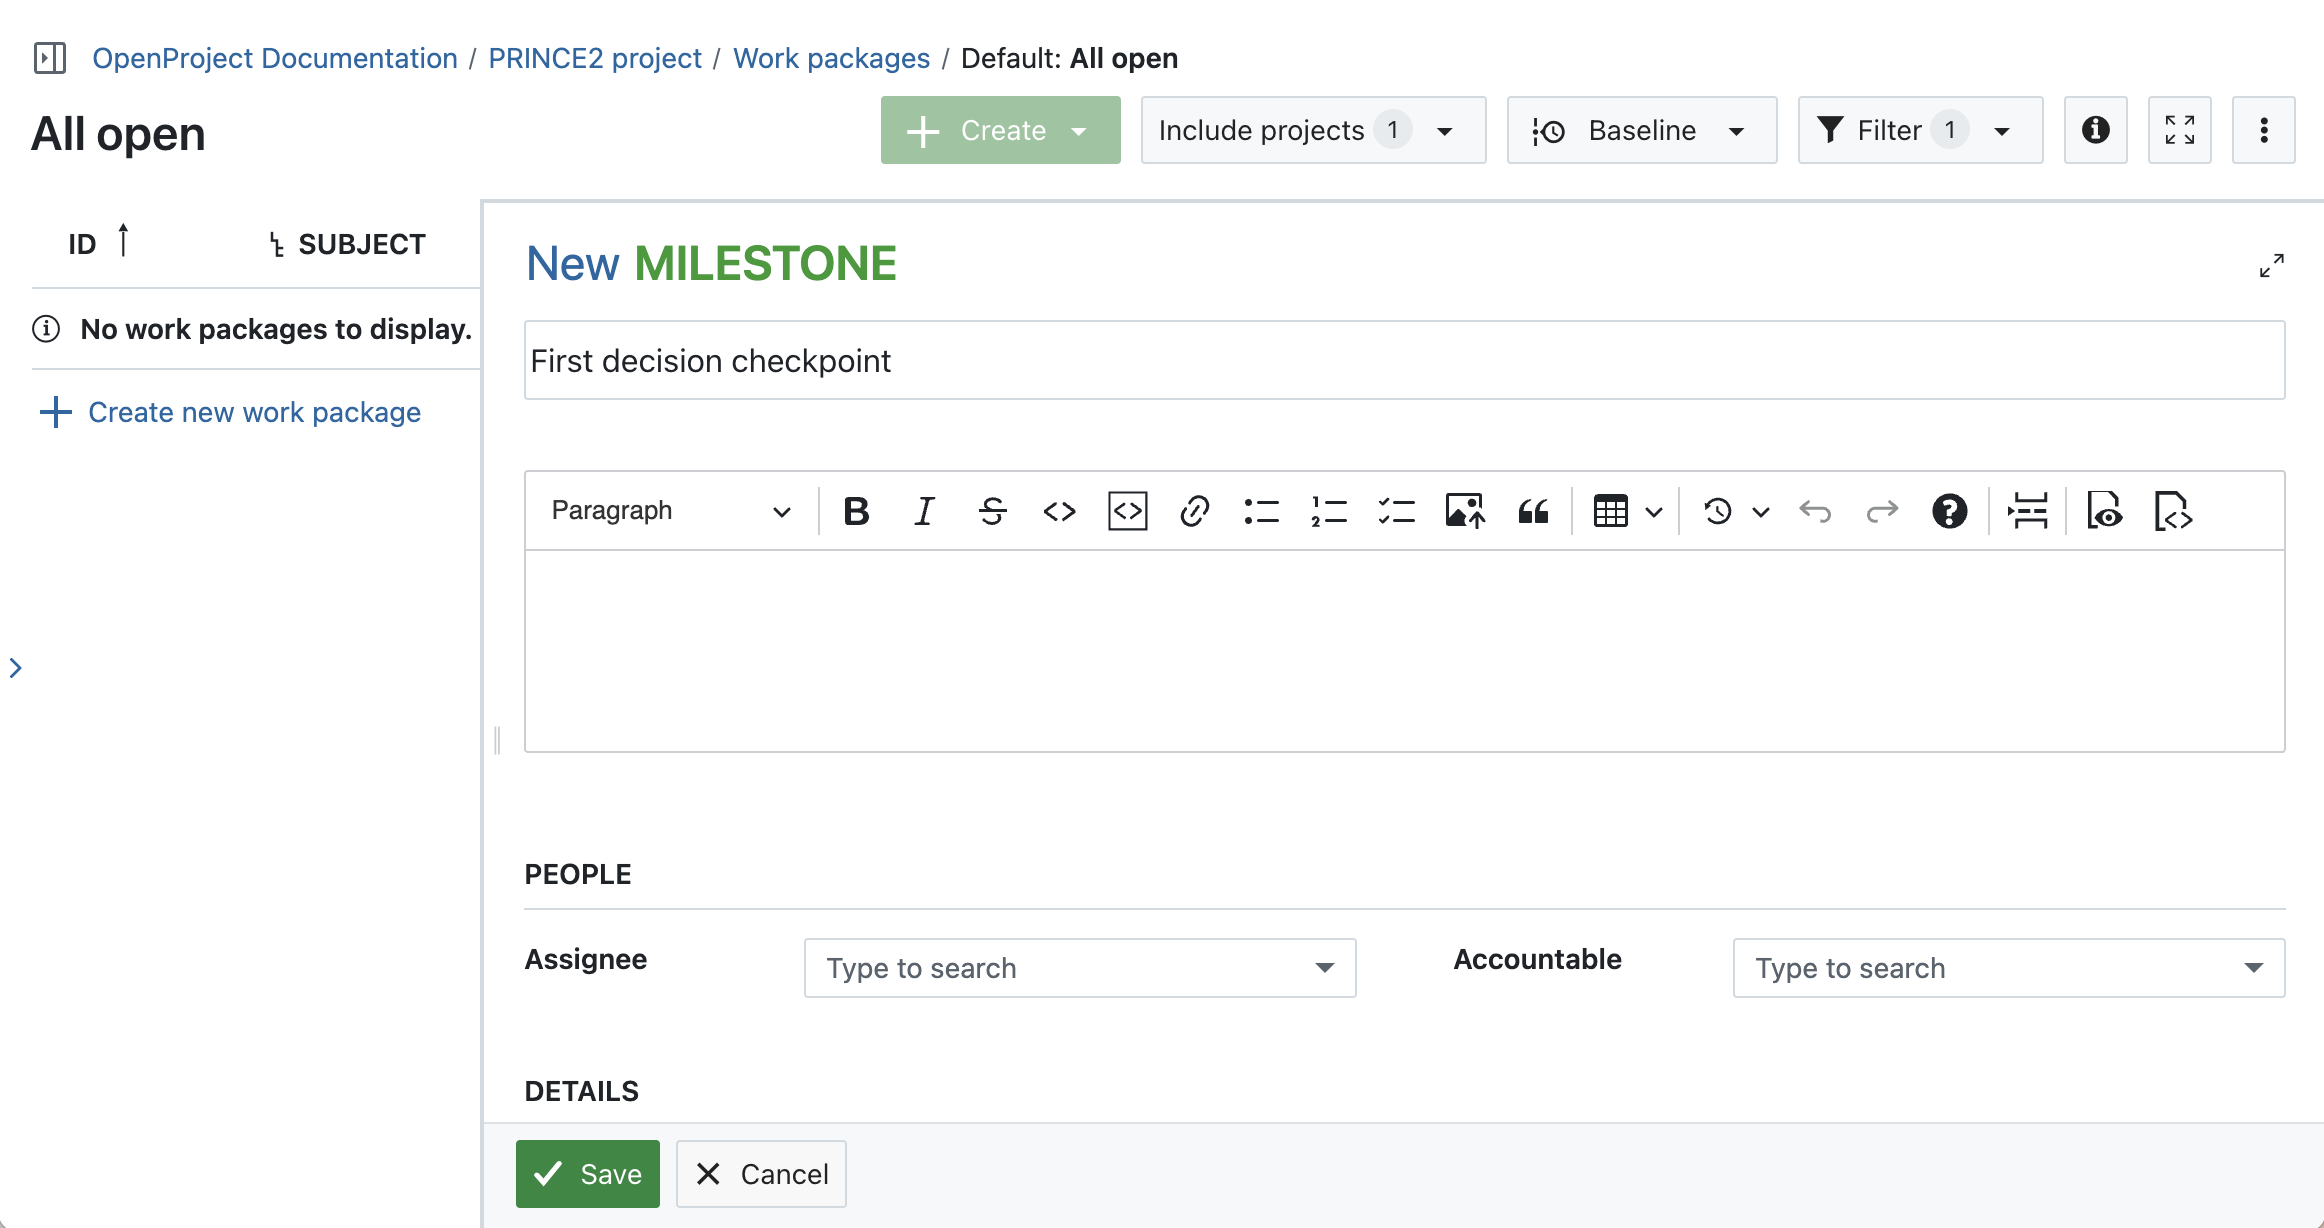
Create several decision checkpoints (Milestones) along with phases, tasks and other work package types you need and create relations and hierarchies.
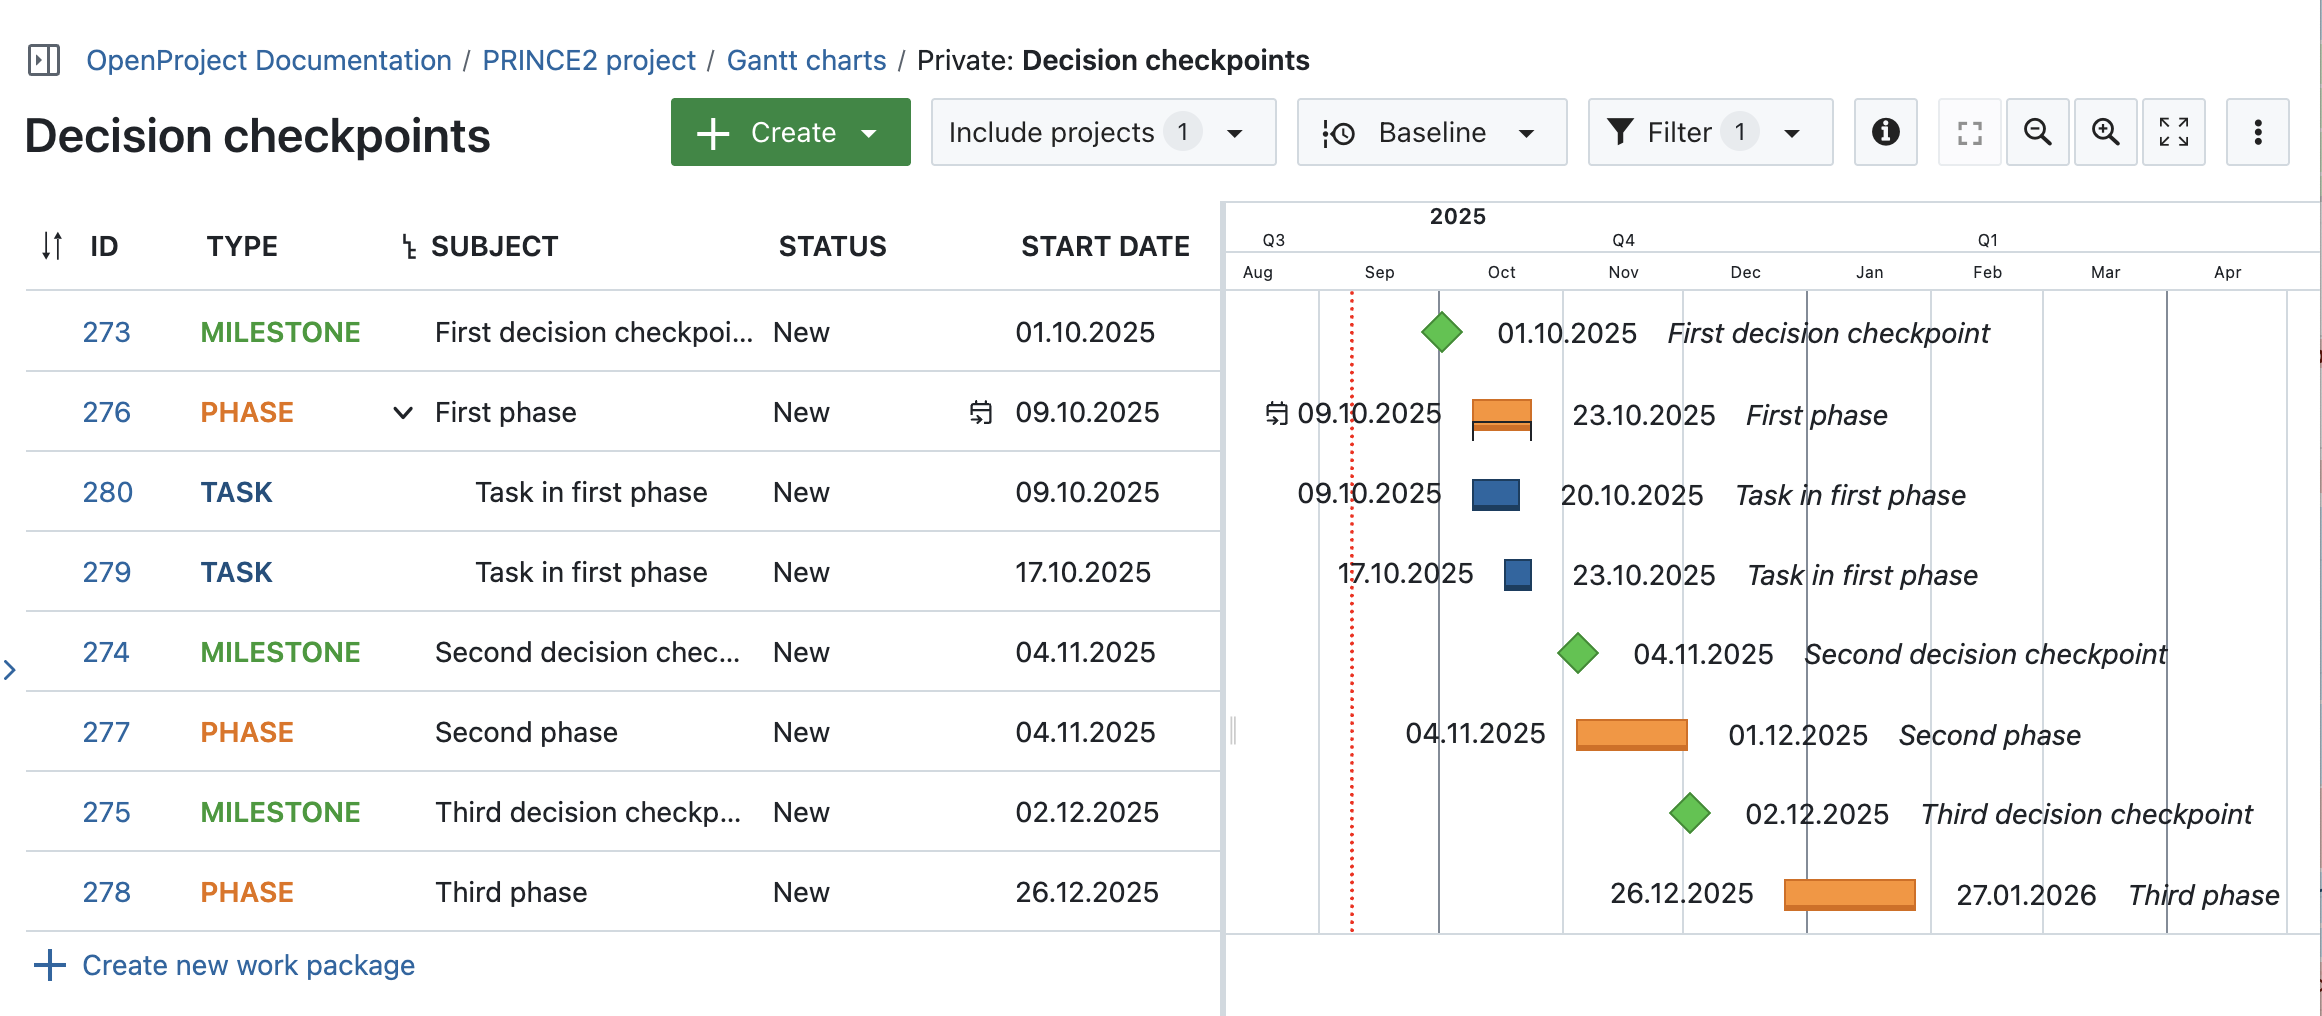
Track decisions and approvals
Use status fields to indicate when a stage or work package is waiting for board approval. For example, set the status to “Pending board decision” or use a custom field with dropdown options like “Pending”, “Approved”, or “Exception required”.
Board members can leave comments or change the status directly in the work package — no separate tool or email chain needed.
3. Initiating a project
Once the project board has authorized the start, PRINCE2 focuses on planning how the project will be executed, controlled, and completed. In OpenProject, this is where you lay the groundwork: define performance targets, plan project phases, and estimate resources.
Define performance targets
Use a Wiki page to summarize the project’s key targets — such as time, cost, scope, risk, quality, and benefits. This creates a shared understanding for everyone involved.
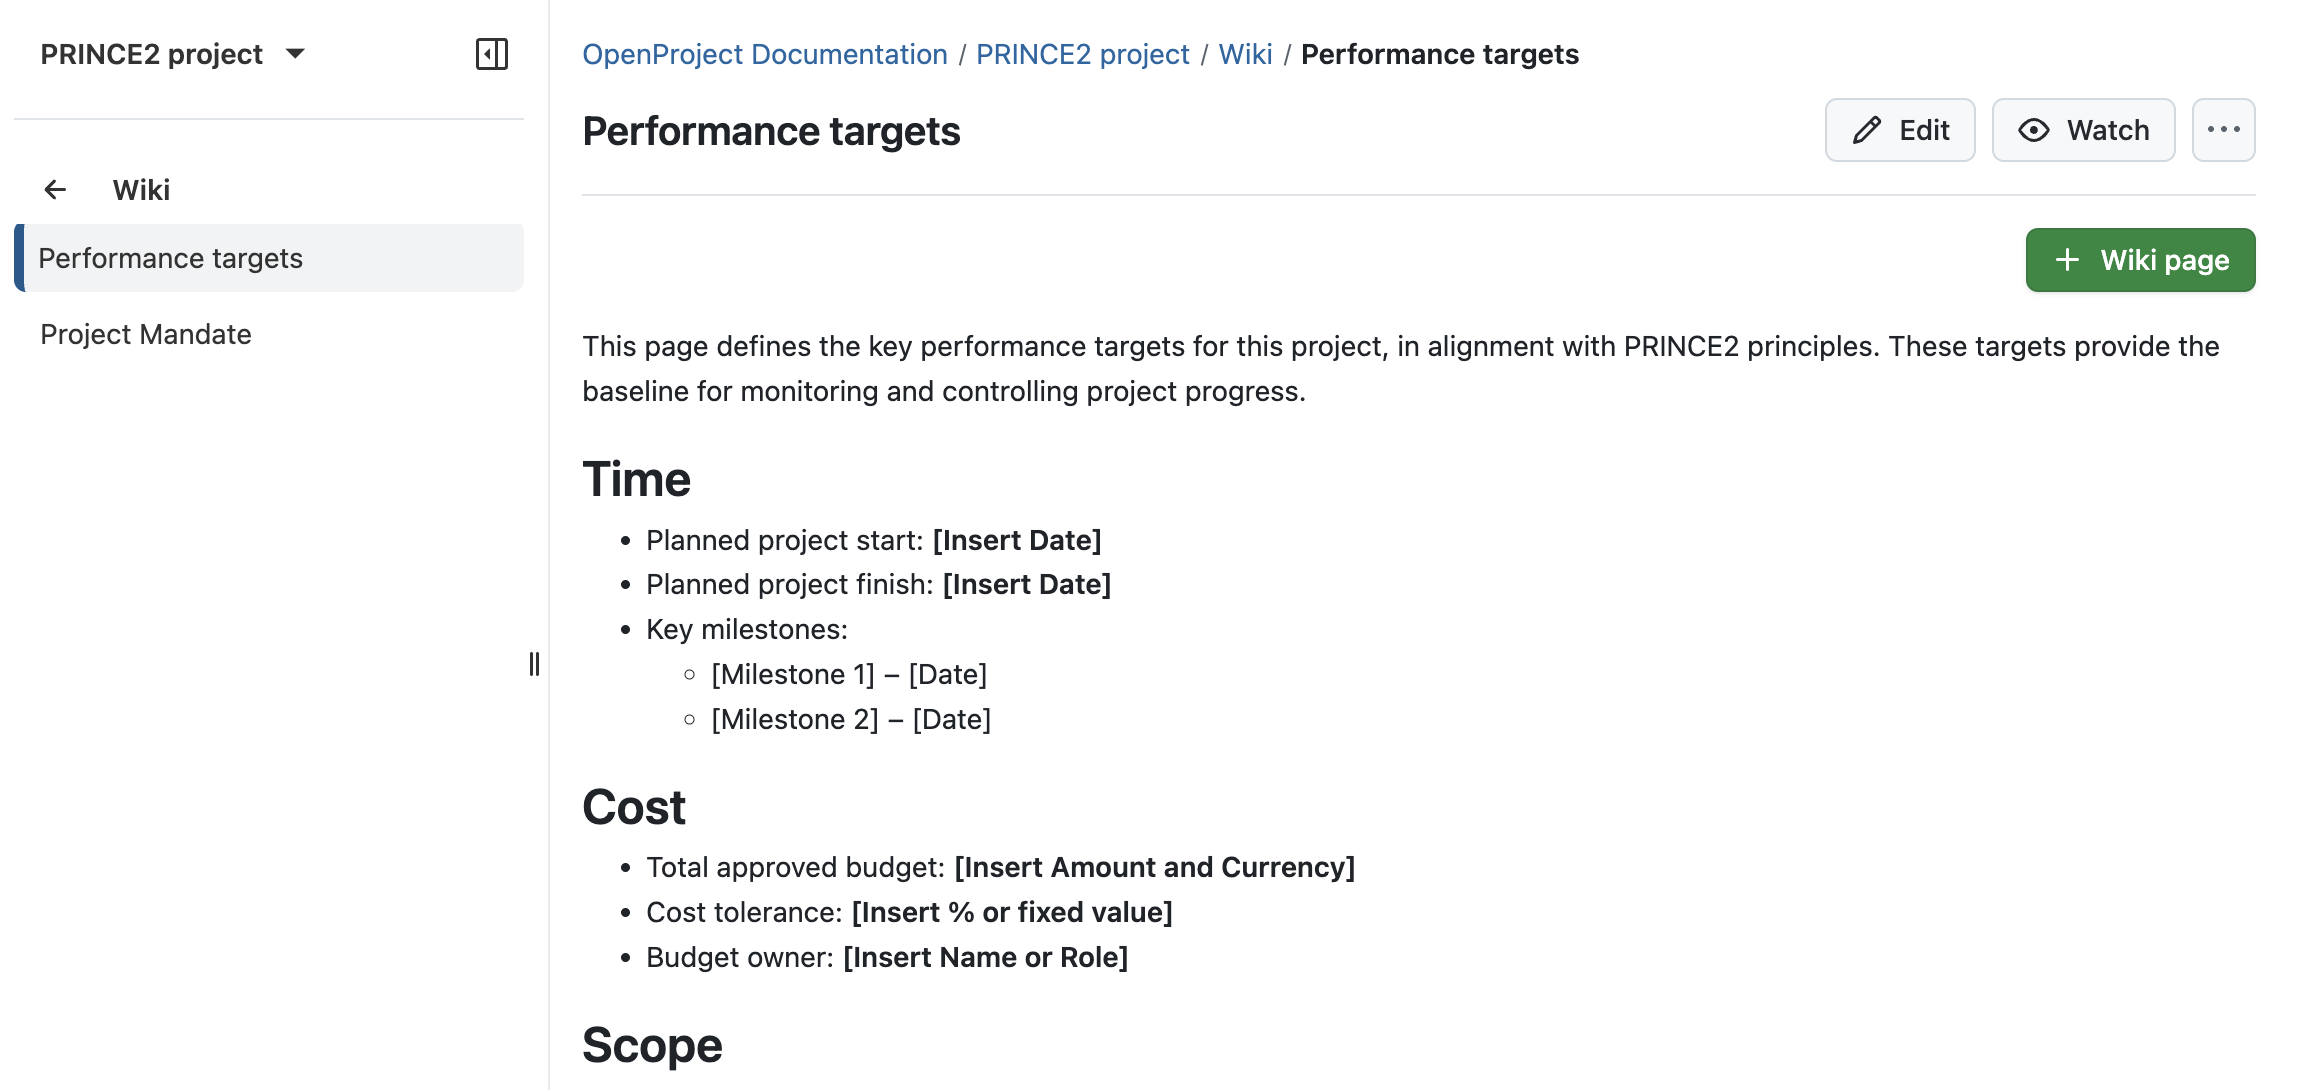
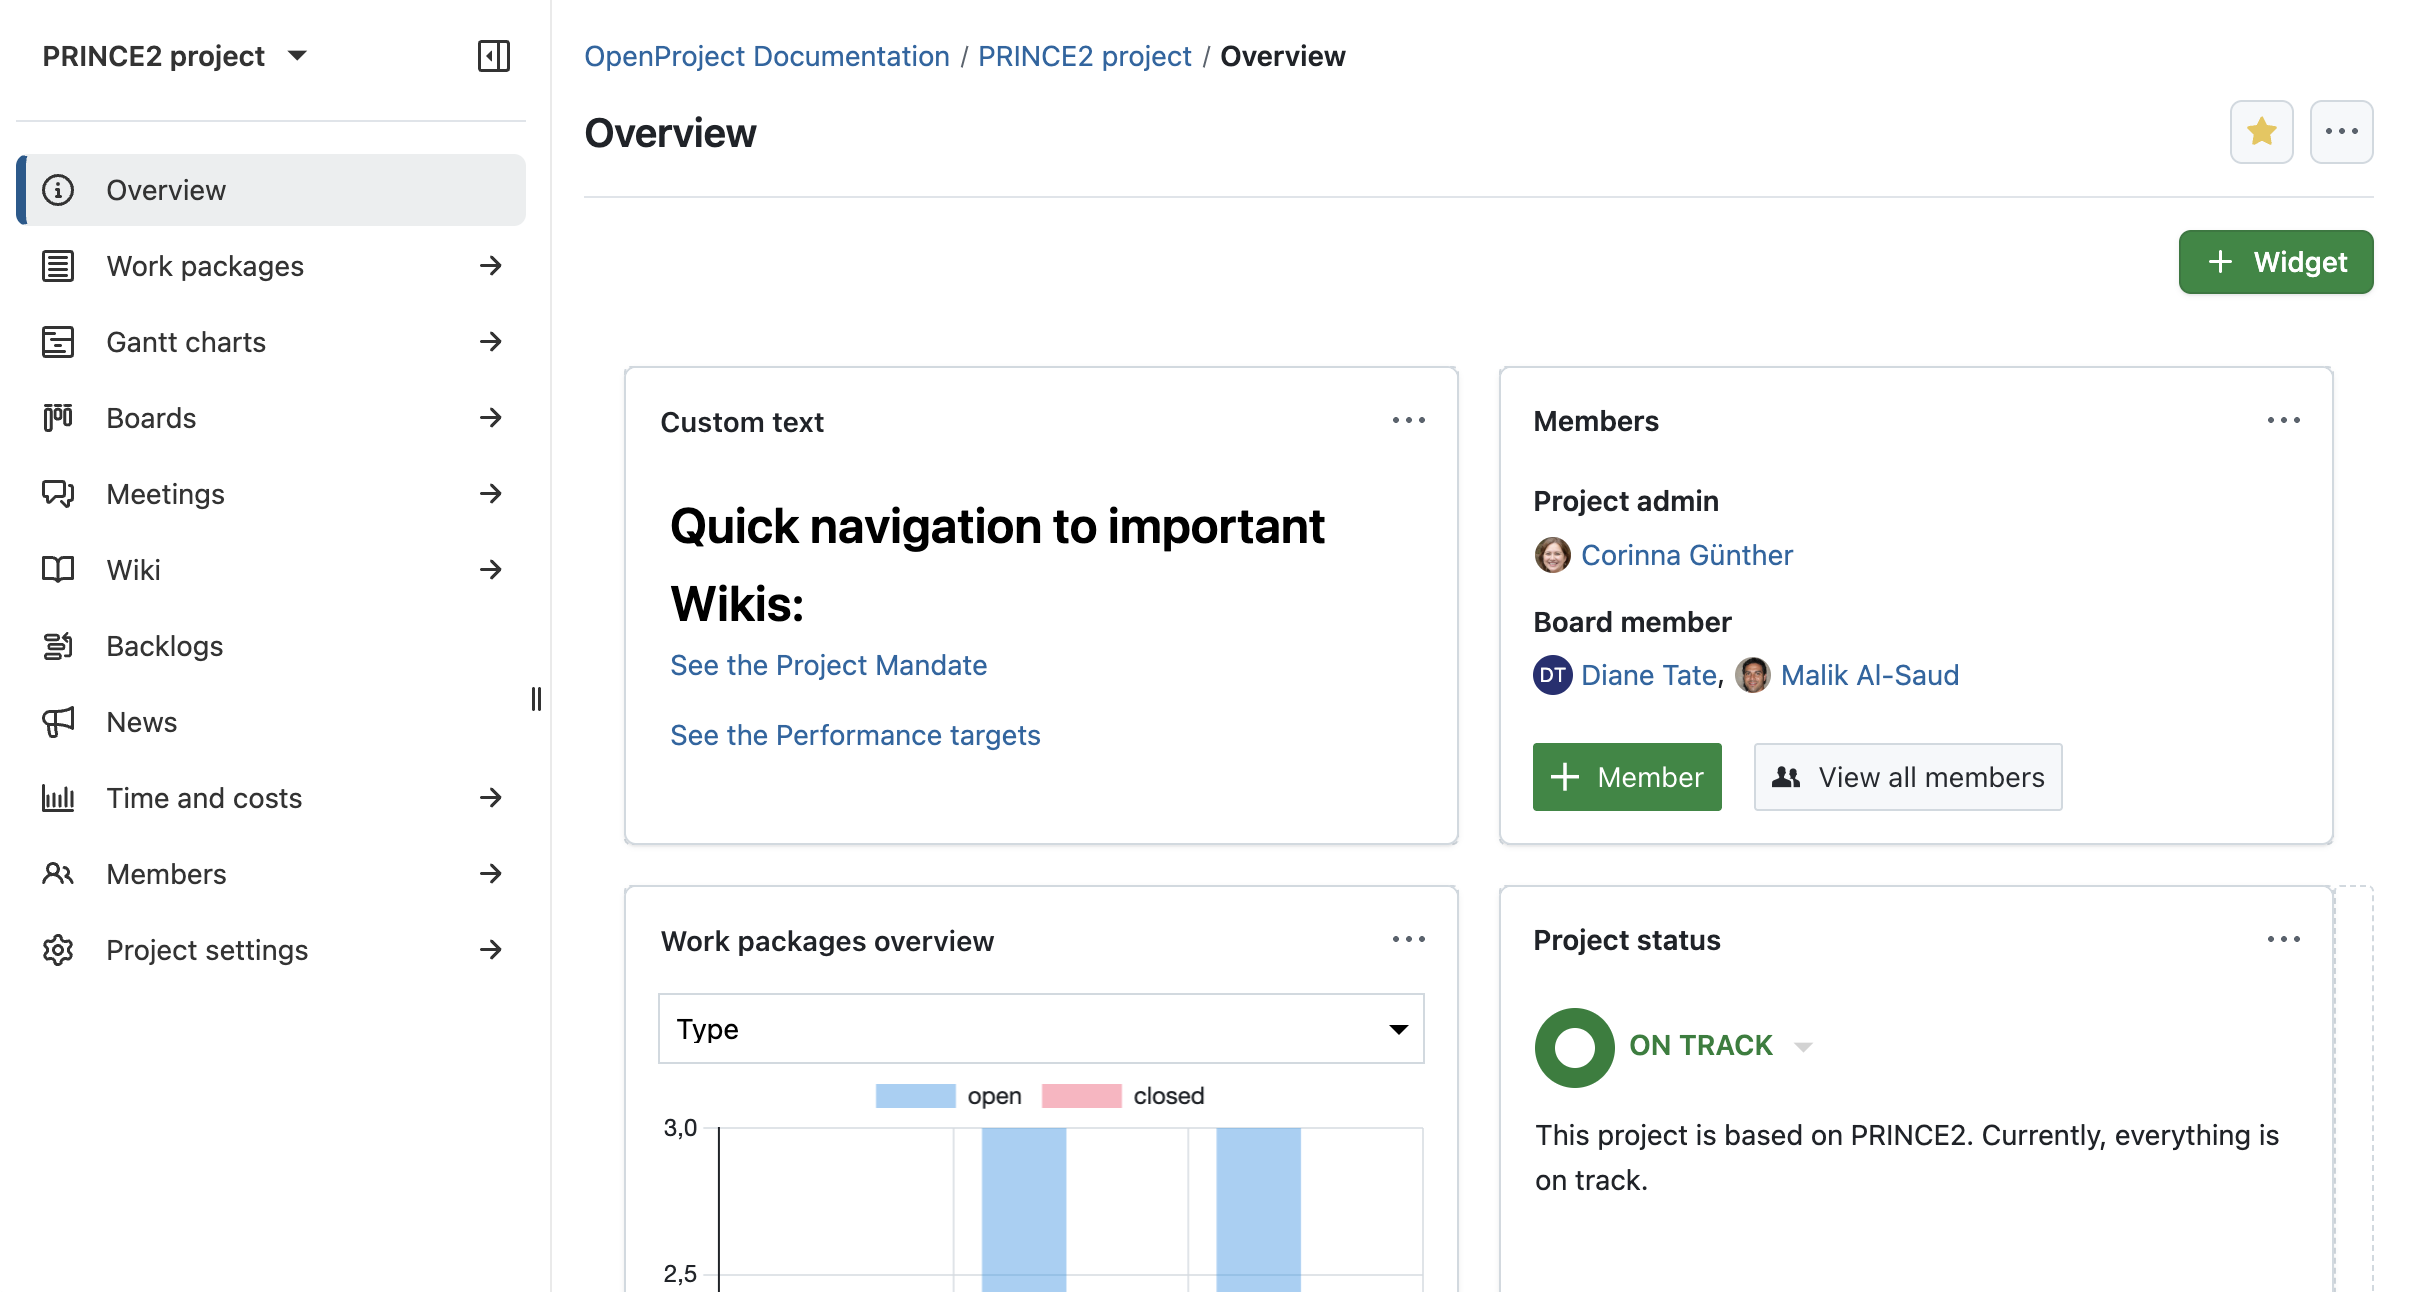
You can include the wiki as a custom text widget on the project overview page to make it visible at a glance. To do this, open the Overview, and click on + Widget, then select Custom text. On this page, you can also display other key performance targets to see all important information when accessing your project.
Set up budgets and assign them
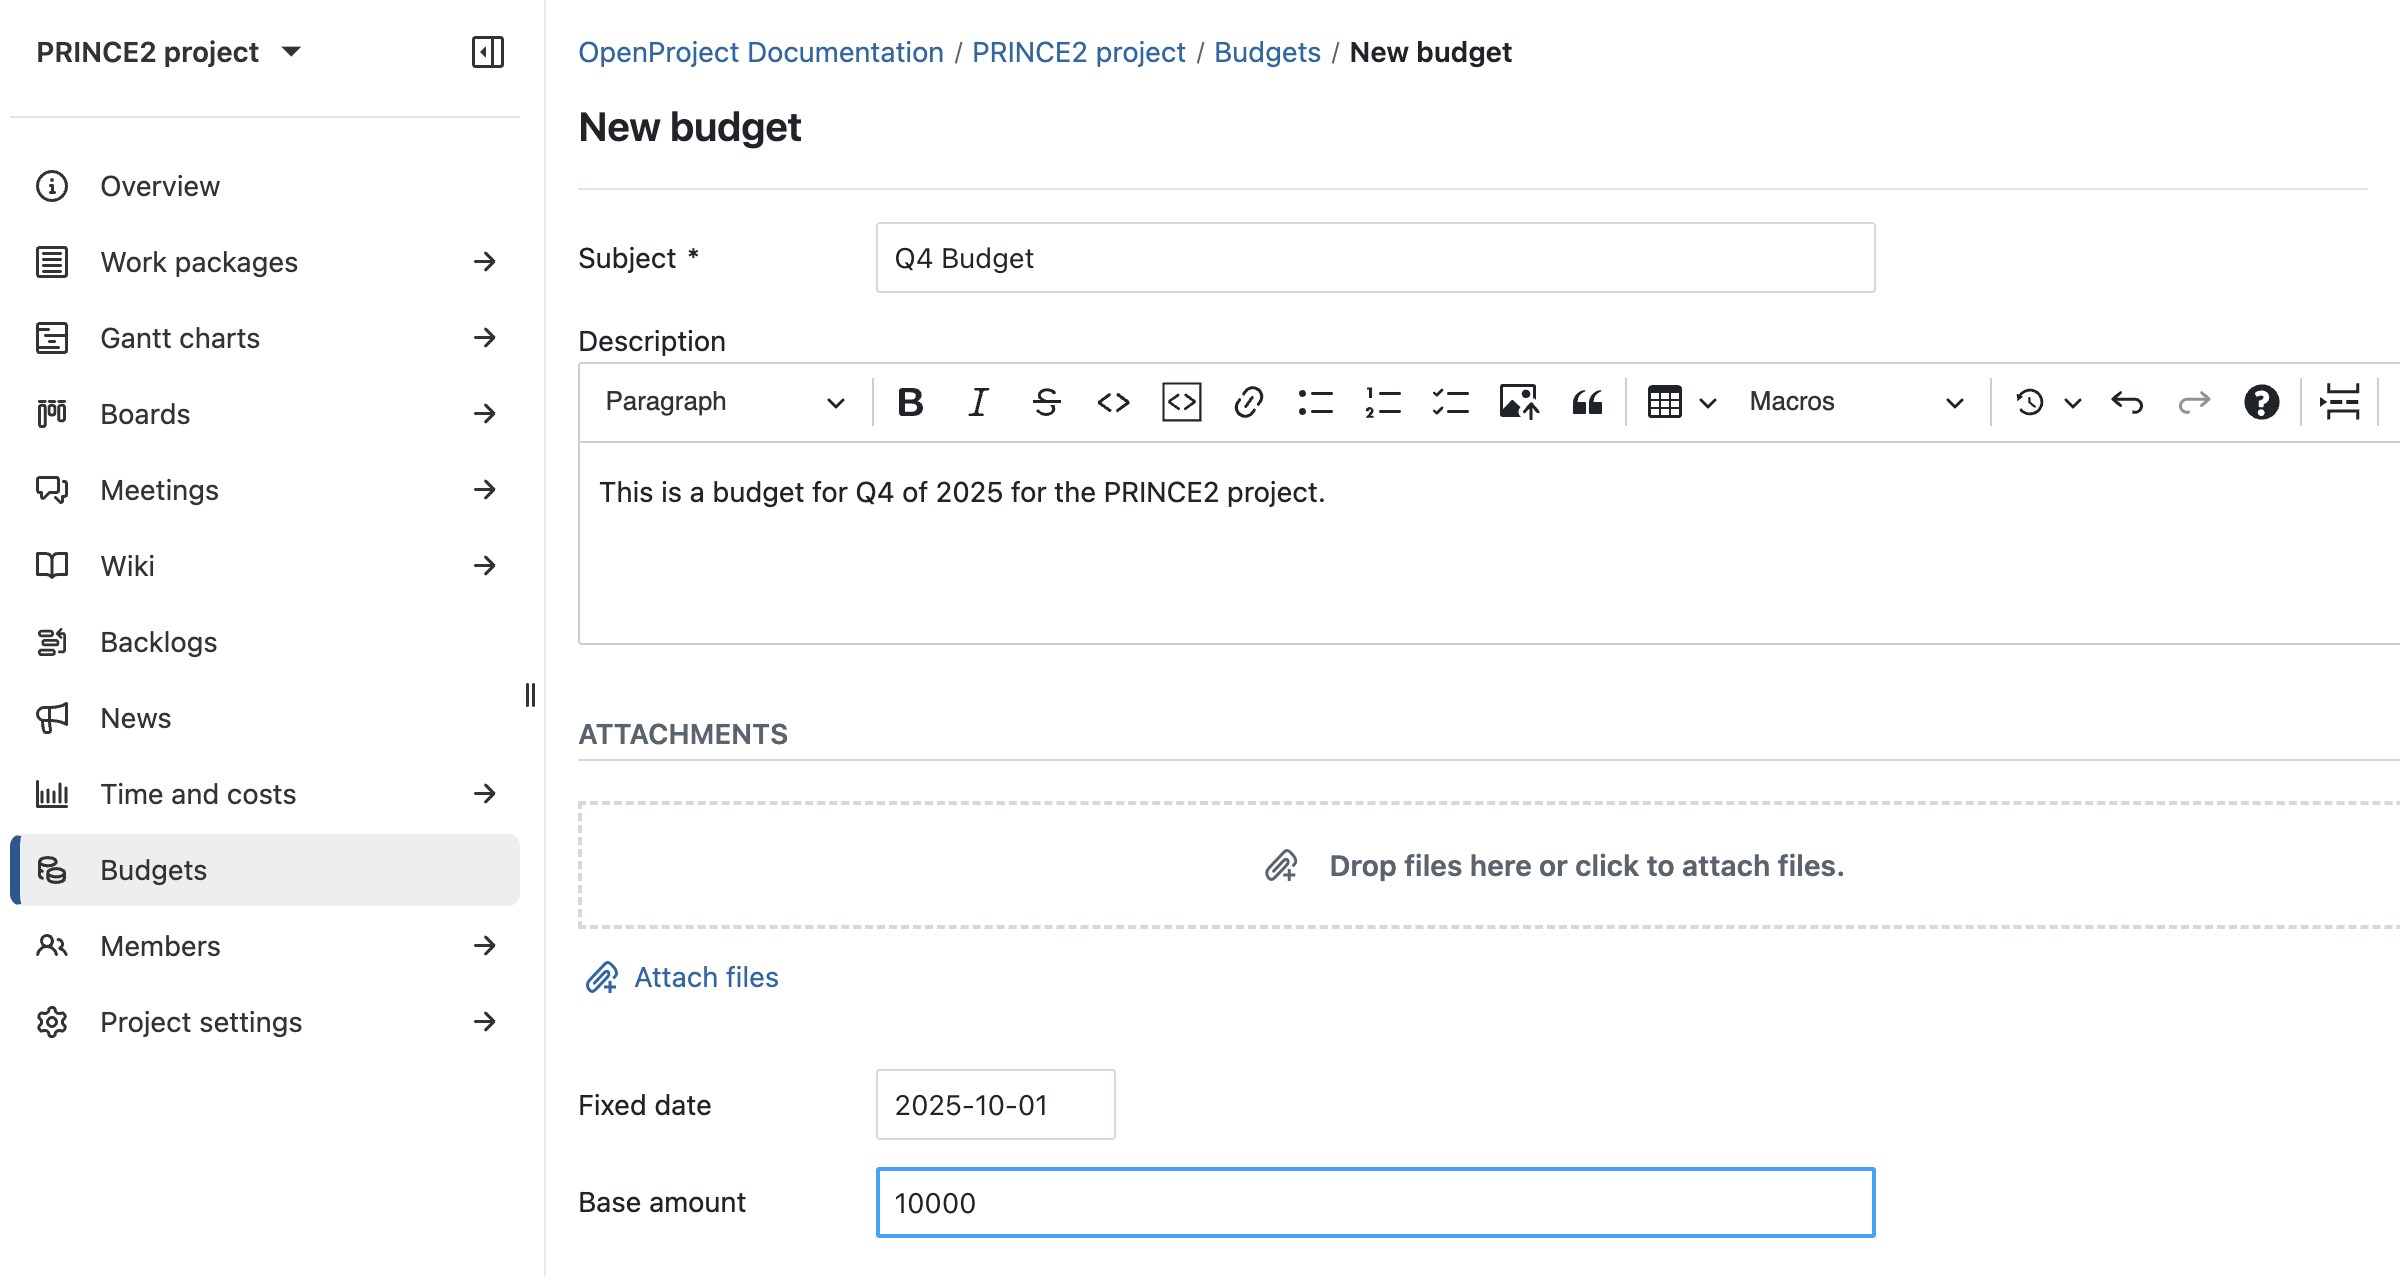
Go to the Budgets module to create a new budget. Enter a name and define cost units, such as hourly labor rates or material costs. You can also set a base amount. This will help you track whether the PRINCE2 project remains within its financial boundaries throughout.
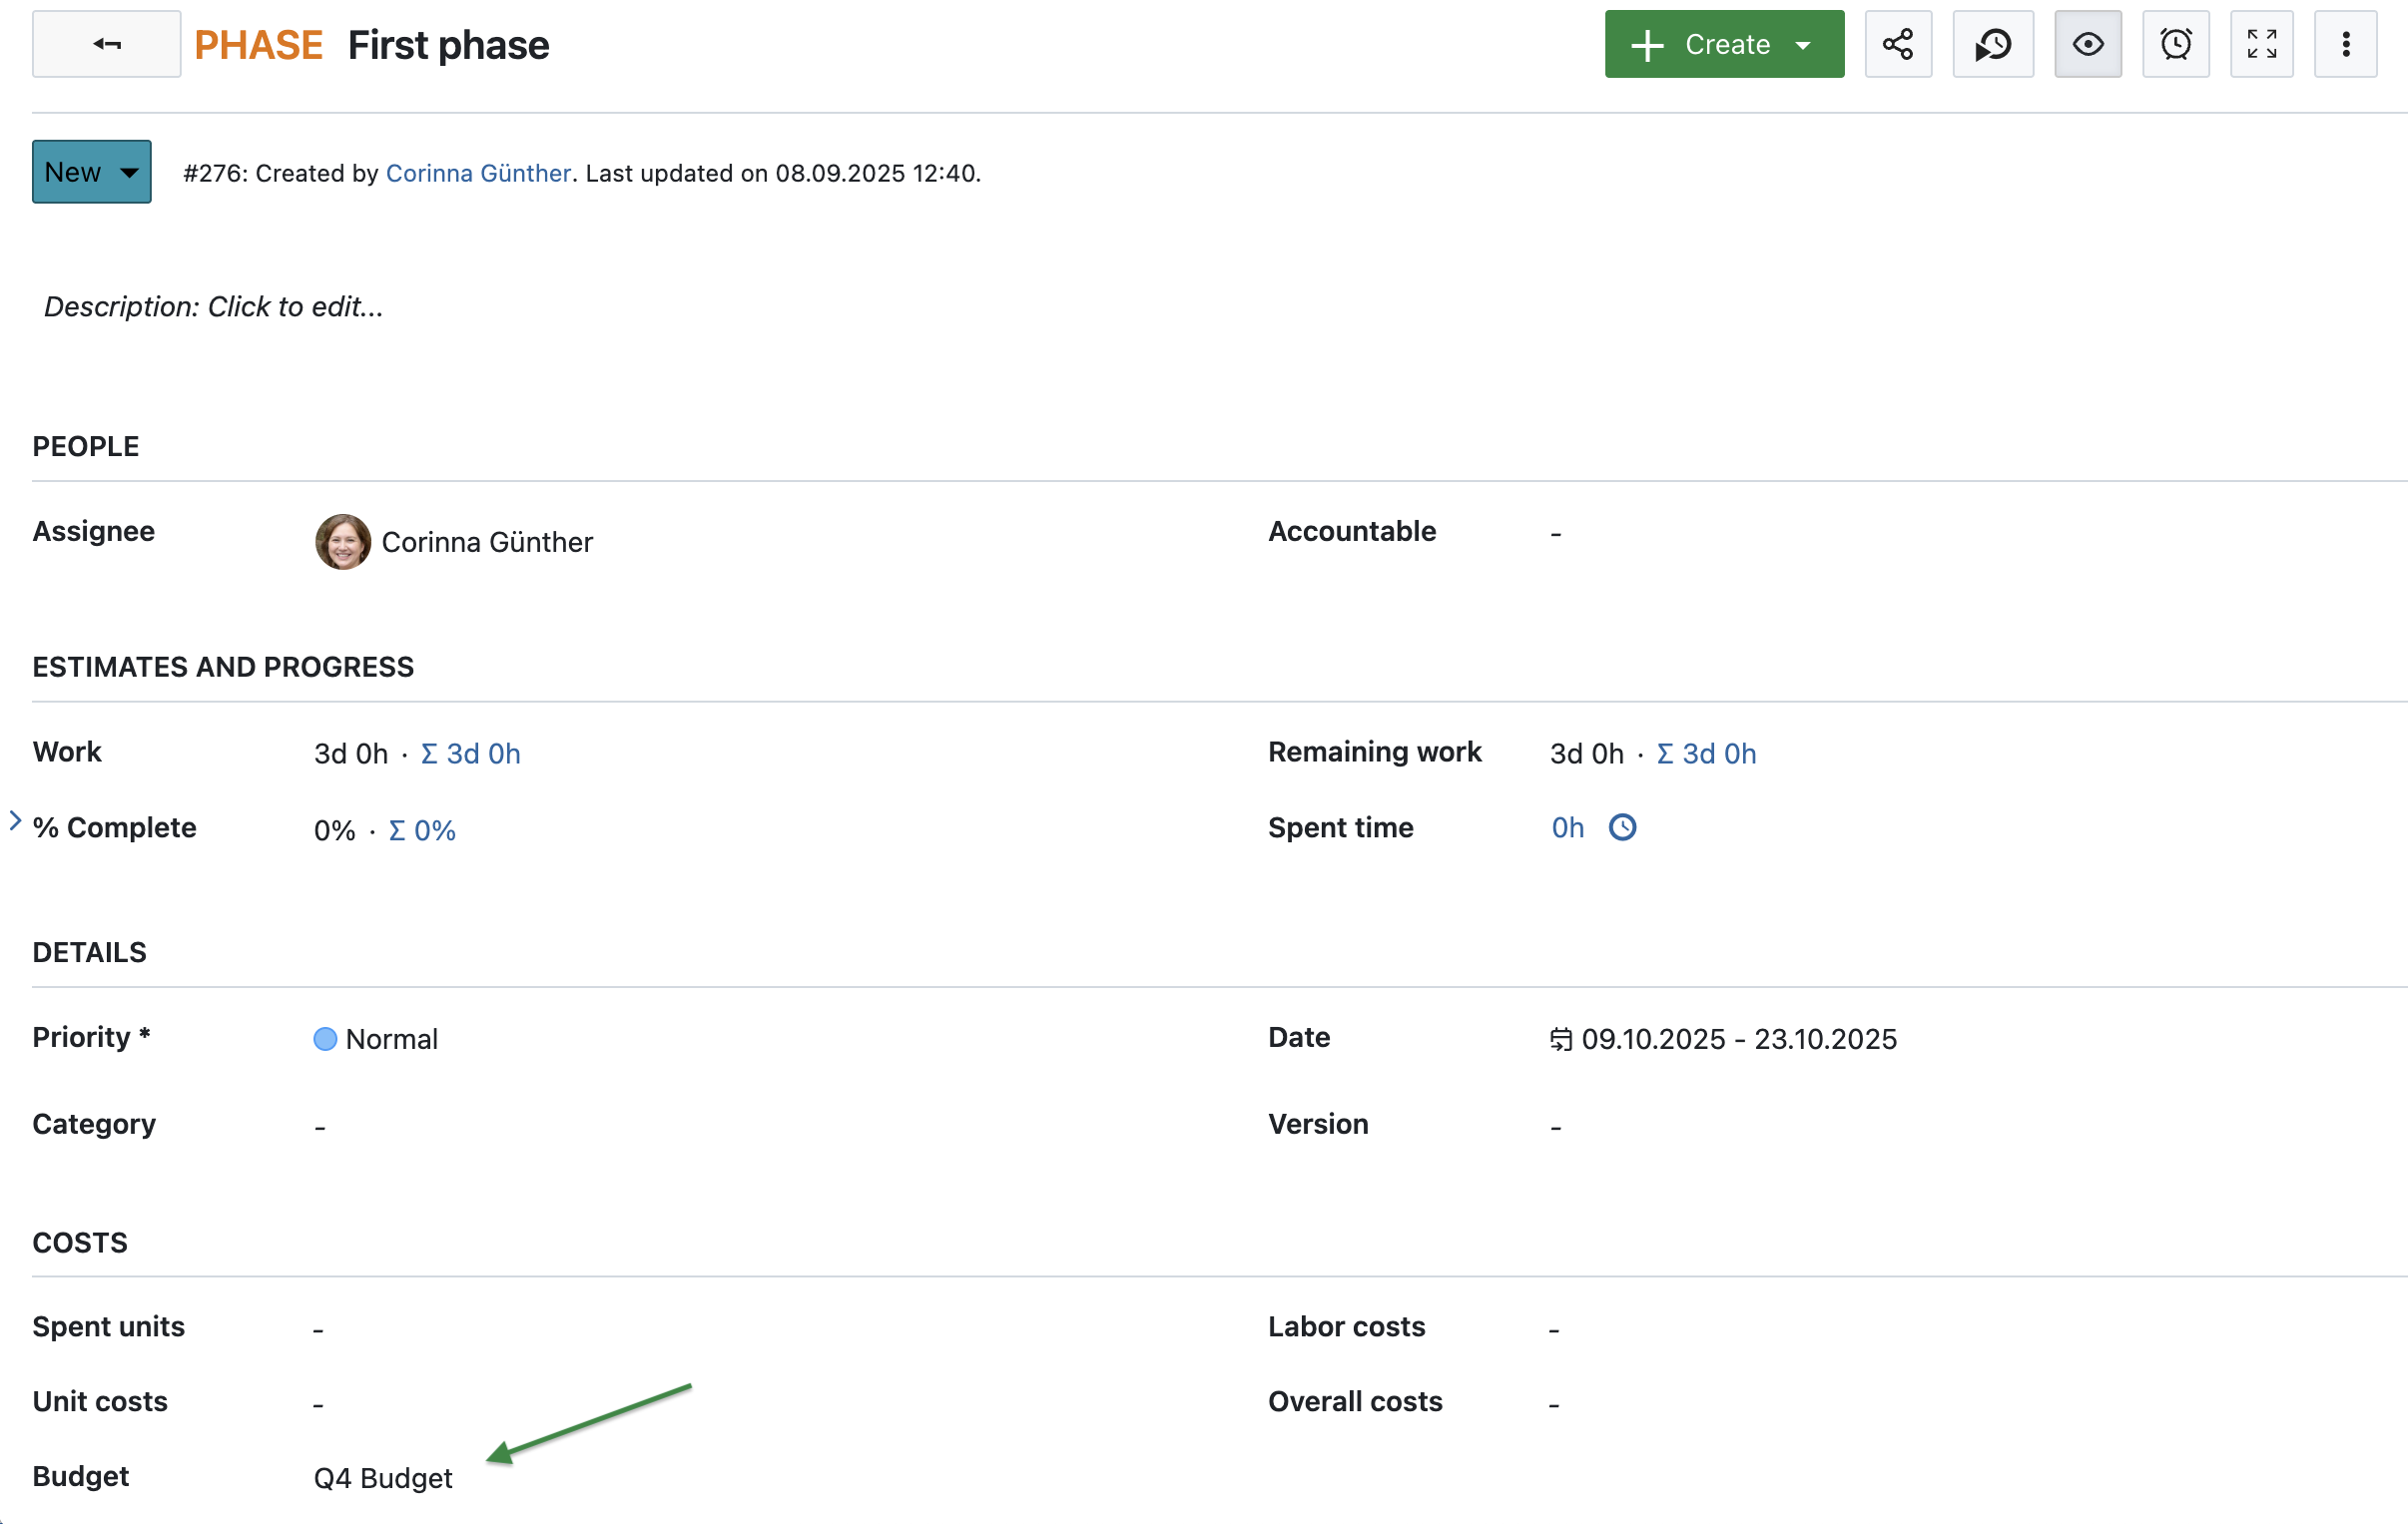
If you’ve created phases or milestones in the directing phase, you can now assign budgets to them. Click the info icon to open the Details view, then assign them to your budget under the Costs section. This ensures financial alignment across stages.
Read more about managing budgets in OpenProject.
4. Controlling a stage
In PRINCE2, the project manager is responsible for monitoring progress within each stage and ensuring that work packages are delivered according to the plan. In OpenProject, you can break phases into smaller work packages, assign responsibilities, and track progress using the work package table.
Break down the work and create relations
After setting up the initial phases and milestones, continue by breaking the phases down into work packages. To do this, click on the three little dots next to a phase and select Create new child. Select type Task or Work package if you created a separate type for this. See the OpenProject user guide on how to create a new type.
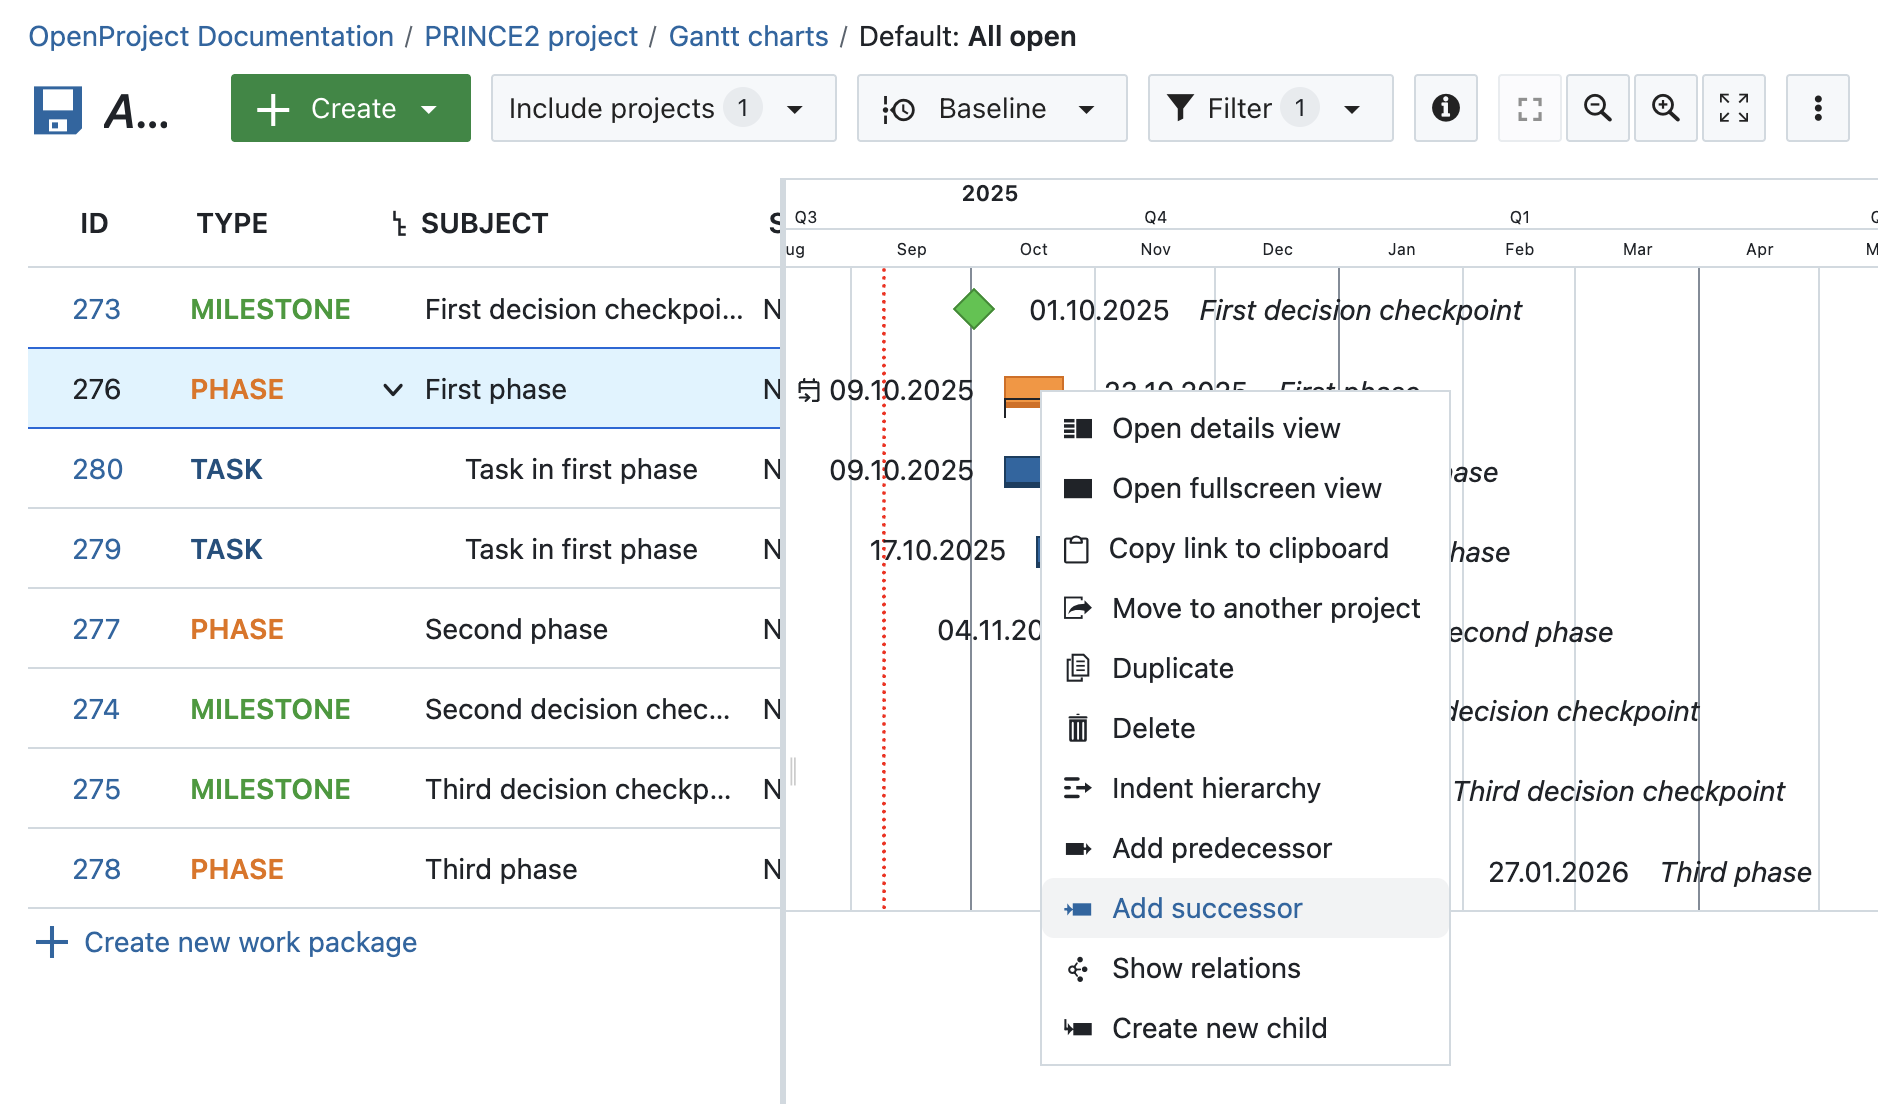
To show dependencies between work packages and create logical links, users can create different types of relations between work packages, e.g. predecessor, successor, child, blocks, part of … or relations without logical effects on the related work package.
Estimate work
During the Controlling a stage process in PRINCE2, it’s crucial to track ongoing work and respond proactively to any risks of deviation. In OpenProject, the Estimates and progress section in each work package provides a clear overview of effort and status.
This section includes:
- Work
- Spent time
- Remaining work
- % Complete
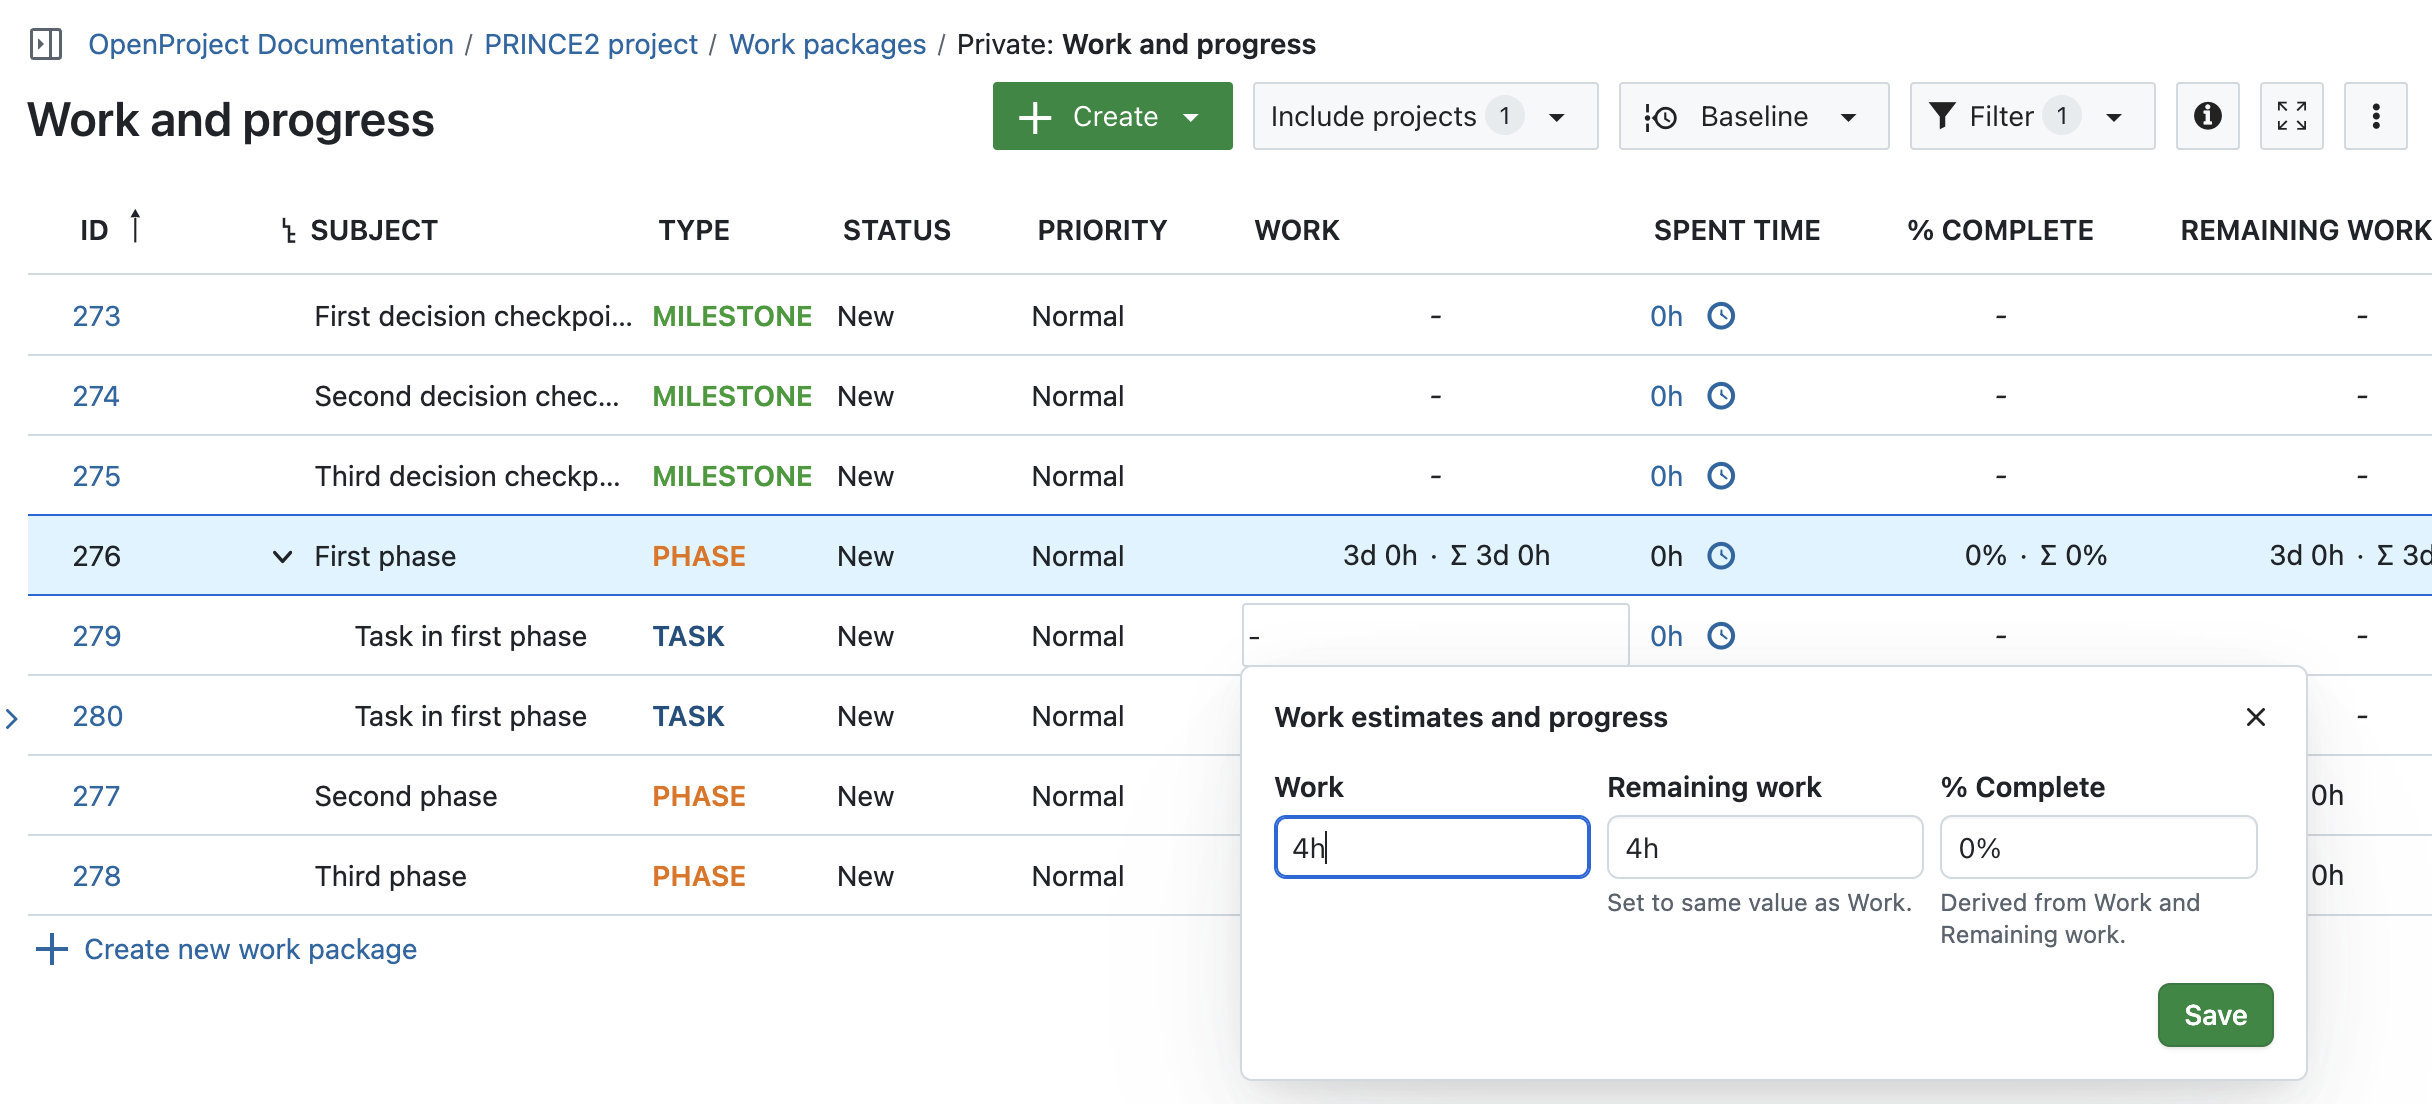
To add work, you can either open a work package and add the information there. Or, if you want to edit several work packages right after each other, create a work package table that shows columns for progress. Add the column Estimated time to provide an effort estimate in hours.
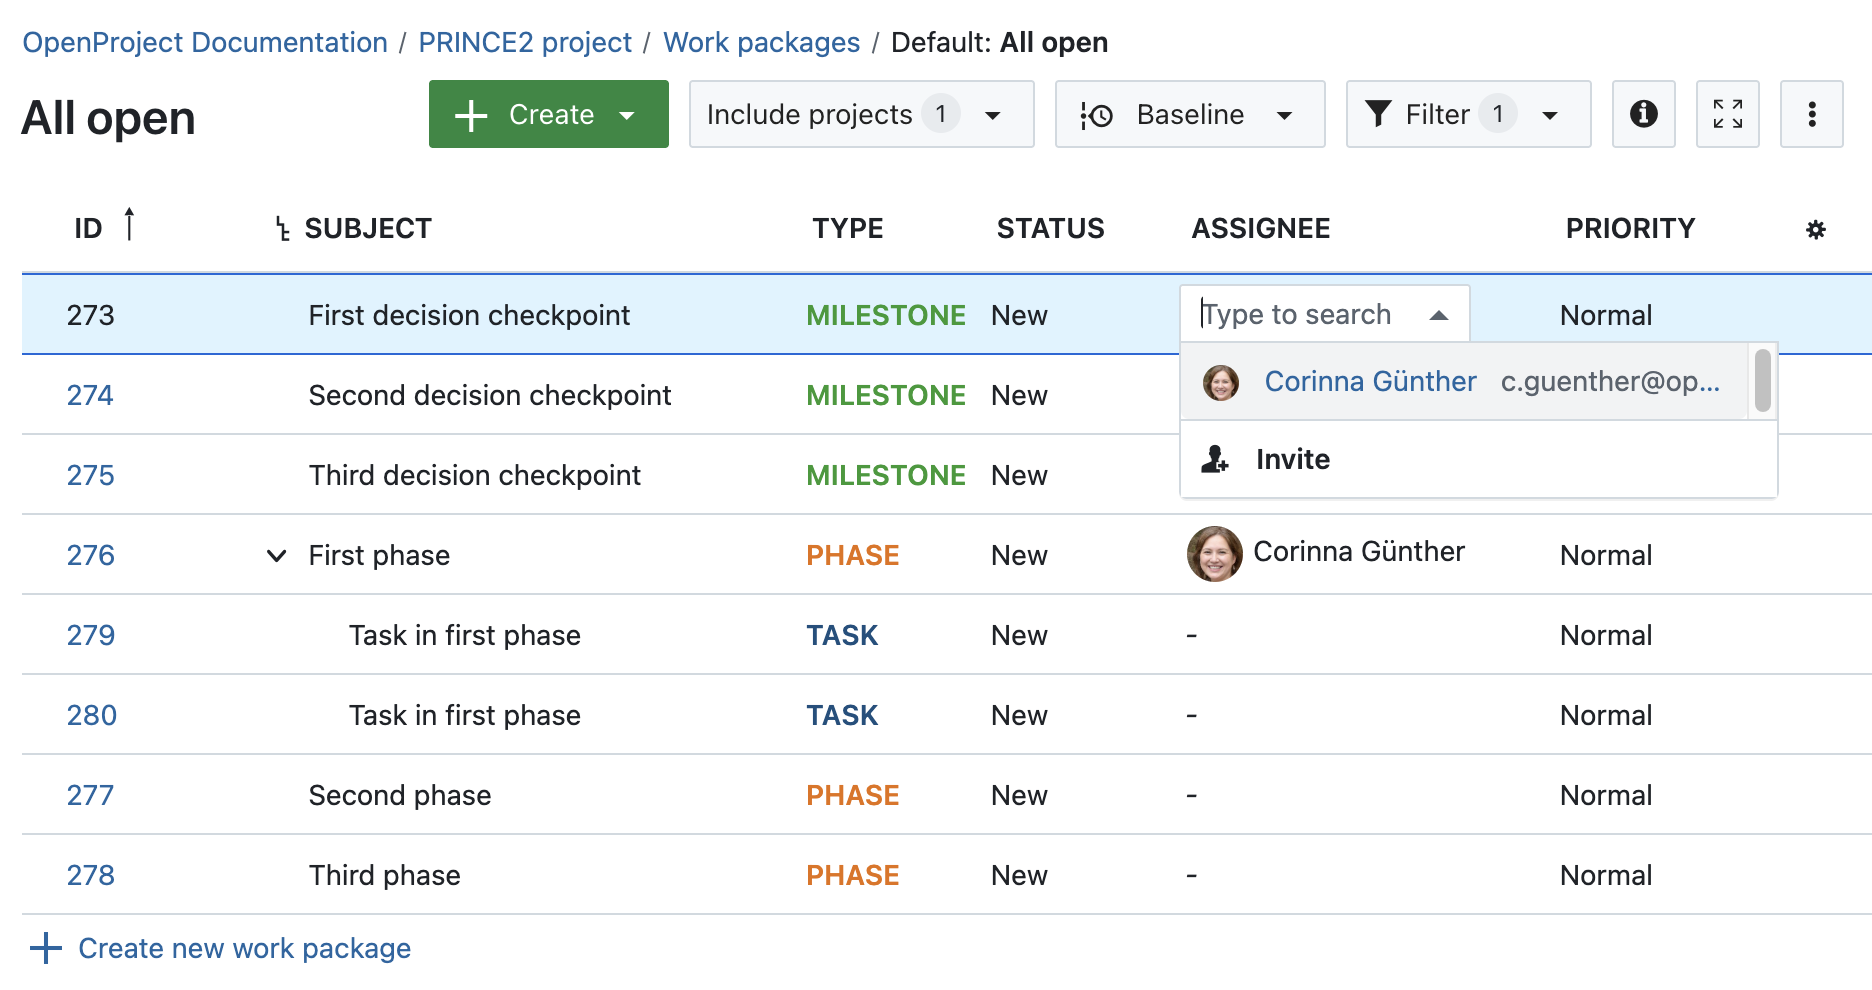
Assign work
Afterward, continue by assigning the work packages to the project members by clicking on the cells in the Assignee column.
5. Managing product delivery
According to PRINCE2, this process focuses on the scheduled execution of work and the delivery of high-quality outcomes. OpenProject supports this through structured collaboration, time tracking, and transparent communication — all directly linked to each work package.
Zeit auf Arbeitspaketen erfassen
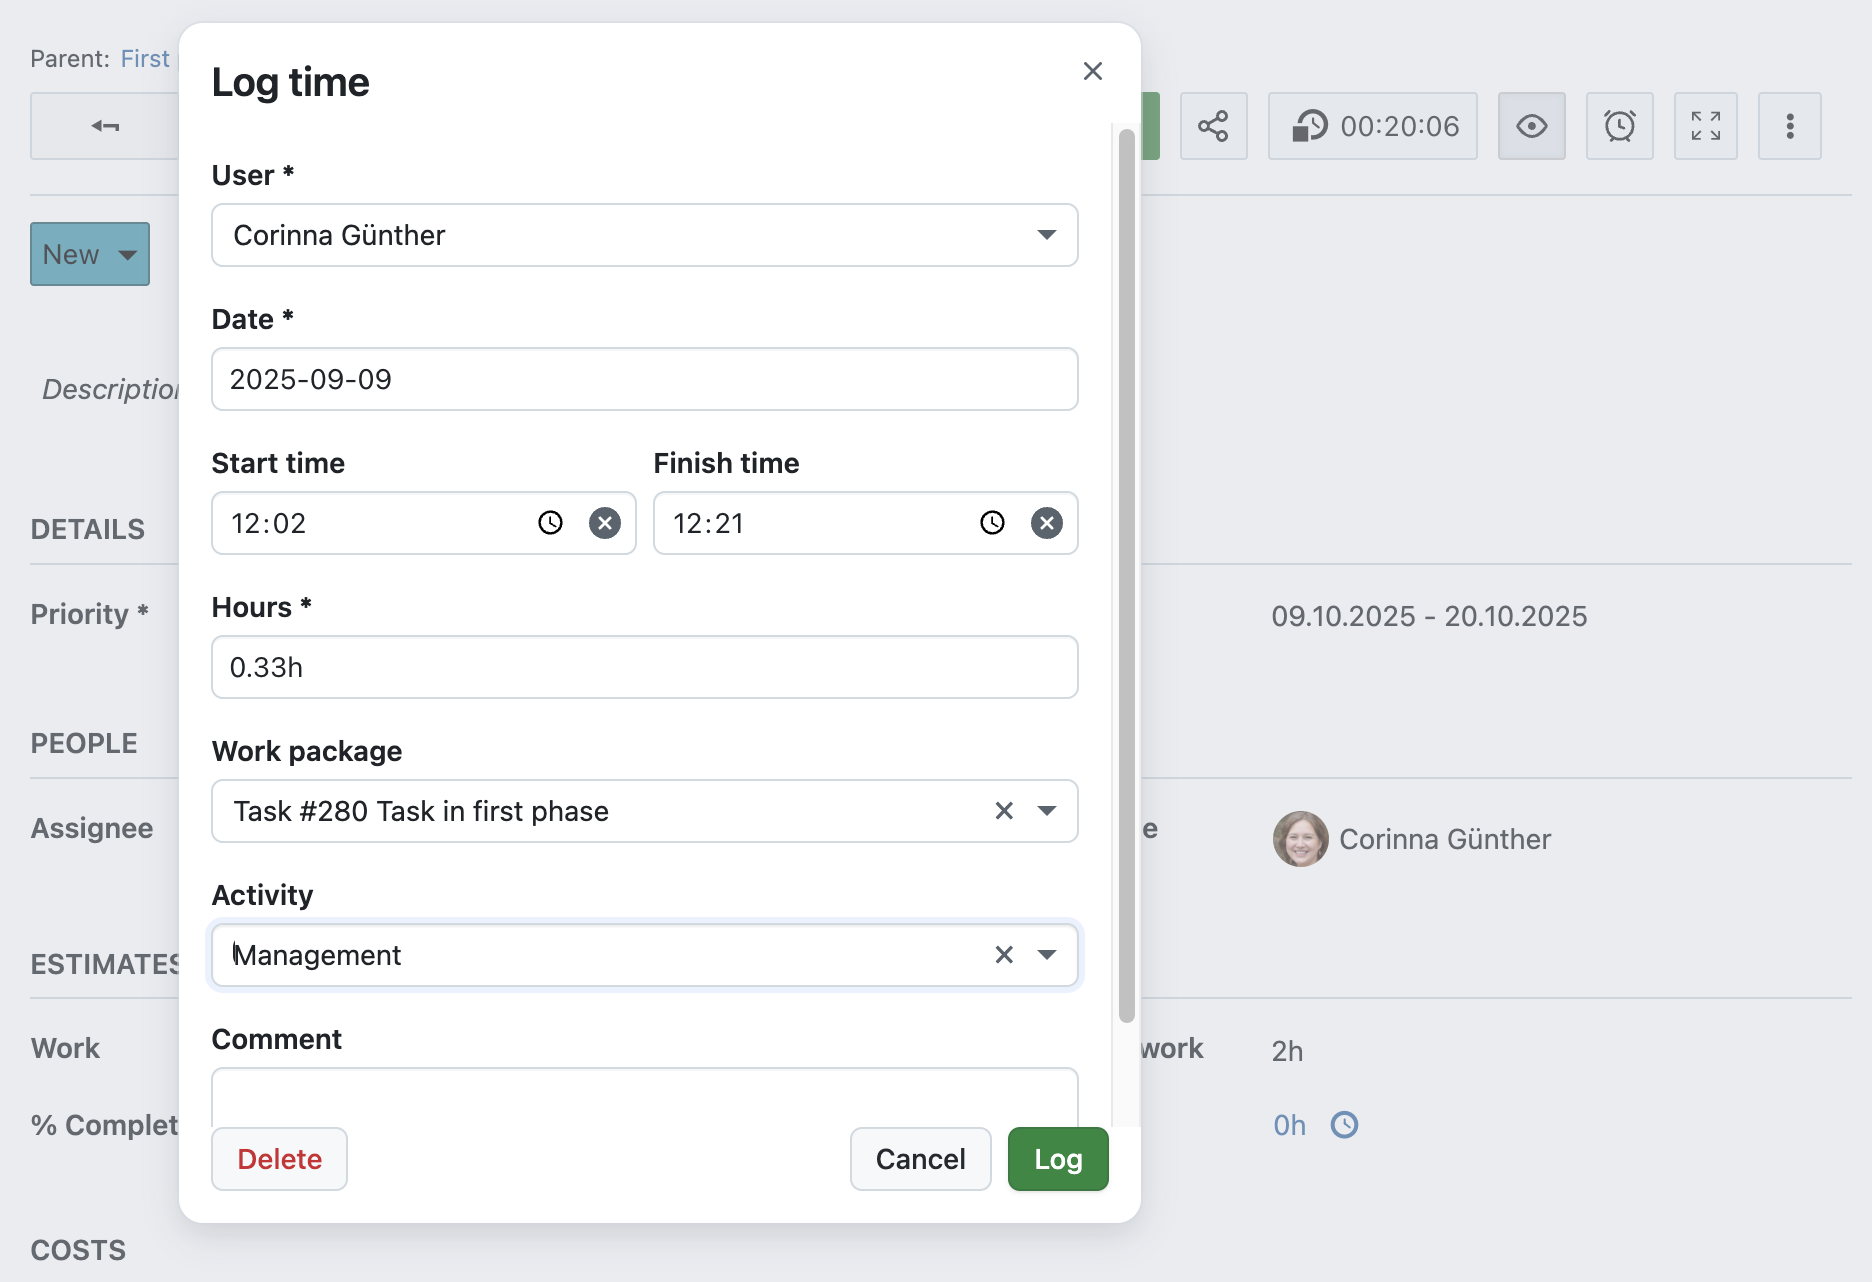
While working on the project, project members can log their time by opening the work package details view, selecting the More (three dots) menu and then the Log time entry. Alternatively, they can click the Time tracking button (clock icon) in the top bar. This starts a timer. Clicking it again stops the timer and opens the Log time modal with the duration pre-filled.
Communicate and document on work packages
To facilitate the communication within the project, OpenProject offers the forums, meetings and news module.
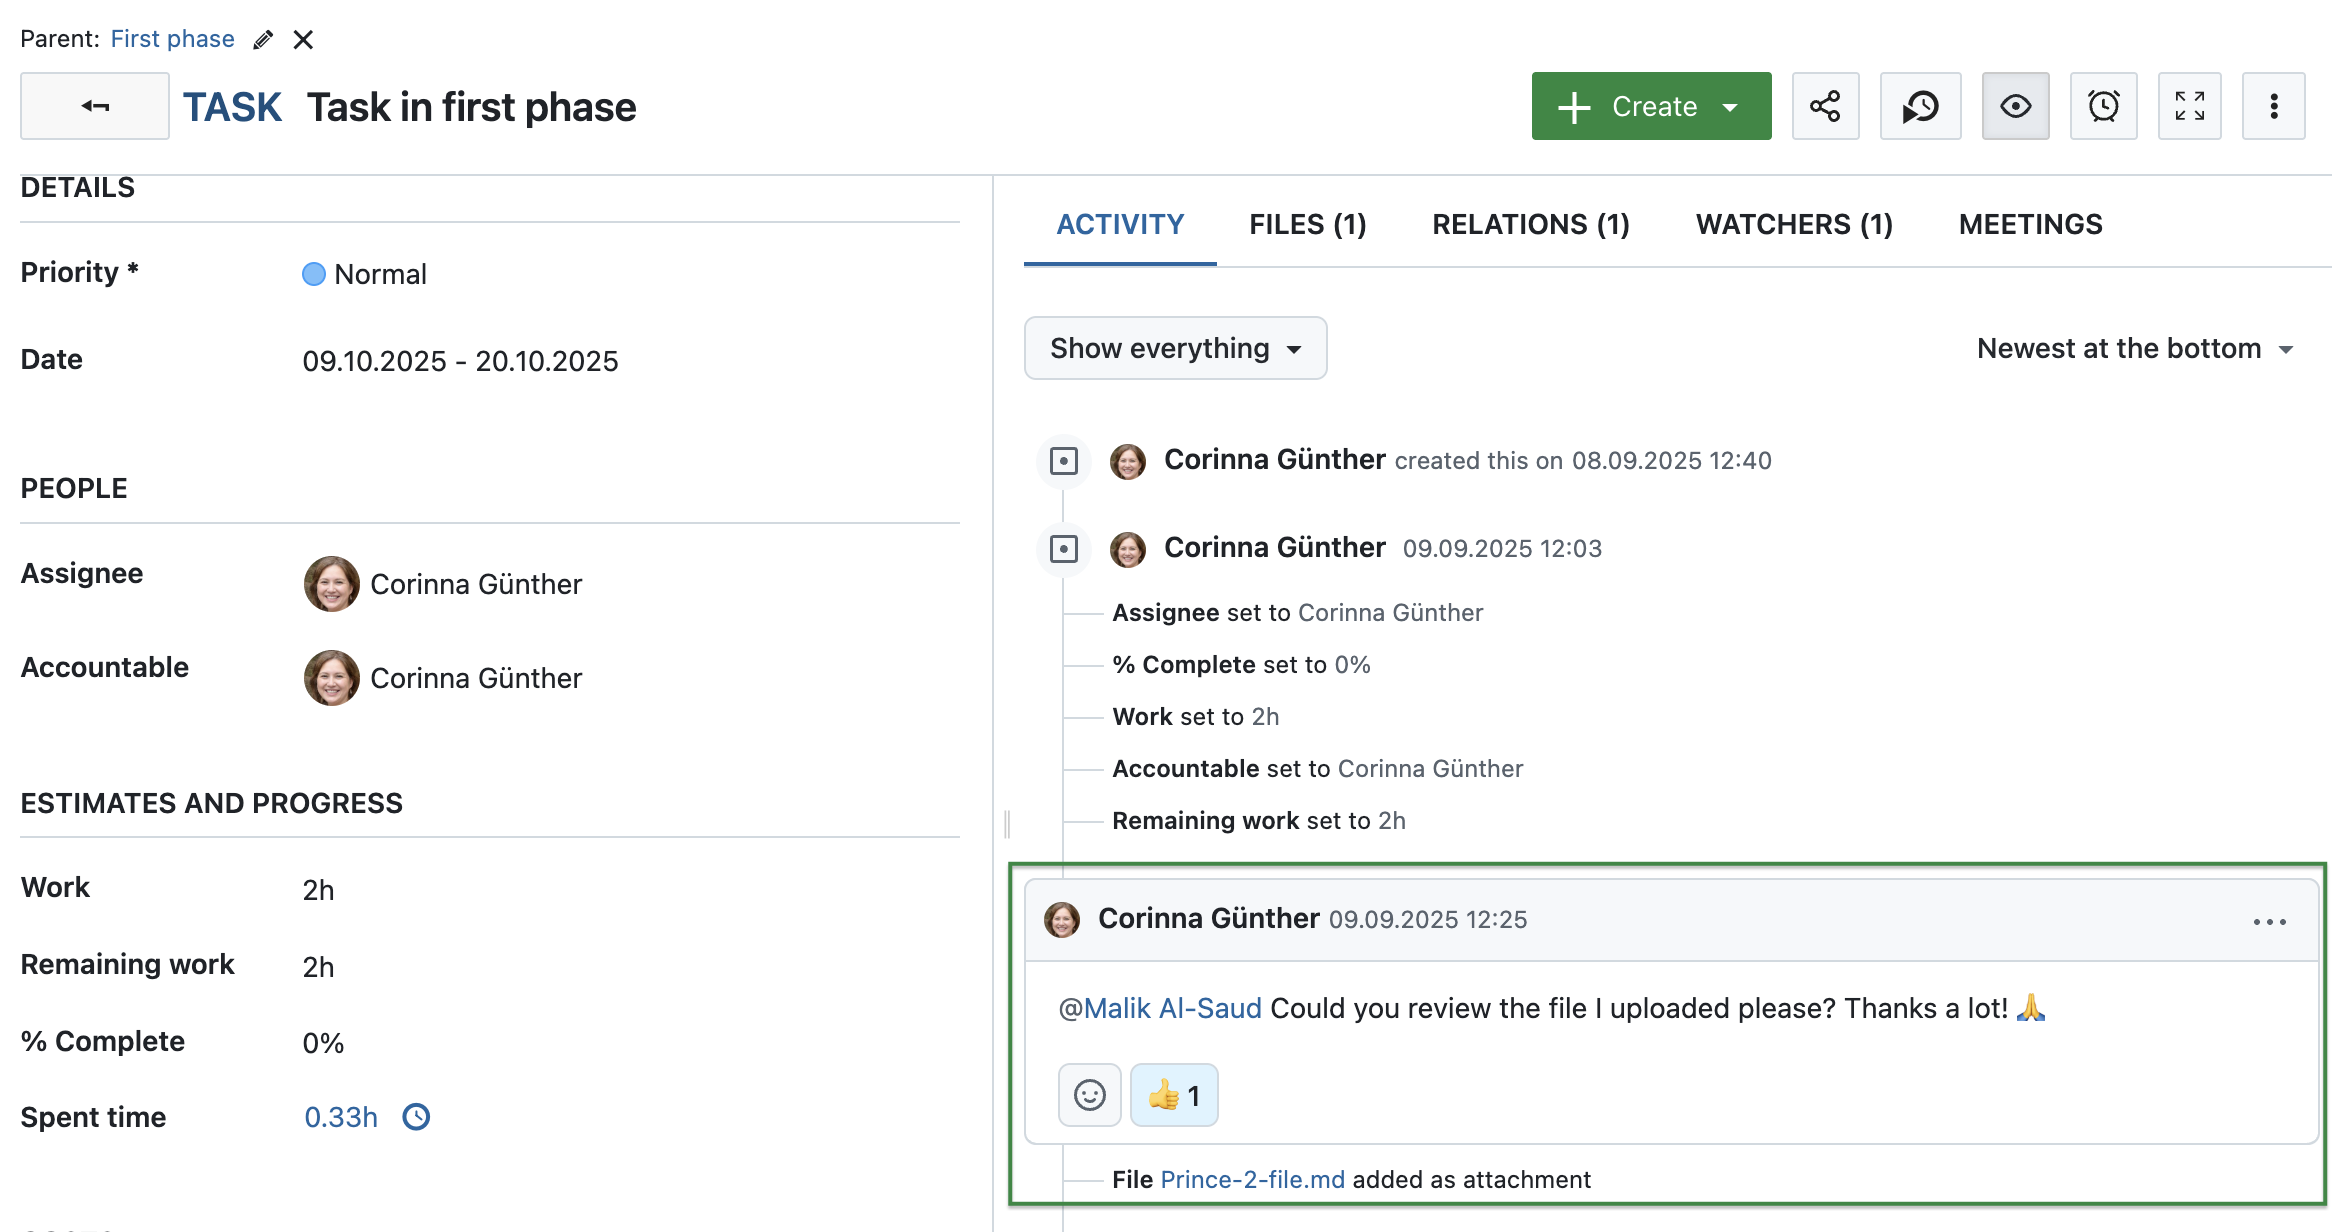
The Activity tab in each work package enables team members and project managers to collaborate and keep track of changes. Use @mentions, emoji reactions, and internal comments (available as Enterprise add-on) to stay aligned throughout the delivery phase. Read more about work package activity with OpenProject.
And then there is file management with OpenProject: Upload files with few clicks to your work package or use one of our integrations to link to and from Nextcloud, OneDrive (Enterprise add-on) or SharePoint (Enterprise add-on).
6. Managing stage boundaries
In PRINCE2, every stage should end with a review and approval before moving on. In OpenProject, you can support this by structuring your project into phases and milestones, tracking progress in the Estimates and progress section, and reviewing key outcomes with the team.
The progress of the phases is documented automatically in the Activity section of the phase. Additionally, the progress can be set directly, as we described in the section on how to control a stage.
Manage meetings
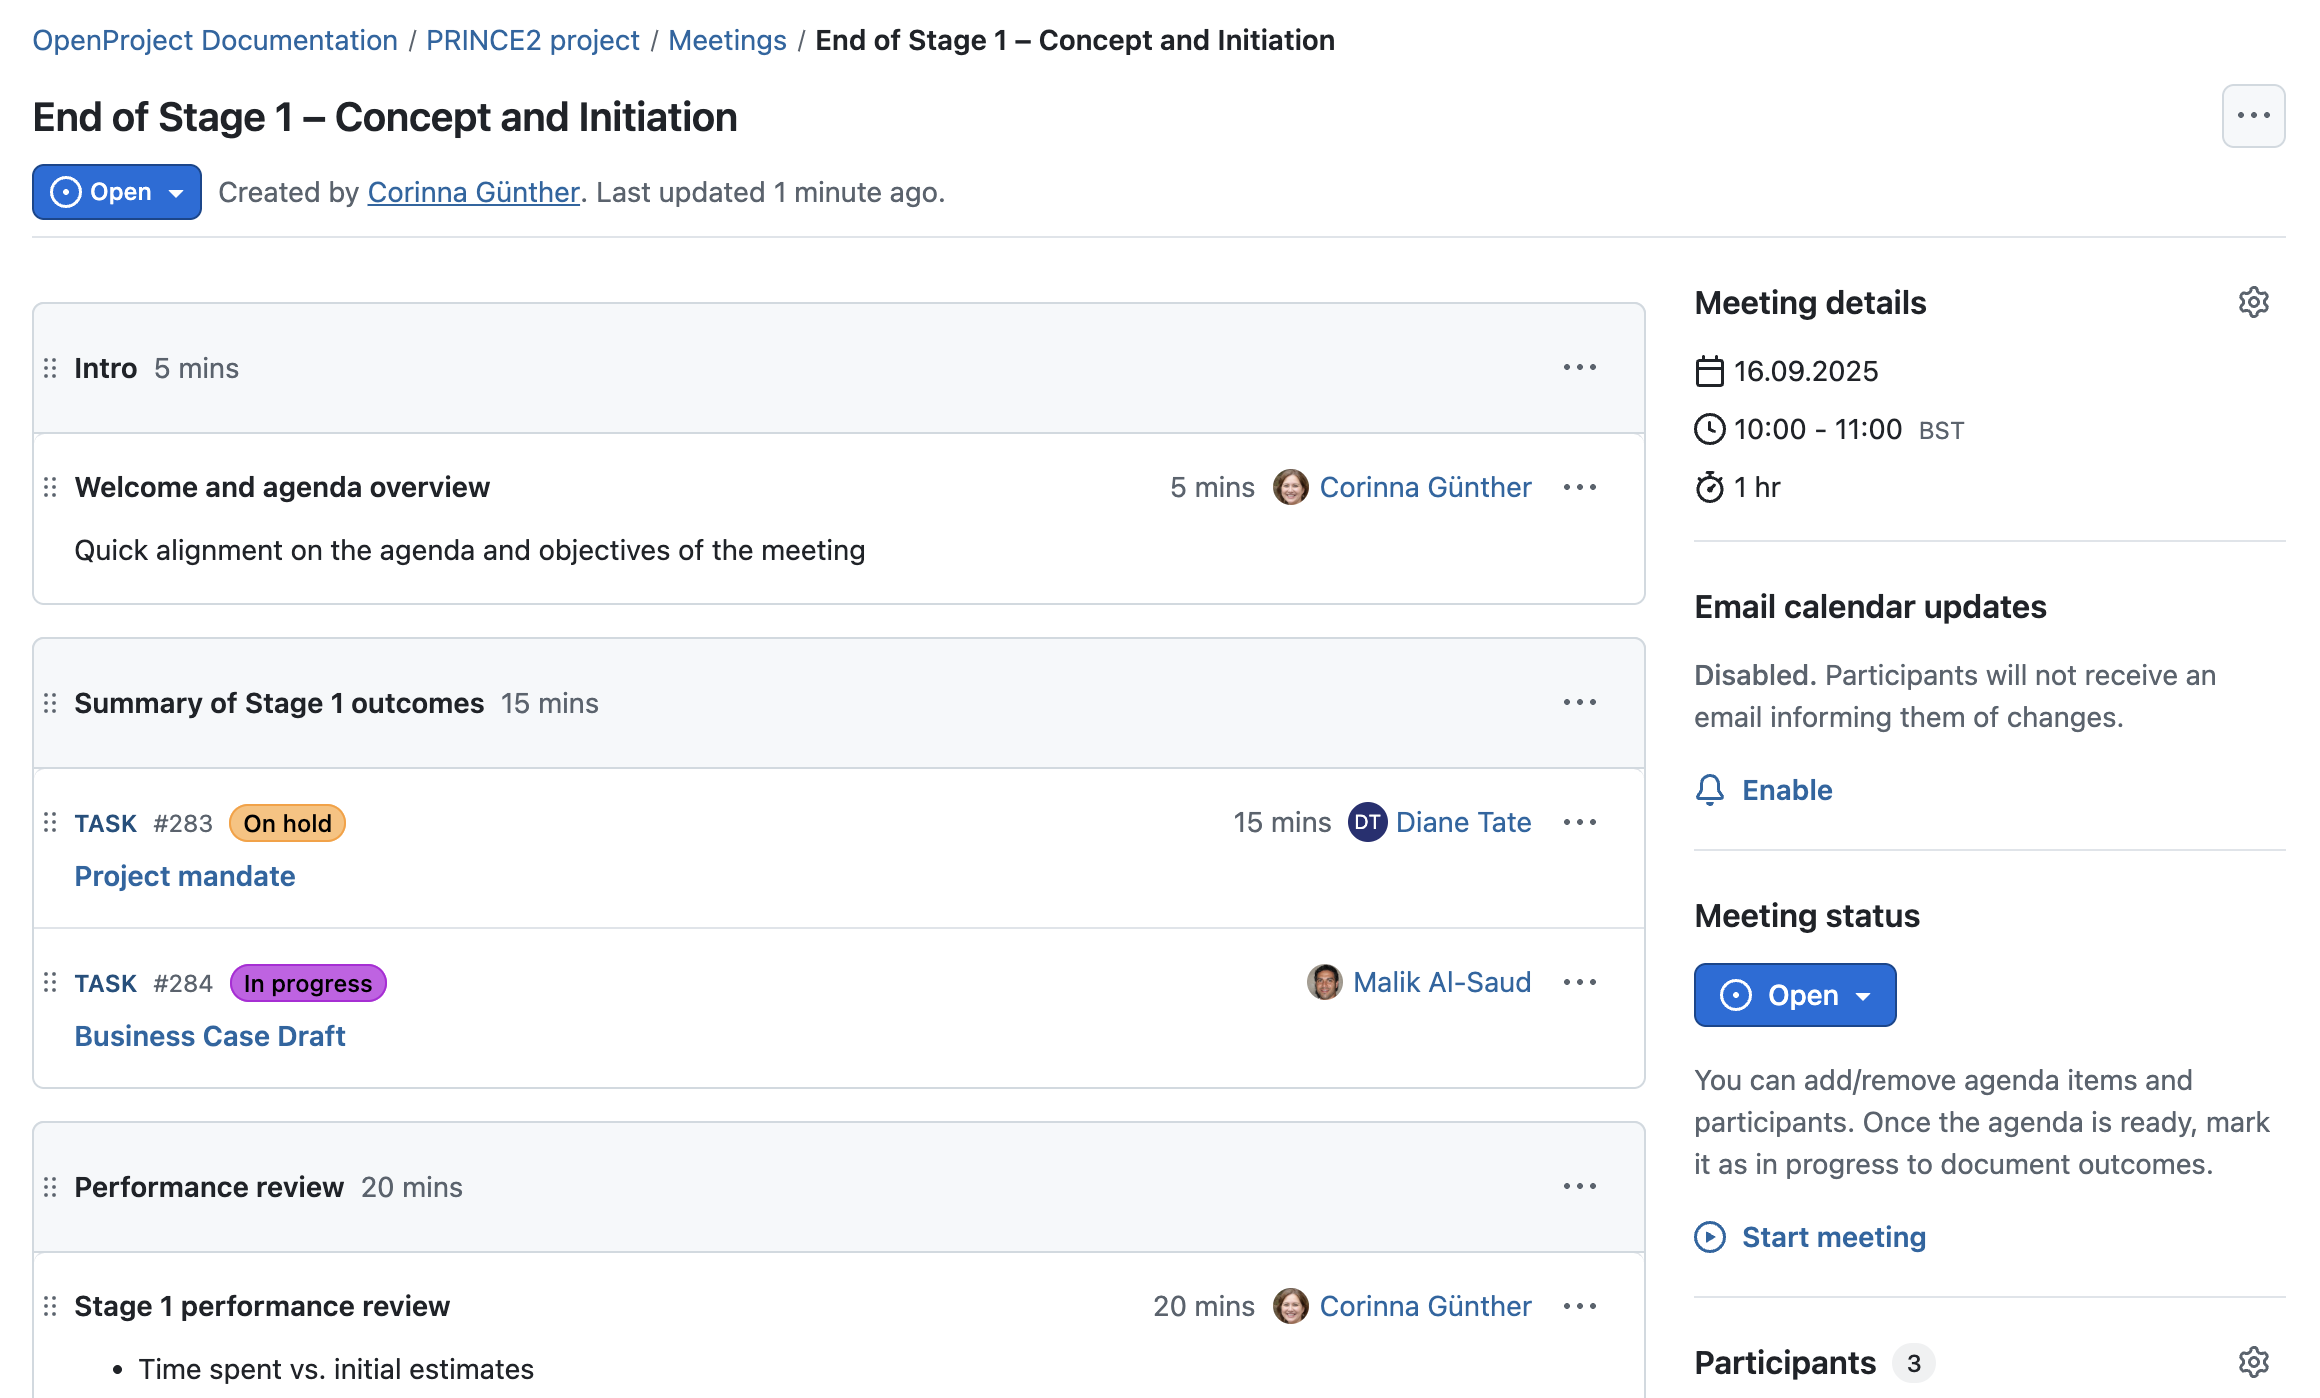
To review progress and make go/no-go decisions between stages, we strongly recommend using OpenProject’s Meetings module. It allows you to prepare structured agendas, assign work packages for discussion, and document decisions directly — all in one place.
You can use recurring meetings (e.g., after each stage) and apply templates to keep reviews consistent across projects. During the meeting, outcomes can be recorded directly in the agenda, and follow-up actions can be created as work packages right away. This ensures accountability and traceability for your stage boundary decisions.
Tipp
Need to share meeting notes with external stakeholders? Simply export the meeting as a PDF to circulate a summary of key outcomes.
Project life cycle with stages and stage gates
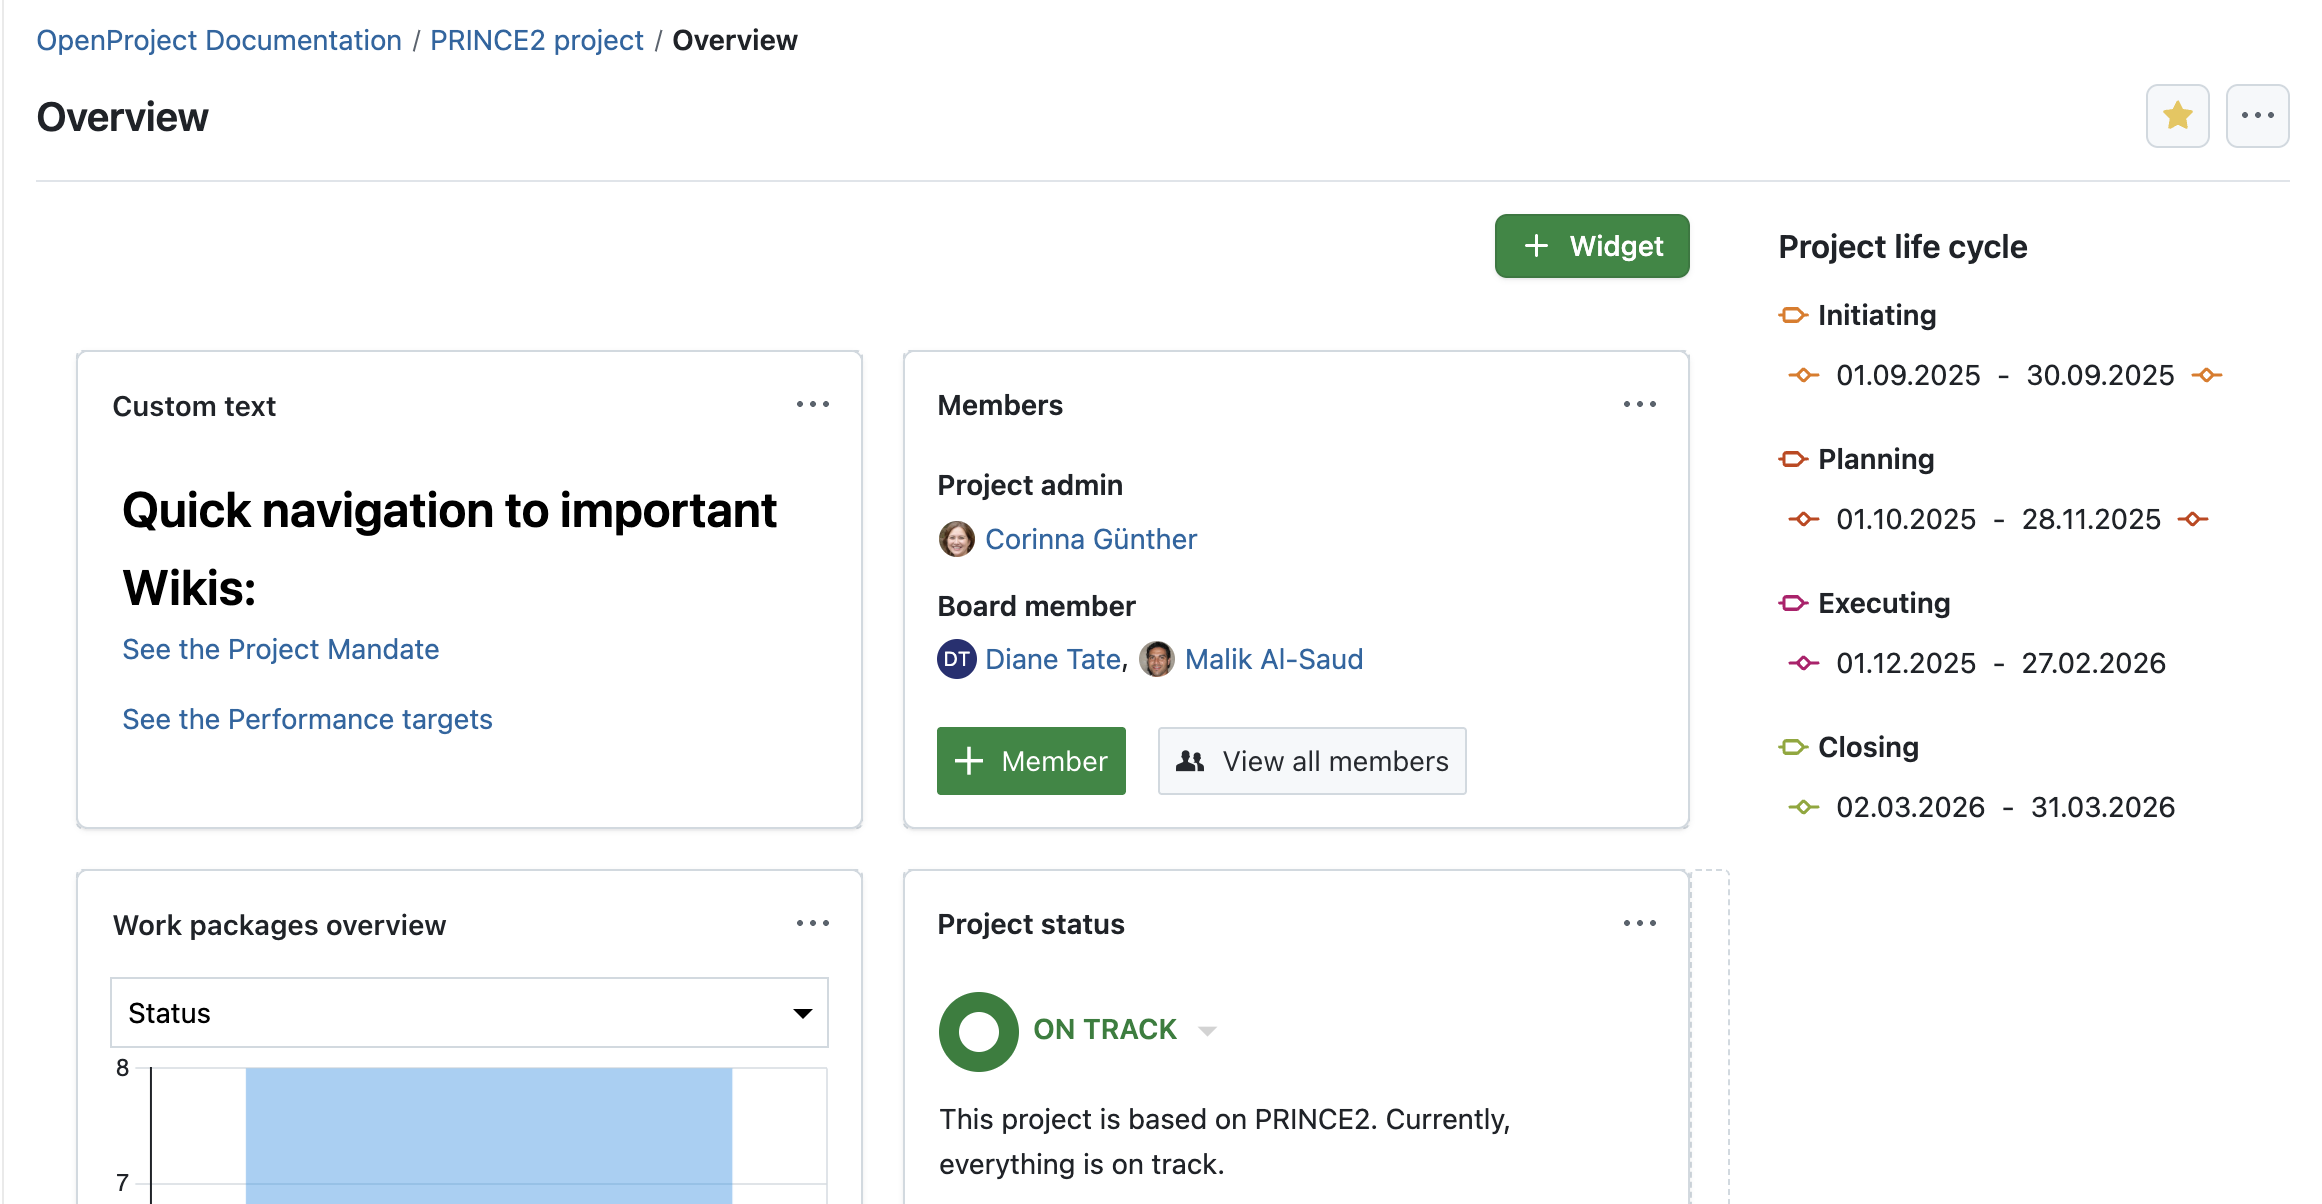
Support stage transitions with approval gates: OpenProject’s project life cycle feature — originally designed for the PM² framework — lets you define phases and gates. In our Enterprise edition, you can edit them and create new ones. Use this feature to visually structure your PRINCE2 stages and introduce checkpoints for management approvals before continuing.
Grundlinie (Planungsvergleich)
To assess how you’re performing against your original plan, use the Baseline comparison feature. With one click, you can quickly see what has changed in your work package tables since a previous snapshot—helpful for identifying deviations before moving to the next stage.
7. Closing the project
In PRINCE2, closing a project means formally completing all work, reviewing outcomes, and handing over deliverables. OpenProject provides the structure and documentation tools to support a smooth and transparent closure process.
PDF reports
When all the tasks, phases and milestones have been completed, you can document the final project report in a wiki page, add a news or create a new document. If you finish your project with a meeting, you can download this as a PDF to generate a final report as well.
Archive the project
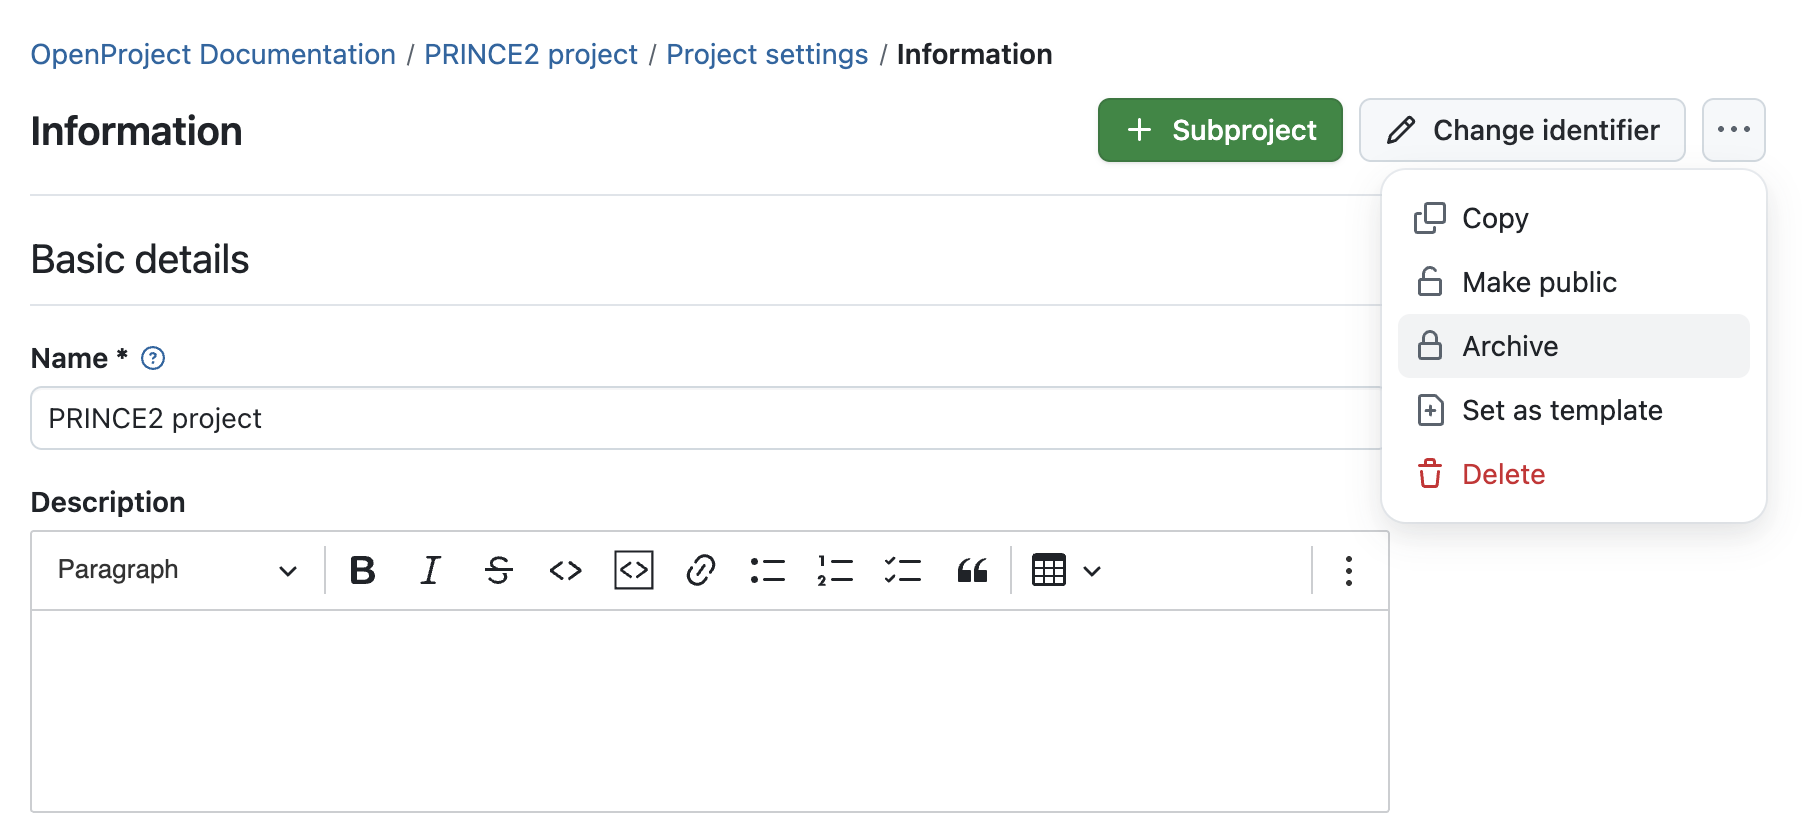
As a last step, you can archive the project by selecting Project settings and then Archive. If you think you’ll work on a project with a similar structure in the future, you can also set this project as a template.
Tipp
Archiving a project also helps keep your workspace clean and focused on active work. You can still access closed projects and filter them in your project list as needed.
Apply PRINCE2 to your free OpenProject test environment
Whether you’re certified in PRINCE2 or simply looking for a structured, flexible framework, OpenProject gives you the tools to manage projects with clarity, accountability, and transparency — all in a secure, open source environment.
More and more organizations are turning to open source alternatives to implement PRINCE2 and avoid vendor lock-in or rising license costs. With OpenProject, you can build workflows that match your organization’s needs, without compromising control.
Start your free OpenProject trial now and see for yourself how you can implement your company’s workflows with OpenProject. No credit card, no phone number, no strings attached. So there’s really no reason not to give OpenProject a try: https://start.openproject.com/
